
Peruzzo CVP1108
PERUZZO Pure Instinct Roof Fork Bike Rack User Manual
Model: CVP1108
1. Introduction
Thank you for choosing the PERUZZO Pure Instinct Roof Fork Bike Rack. This universal roof-mounted bike carrier is designed for the safe and versatile transport of bicycles. It accommodates a wide range of bicycle models, from standard to high-performance, ensuring your bike travels securely.
This manual provides essential information for the correct installation, operation, and maintenance of your bike rack. Please read it thoroughly before use to ensure safety and optimal performance.

Figure 1: Overview of the PERUZZO Pure Instinct Roof Fork Bike Rack.
This image displays the complete PERUZZO Pure Instinct Roof Fork Bike Rack, showcasing its elongated design with the fork mount at one end and the rear wheel strap at the other, ready for installation on a vehicle's roof bars.
2. Safety Information
Always prioritize safety when installing and using the bike rack. Failure to follow these instructions may result in property damage, injury, or death.
- Ensure the bike rack is securely attached to your vehicle's roof bars before each use.
- Verify that the bicycle is properly secured to the rack before driving.
- Do not exceed the maximum load capacity of 17 kg (37.5 lbs) for the rack.
- Be aware of the increased height and width of your vehicle when the rack and bicycle are installed, especially when entering garages, car washes, or low-clearance areas.
- Drive at reduced speeds, especially on rough roads, during strong winds, or when cornering.
- Regularly inspect all components for wear, damage, or loose fittings.
- Keep keys for the locking mechanism in a safe place.
3. Package Contents
Before beginning installation, ensure all components are present:
- PERUZZO Pure Instinct Roof Fork Bike Rack main unit
- 9mm quick-release skewer (pre-installed in fork mount)
- Keys for locking mechanism
- Mounting hardware for roof bars (if not pre-assembled)
- Instruction Manual (this document)
Note: Additional adapters for 12mm, 15mm, 15mm Boost, and 20mm thru-axles are sold separately.
4. Setup and Installation
This section details the steps to install the PERUZZO Pure Instinct Roof Fork Bike Rack onto your vehicle's roof bars.
4.1 Attaching to Roof Bars
The rack is designed for easy mounting. Ensure your vehicle's roof bars are properly installed and rated for the combined weight of the rack and bicycle.
- Position the bike rack on your vehicle's roof bars. The fork mount end should face forward.
- Secure the rack to the roof bars using the provided mounting hardware. For T-slot bars, slide the bolts into the T-slot and tighten the nuts from below. For square or round bars, use the appropriate clamps and tighten them securely.
- Ensure all mounting points are tightened firmly. The rack should not move or wobble when pushed.

Figure 2: Side profile of the PERUZZO Pure Instinct Roof Fork Bike Rack.
This image shows the side view of the bike rack, highlighting its length and the attachment points for the roof bars, providing a clear perspective of its overall structure.
4.2 Understanding the Fork Mount
The front of the rack features a robust fork mount designed to secure your bicycle's front fork.

Figure 3: Front view of the fork mount with the integrated lock.
This image provides a direct front view of the bike rack's fork mount, clearly showing the keyhole for the locking mechanism and the robust design of the fork clamps.

Figure 4: Detailed view of the locking mechanism on the fork mount.
A close-up shot of the key inserted into the locking mechanism on the fork mount, demonstrating how the bike is secured to the rack and the rack to the roof bars.

Figure 5: Fork mount with the standard 9mm quick-release skewer.
This image shows a detailed view of the fork mount with the 9mm quick-release skewer in place, ready to receive a bicycle's front fork. It highlights the mechanism for securing the bike.

Figure 6: Close-up of the fork clamp mechanism.
A detailed view of the fork clamp mechanism, showing the robust design that holds the bicycle's front fork securely in place. This image emphasizes the structural integrity of the mount.
5. Operating Instructions
5.1 Loading a Bicycle
- Remove the front wheel from your bicycle.
- Lift the bicycle onto the roof rack, aligning the front fork dropouts with the skewer on the fork mount.
- Lower the fork onto the skewer and close the quick-release lever firmly. Ensure the fork is fully seated and the lever is tight. For thru-axle bikes, insert the appropriate adapter (sold separately) and secure the thru-axle.
- Secure the rear wheel using the adjustable strap provided at the rear of the rack. Thread the strap through the wheel and tighten it securely.
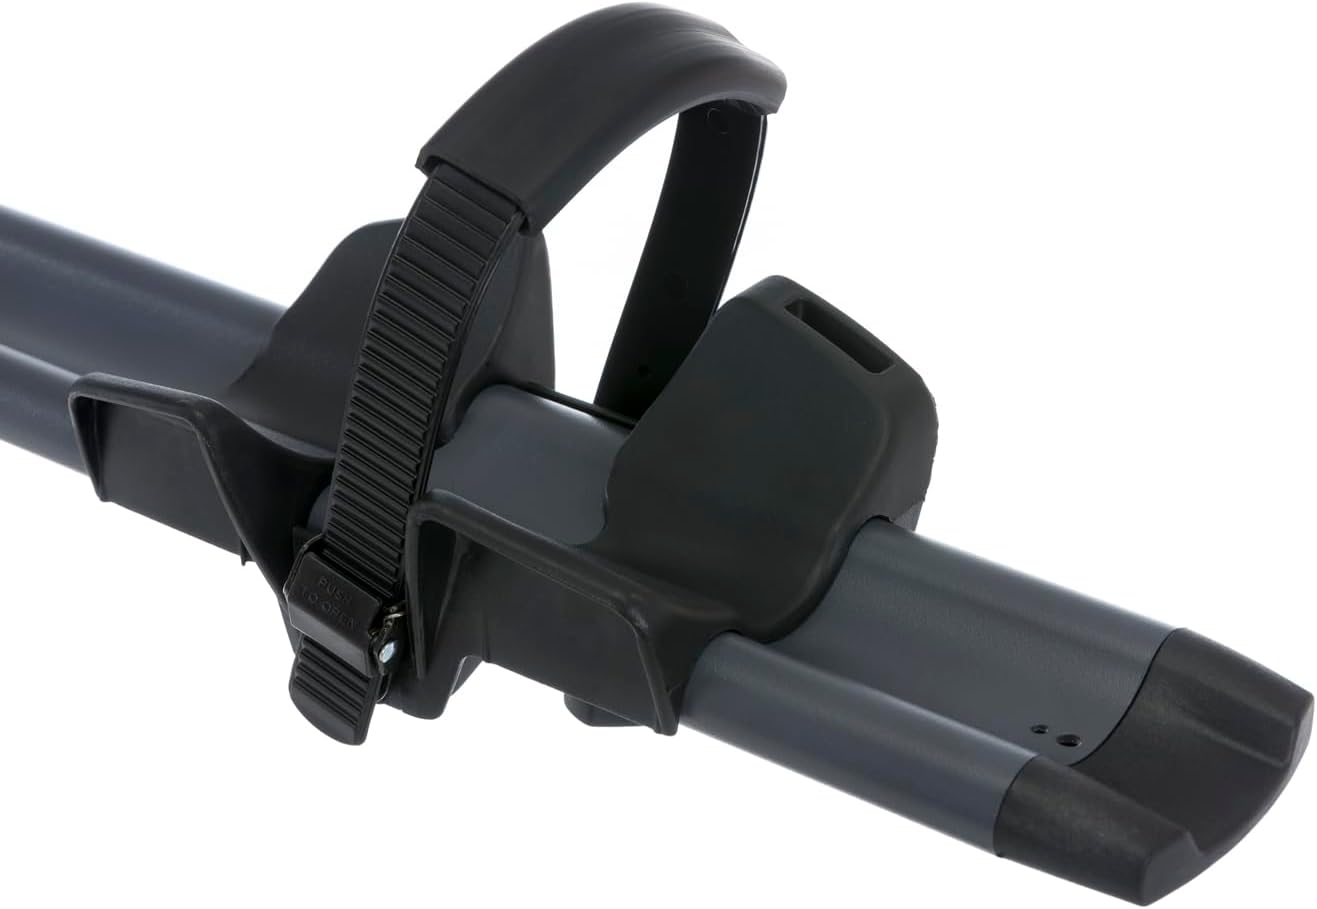
Figure 7: Rear wheel strap mechanism.
This image shows a close-up of the adjustable strap designed to secure the bicycle's rear wheel to the rack, ensuring stability during transport.
5.2 Securing the Bicycle
The PERUZZO Pure Instinct Roof Fork Bike Rack features integrated locks for added security:
- Bike to Rack Lock: Use the key to lock the quick-release lever on the fork mount. This prevents unauthorized removal of the bicycle from the rack.
- Rack to Bars Lock: The same key also locks the rack to your vehicle's roof bars, providing an additional layer of security against theft of the entire rack.
Always ensure both locking mechanisms are engaged before driving.
5.3 Unloading a Bicycle
- Unlock the rear wheel strap and remove the rear wheel.
- Unlock the quick-release lever on the fork mount using the key.
- Open the quick-release lever and carefully lift the bicycle off the rack.
- Reattach your front wheel to your bicycle.
6. Maintenance
Regular maintenance ensures the longevity and safe operation of your bike rack.
- Cleaning: Clean the rack regularly with mild soap and water, especially after exposure to dirt, salt, or harsh weather conditions. Rinse thoroughly and dry.
- Inspection: Periodically inspect all bolts, nuts, straps, and moving parts for wear, corrosion, or damage. Replace any worn or damaged components immediately.
- Lubrication: Apply a small amount of silicone spray or light grease to the locking mechanism and quick-release skewer pivot points to ensure smooth operation.
- Storage: When not in use, store the bike rack in a clean, dry place away from direct sunlight and extreme temperatures.
7. Troubleshooting
| Problem | Possible Cause | Solution |
|---|---|---|
| Rack feels loose on roof bars. | Mounting hardware is not tightened sufficiently. | Re-tighten all mounting bolts and clamps securely. Ensure correct installation for your roof bar type. |
| Bicycle wobbles on the rack. | Fork skewer not tight; rear wheel strap loose. | Ensure the quick-release lever is fully closed and locked. Tighten the rear wheel strap firmly. Check for correct fork adapter if using thru-axle. |
| Key does not turn in lock. | Lock mechanism is dirty or corroded. | Apply a small amount of graphite lubricant or WD-40 to the keyhole and gently work the key. Clean any debris. |
| Cannot fit bicycle fork onto skewer. | Incorrect skewer/adapter for your bike's fork. | Verify your bike's front axle type (e.g., 9mm quick-release, 12mm, 15mm, 20mm thru-axle). Purchase the correct adapter if needed. |
8. Specifications
| Feature | Detail |
|---|---|
| Brand | Peruzzo |
| Model | CVP1108 |
| Product Dimensions (L x W x H) | 140 x 22 x 10 cm (55.1 x 8.7 x 3.9 inches) |
| Item Weight | 200 Grams (0.44 lbs) |
| Maximum Load Capacity | 17 kg (37.5 lbs) |
| Material | Plastic |
| Color | Black |
| Fork Compatibility | 9mm Quick-Release (standard); Adapters for 12mm, 15mm, 15mm Boost, 20mm thru-axles available separately. |
| Max Wheelbase | 125 cm (49.2 inches) |
| Max Tire Width | 7 cm (2.75 inches) |
| Locking Mechanism | Integrated locks for bike-to-rack and rack-to-bars security. |
9. Warranty and Support
For warranty information, technical support, or to purchase replacement parts and accessories, please contact PERUZZO customer service or visit their official website. Keep your proof of purchase for warranty claims.
PERUZZO is committed to providing high-quality products and support to its customers.
Related Documents - CVP1108
 |
Peruzzo Tour Professional Bike Carrier Installation Guide Step-by-step installation instructions for the Peruzzo Tour Professional bike carrier, detailing how to mount it onto car roof bars and secure bicycles for transport. Includes product specifications and manufacturer details. |
 |
Peruzzo Art. 23.GP021 GPRHEA - Modular Bike Rack System Assembly and Load Capacity Guide Detailed guide for the Peruzzo Art. 23.GP021 GPRHEA modular bike rack system, covering assembly, load capacities for various configurations, and accessory limits. Includes manufacturer information. |
 |
Peruzzo Art. 23.GP020 GPPAN Bike Rack User Manual and Specifications Detailed user manual and specifications for the Peruzzo Art. 23.GP020 GPPAN bike rack, including assembly instructions, load capacities, and safety guidelines. |
 |
Peruzzo Venezia Bicycle Carrier User Manual Installation and usage guide for the Peruzzo Venezia 3-bike carrier. Learn how to safely mount, secure, and maintain your bicycle rack. |
 |
Peruzzo Firenze 660E Bike Carrier: Assembly and User Instructions Comprehensive instructions for assembling and using the Peruzzo Firenze 660E bike carrier. Includes safety guidelines, compatibility checks, technical specifications, and step-by-step assembly procedures. |
 |
Peruzzo G3 Saturn Bike Rack Assembly and Load Capacity Guide Comprehensive guide for the Peruzzo G3 Saturn modular bike rack system, detailing configurations, maximum load capacities for components and systems, and step-by-step assembly instructions. |
Ask a question about this manual
Ask about setup, troubleshooting, compatibility, parts, safety, or missing instructions. Manuals+ will review the question and use this page’s manual context to help answer it.