Tomshine 93d6461d-17a8-45d0-bfc9-82643fae0e7c
Tomshine Floor Lamp User Manual
Model: 93d6461d-17a8-45d0-bfc9-82643fae0e7c
Introduction
This manual provides detailed instructions for the setup, operation, and maintenance of your Tomshine Floor Lamp. Designed for versatile lighting, this LED floor lamp features stepless dimming, four color temperature settings, and convenient control via both a touch sensor and a remote control. Its flexible gooseneck allows for precise light positioning, making it ideal for living rooms, bedrooms, offices, and reading areas.
Safety Instructions
- Ensure the power supply voltage matches the lamp's requirements before plugging in.
- Do not disassemble or modify the lamp. Refer all servicing to qualified personnel.
- Keep the lamp away from water or damp environments. This product is designed for indoor use only.
- Avoid direct eye exposure to the LED light source for prolonged periods.
- Place the lamp on a stable, flat surface to prevent tipping. The sturdy iron base is designed for stability, but caution is advised around children and pets.
- Unplug the lamp from the power outlet before cleaning or performing any maintenance.
Package Contents
Verify that all components are present before assembly:
- LED Floor Lamp (Gooseneck head, multiple pole sections, base)
- Remote Control
- AC Adapter

Figure 1: Lamp Components and Accessories
Setup and Assembly
Follow these steps to assemble your floor lamp:
- Connect the power cable from the lamp base to the AC adapter.
- Carefully thread the power cable through the pole sections.
- Screw the pole sections together clockwise, ensuring a secure connection. Start from the base and work your way up to the gooseneck section.
- Once all sections are securely connected, plug the AC adapter into a standard wall outlet.
Video 1: Product Features and Assembly Guide. This video demonstrates the lamp's various lighting modes and provides a step-by-step guide for assembling the lamp components, including connecting the power cable and screwing the pole sections together.
Operating Instructions
Touch Sensor Control
The lamp features a touch control panel located on the stand below the gooseneck:
- Short Press: Tap the power icon to turn the lamp ON/OFF. Short press the sun icon to cycle through the 4 color temperatures (3000K, 4000K, 5000K, 6000K).
- Long Press: Slide your finger across the touch surface or long press the sun icon to adjust the brightness steplessly (20%-100%).
Remote Control
The included remote control offers comprehensive control over the lamp's functions. The remote can be conveniently adsorbed onto the lamp post via its magnetic feature.
- Power Button: Turn the lamp ON/OFF.
- Color Temperature Adjustment: Buttons for increasing or decreasing color temperature.
- Brightness Adjustment: Buttons for increasing or decreasing brightness.
- Preset Modes: Dedicated buttons for various lighting scenes:
- Leisure Mode
- Reading Mode
- Office Mode
- Breastfeeding Mode
- Entertainment Mode
- Sleep Mode
- 100% Brightness: Instantly set the lamp to full brightness.
- Sleeping Timer: Set a 1-hour timer for automatic shut-off.

Figure 2: Remote Control and Touch Panel
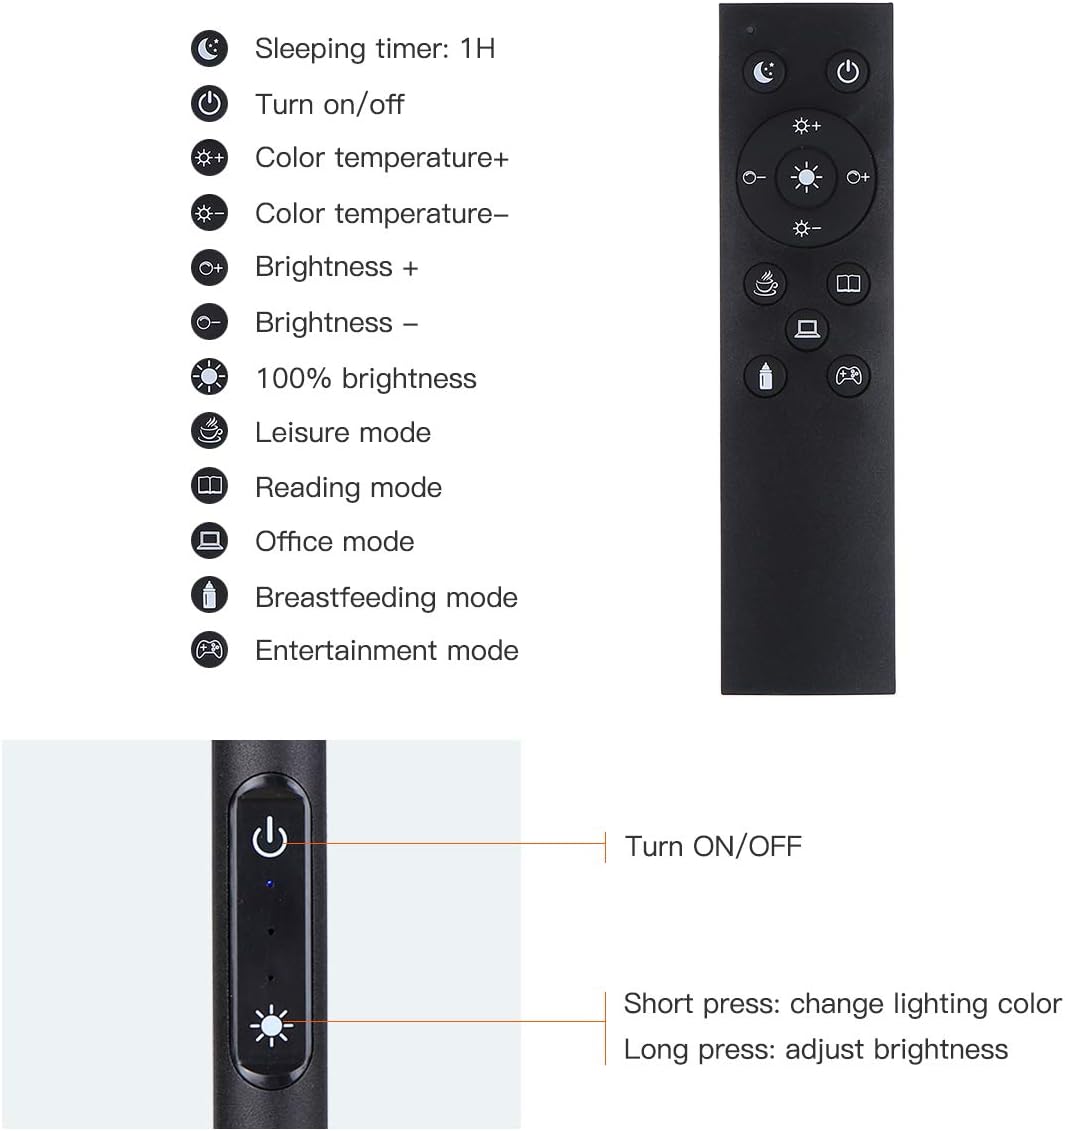
Figure 3: Remote and Touch Control Functions

Figure 4: Color Temperature and Brightness Options
Adjustable Gooseneck
The lamp features a flexible gooseneck and a 360° swivel head, allowing you to direct light precisely where needed. The gooseneck maintains its position once adjusted, preventing drift or drooping.

Figure 5: Flexible Gooseneck and Dimensions
Maintenance
- Cleaning: Disconnect the power before cleaning. Use a soft, dry cloth to wipe the lamp. Do not use abrasive cleaners or solvents.
- LED Light Source: The lamp is equipped with integrated LED bulbs that are designed for long life and are not user-replaceable.
- Storage: If storing the lamp for an extended period, disassemble it and store in its original packaging in a dry, cool place.
Troubleshooting
| Problem | Possible Cause | Solution |
|---|---|---|
| Lamp does not turn on. | No power supply; loose connection; faulty adapter. | Check if the power plug is securely inserted into the outlet and the lamp. Ensure the adapter is functioning. Try a different outlet. |
| Remote control not working. | Remote battery low or dead; remote out of range; obstruction. | Replace the remote control battery. Ensure there are no obstructions between the remote and the lamp. Move closer to the lamp. |
| Brightness/Color temperature not adjusting. | Incorrect button pressed; lamp in a fixed mode. | Refer to the operating instructions for correct button functions. If in a preset mode, try switching to manual adjustment. |
| Lamp flickers or dims unexpectedly. | Unstable power supply; loose connection. | Ensure the power connection is stable. Try plugging into a different outlet. If the issue persists, contact customer support. |
Specifications
| Feature | Detail |
|---|---|
| Brand | Tomshine |
| Model Number | 93d6461d-17a8-45d0-bfc9-82643fae0e7c |
| Lamp Type | Floor Lamp |
| Light Source Type | LED |
| Brightness | 1500 Lumen |
| Wattage | 10 watts |
| Color Temperatures | 3000K, 4000K, 5000K, 6000K (4 modes) |
| Dimming | Stepless (20%-100%) |
| Control Method | Touch, Remote Control |
| Product Dimensions | 63.78"D x 7.87"W x 63.6"H |
| Item Weight | 2.76 Pounds |
| Base Material | Iron |
| Shade Material | Metal |
| Power Source | Plug-in |
| Indoor/Outdoor Usage | Indoor |
Warranty and Support
Tomshine products are manufactured to the highest quality standards. For any questions, technical support, or warranty claims, please contact Tomshine customer service through the retailer's platform or visit the official Tomshine store online. Please retain your proof of purchase for warranty purposes.
For more information, visit the Tomshine Store.
Ask a question about this manual
Ask about setup, troubleshooting, compatibility, parts, safety, or missing instructions. Manuals+ will review the question and use this page’s manual context to help answer it.