Introduction
This instruction manual provides guidance for assembling the Italeri 1:72 F-35B Lightning II V/STOL plastic model kit. This highly detailed kit allows for the construction of a replica of the F-35B, a multirole fighter capable of Short Take-Off and Vertical Landing (STOVL). Please read all instructions carefully before beginning assembly.

Image: Assembled Italeri 1:72 F-35B Lightning II V/STOL model, showcasing its detailed design and weaponry.
Safety Information
- Choking Hazard: This kit contains small parts and is not suitable for children under 3 years of age. Keep all components away from small children.
- Adhesives and Paints: Use adhesives and paints in a well-ventilventilated area. Avoid inhaling fumes. Follow the safety instructions provided with your chosen glues and paints.
- Sharp Tools: Exercise caution when using hobby knives, cutters, and other sharp tools. Always cut away from your body.
- Eye Protection: Consider wearing eye protection when cutting or sanding plastic parts to prevent small debris from entering your eyes.
Package Contents
Your Italeri F-35B Lightning II V/STOL model kit includes the following components:
- Plastic sprues with model parts
- Decal sheet for markings
- Illustrated assembly instructions

Image: The packaging for the Italeri F-35B Lightning II V/STOL model kit, showing the aircraft in a STOVL configuration.
Required Tools and Paints
To successfully assemble and finish your model, you will need the following tools and paints, which are not included in the kit:
Recommended Tools

Image: A selection of recommended tools for model building, including precision tweezers, a hobby knife, and a cutting mat.
- Plastic cement/glue
- Side cutters or sprue nippers
- Hobby knife with sharp blades
- Tweezers for small parts
- Sanding sticks or fine-grit sandpaper
- Masking tape
- Cutting mat
Required Paints

Image: A guide to required paints, showing various colors and their Italeri article numbers for accurate color matching.
Refer to the included instruction sheet for specific paint codes and color schemes. A typical F-35B model will require various shades of grey, metallic colors for engine parts, and other detail colors.
| Art. Nr. | Description |
|---|---|
| 510004769 | IT Acrylfarbe Weiss 20ml |
| 510004679 | IT Acrylfarbe Stahl 20ml |
| 510004678 | IT Acrylfarbe Silber glänzend 20ml |
| 510004768 | IT Acrylfarbe Schwarz 20ml |
| 510004605 | IT Acrylfarbe Rot glänzend 20ml |
| 510004765 | IT Acrylfarbe Hellgrau matt 20ml |
| 510004669 | IT Acrylfarbe Grün glänzend 20ml |
| 510004752 | IT Acrylfarbe Gunship-Grau matt 20ml |
| 510004762 | IT Acrylfarbe Hell Ghost Grau matt 20ml |
| 510004681 | IT Acrylfarbe Metallgrau matt 20ml |
| 510004734 | IT Acrylfarbe Mittel-Grün matt 20ml |
| 510004606 | IT Acrylfarbe Rot matt 20 ml |
Optional Weathering Washes
| Art. Nr. | Description |
|---|---|
| 510004951 | IT Dunkelbraun (Acryl Model Wash) |
| 510004952 | IT Schwarz (Acryl Model Wash) |
| 510004953 | IT Oiled Earth (Acryl Model Wash) |
| 510004954 | IT Rost (Acryl Model Wash) |
| 510004955 | IT Grau (Acryl Model Wash) |
| 510004956 | IT Dunkelgrün (Acryl Model Wash) |
Assembly Instructions
Follow the detailed, step-by-step illustrated instructions included in your kit. The general assembly process involves:
- Part Preparation: Carefully cut parts from the plastic sprues using side cutters. Clean any excess plastic (flash) with a hobby knife or sandpaper.
- Dry Fitting: Before applying glue, dry fit parts to ensure a proper fit. This helps identify and correct any alignment issues.
- Gluing: Apply plastic cement sparingly to the mating surfaces. Hold parts together until the glue sets.
- Sub-Assemblies: Assemble smaller sections (e.g., cockpit, landing gear, wings) before joining them to the main fuselage.
- Detailing: Add smaller details and external stores as indicated in the instructions.

Image: A detailed view of the F-35B model's cockpit and forward fuselage, highlighting the precision of the kit.

Image: Side profile of the F-35B model, illustrating the open internal weapon bays and deployed landing gear, showcasing the V/STOL capabilities.

Image: Detailed view of the F-35B model's landing gear and external weapon pylons, showing the included ordnance.

Image: Rear view of the F-35B model, highlighting the detailed engine exhaust nozzle and tail section.
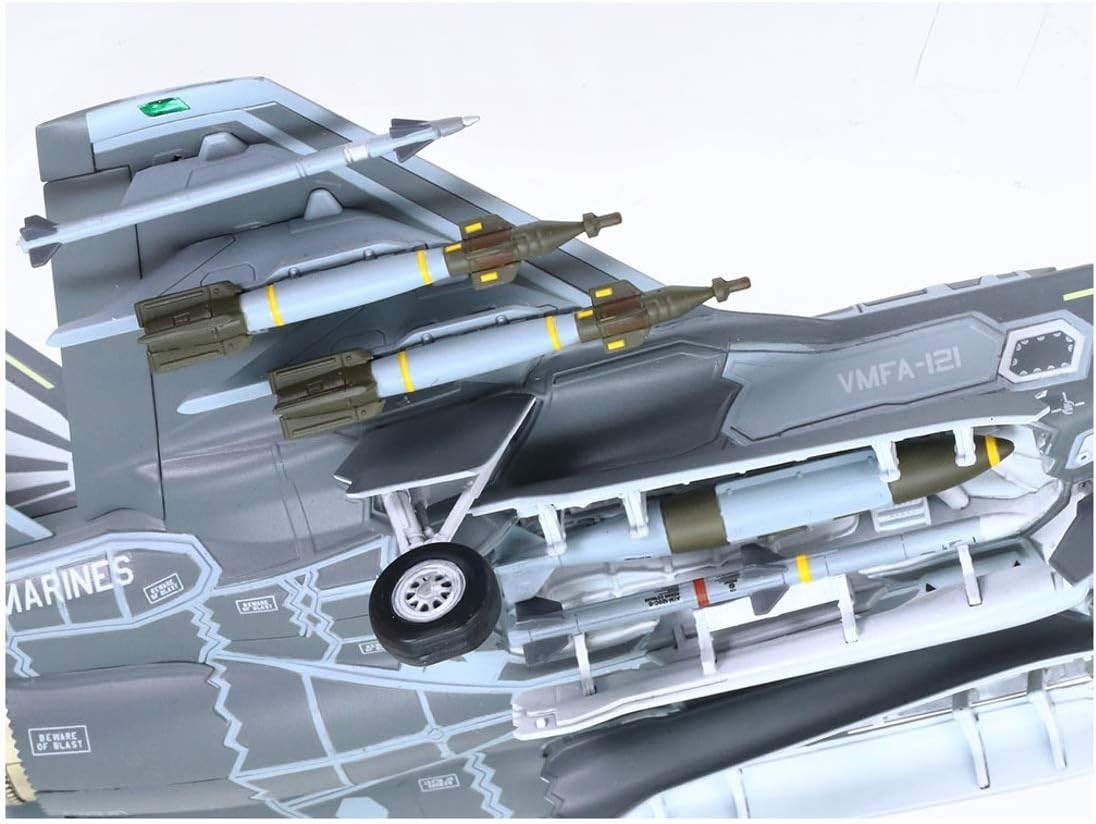
Image: A model bomb on a transport cart, an example of the detailed accessories that can be included with the model.
Painting and Decals
Painting and applying decals are crucial steps to achieve a realistic finish. Refer to the kit's instruction sheet for specific color schemes and decal placement diagrams.
- Preparation: Ensure the model surfaces are clean and free of dust or grease before painting.
- Priming: Apply a thin coat of primer to help paint adhere better and reveal any surface imperfections.
- Base Coats: Apply main camouflage colors in thin, even coats. Allow each coat to dry thoroughly.
- Detail Painting: Paint smaller details such as landing gear, cockpit interior, and weapons.
- Gloss Coat: Apply a clear gloss coat before decals to prevent 'silvering' (air trapped under the decal).
- Decal Application: Carefully cut out each decal. Dip it in warm water for a few seconds until it slides freely from the backing paper. Position the decal on the model and gently blot excess water. Use decal setting solutions for better adhesion and to conform to surface details.
- Final Coat: Once decals are dry, apply a clear flat or satin coat to seal them and achieve the desired finish.

Image: The decal sheet included with the kit, featuring various national insignia, squadron markings, and stencils for different F-35B versions.
Specifications
| Feature | Detail |
|---|---|
| Brand | Italeri |
| Model Name | F-35B Lightning II V/STOL |
| Model Number | 510001425 |
| Scale | 1:72 |
| Material Type | Plastic |
| Number of Pieces | 100 |
| Item Dimensions (L x W x H) | 1.97 x 9.65 x 9.57 inches |
| Item Weight | 10.6 Ounces |
| Age Range (Description) | Adult, teenagers, pensioners, teens |
| Additional Features | Detailed plastic model kit, high quality parts, easy assembly, V/STOL capability |
Troubleshooting
Encountering issues during model assembly is common. Here are some general troubleshooting tips:
- Parts Not Fitting: Ensure all sprue gates are cleanly removed. Lightly sand mating surfaces if necessary. Check the instruction diagram carefully for correct part orientation.
- Gaps Between Parts: Use plastic filler putty to fill any noticeable gaps after gluing. Sand smooth once dry.
- Paint Issues: If paint is not adhering, ensure the surface is clean and primed. If paint is too thick, thin it slightly. If paint is uneven, apply multiple thin coats instead of one thick coat.
- Decal Silvering: Apply decals over a gloss surface. Use decal setting solutions to help decals conform to surface details and eliminate air bubbles.
- Broken Parts: Small broken parts can often be re-attached with super glue. For larger breaks, consider reinforcing with a small piece of plastic or metal pin.
Maintenance
Once your model is complete, proper care will ensure its longevity:
- Cleaning: Dust your model regularly with a soft brush or a can of compressed air. Avoid using harsh chemicals or abrasive materials.
- Storage: Store the model in a cool, dry place away from direct sunlight, which can cause paint to fade or plastic to warp. A display case can protect it from dust and accidental damage.
- Handling: Handle the model by its sturdy sections (e.g., fuselage, wings) to avoid breaking delicate parts like antennas or landing gear.
Warranty and Support
For any questions regarding missing parts, manufacturing defects, or assembly challenges not covered in this manual, please contact Italeri customer support. Refer to the contact information provided on the product packaging or the official Italeri website for assistance.