1. Introduction
This manual provides detailed instructions for the proper setup, operation, and maintenance of your Benro A573T 3-Section Dual-Tube Aluminum Video Tripod with S6PRO Video Head. This tripod system is designed for stability and versatility, supporting small video cameras and mirrorless rigs with accessories up to 13.2 lb (6 kg). Please read this manual thoroughly before using the product to ensure safe and optimal performance.
2. Setup
2.1 Unpacking and Initial Inspection
- Carefully remove all components from the packaging.
- Verify that all parts are present: tripod legs, S6PRO video head, pan bar, mid-level spreader, and carrying case.
- Inspect all components for any signs of damage. If any damage is found or parts are missing, contact Benro customer support immediately.
2.2 Attaching the S6PRO Video Head
The S6PRO video head is typically pre-attached to the 75mm bowl of the tripod. If it needs to be re-attached or secured:
- Place the S6PRO video head into the 75mm bowl of the tripod.
- Tighten the bowl clamp knob located beneath the bowl to secure the head firmly.
- Attach the pan bar to the designated receiver on the S6PRO head and tighten its locking knob.

Image: The S6PRO video head mounted on the tripod, showing the pan bar attached.
2.3 Extending Tripod Legs and Using the Mid-Level Spreader
- Release the leg twist locks on each section of the tripod legs.
- Extend the legs to the desired height. Ensure all leg sections are fully extended or retracted to the same length for stability.
- Tighten the twist locks securely to prevent leg collapse.
- The mid-level spreader connects the legs to provide additional stability. Adjust its length to achieve the desired leg spread and lock it into position.
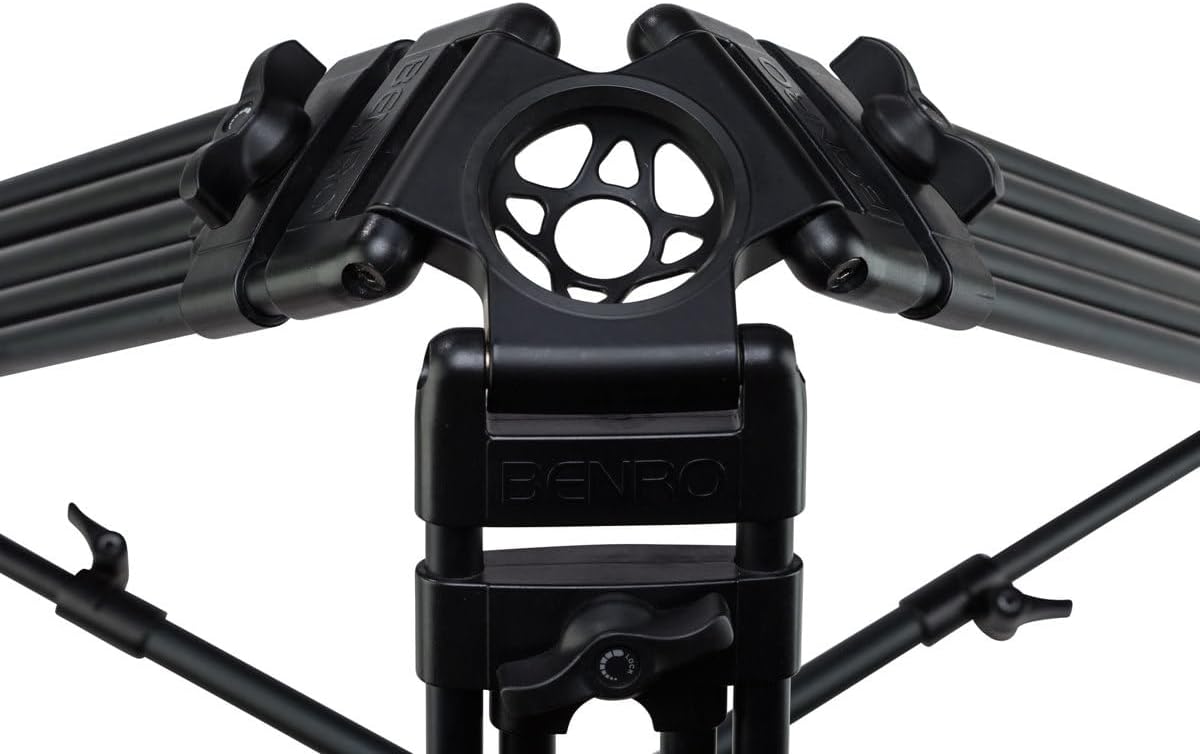
Image: A close-up view of the mid-level spreader connecting the tripod legs, enhancing stability.
2.4 Adjusting Feet for Terrain
The tripod comes with convertible rubber and dual spiked feet for adaptability on various surfaces.
- For indoor use or delicate surfaces, ensure the rubber feet are extended.
- For outdoor use on soft ground (e.g., grass, dirt), retract the rubber feet to expose the metal spikes for better grip.
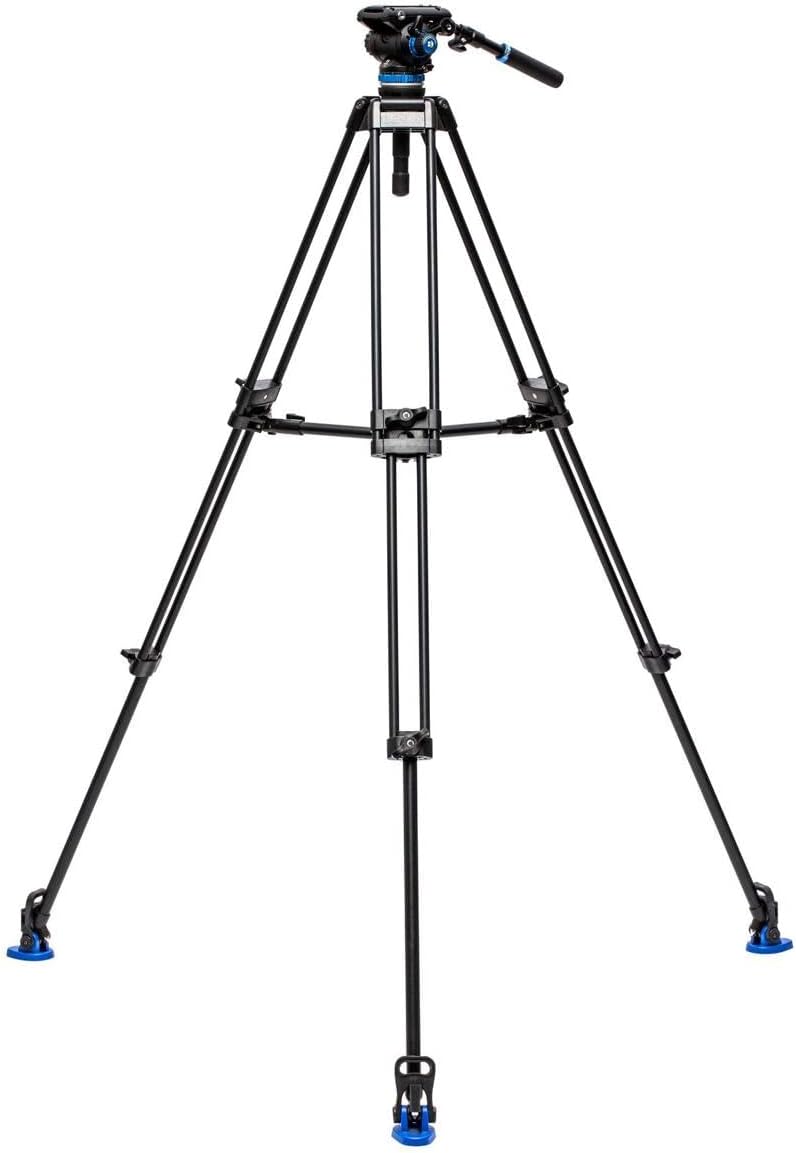
Image: A detailed view of the tripod feet, illustrating the convertible rubber and spiked options for different terrains.
2.5 Mounting Your Camera
- Ensure the quick release plate is detached from the S6PRO head.
- Attach the quick release plate to the bottom of your camera or rig using the appropriate screw (1/4"-20 or 3/8"-16).
- Slide the quick release plate with your camera into the receiver on the S6PRO head until it locks securely. Always double-check the lock before releasing your grip on the camera.
3. Operating
3.1 Adjusting Tripod Height and Leveling
- To adjust the height, release the leg twist locks, extend or retract the leg sections, and then securely tighten the locks.
- Use the built-in bubble level on the S6PRO head to ensure the tripod is perfectly level before shooting. Adjust the leg lengths as needed.

Image: The Benro A573T tripod fully extended, demonstrating its maximum height capability.
3.2 Using the S6PRO Video Head
The S6PRO head offers precise control for smooth video movements.
- Pan Lock: Loosen the pan lock knob to allow horizontal rotation (panning). Tighten to lock the head in position.
- Tilt Lock: Loosen the tilt lock knob to allow vertical movement (tilting). Tighten to lock the head at the desired angle.
- Fluid Drag Control: The S6PRO features adjustable fluid drag for both pan and tilt. Rotate the drag control knobs to increase or decrease resistance, allowing for smoother or faster movements as required.
- Counterbalance: Adjust the counterbalance setting to match the weight of your camera setup. This helps prevent the camera from tipping forward or backward when the tilt lock is disengaged, providing a more balanced feel.

Image: A close-up of the S6PRO video head, highlighting the pan, tilt, drag, and counterbalance controls.
3.3 Versatile Mounting Options
The S6PRO video head can be mounted separately on sliders, jibs, or monopods using its 65mm flat base and 3/8"-16 thread. Ensure the mounting platform is compatible and secure before use.
4. Maintenance
4.1 Cleaning
- Wipe down the tripod and head with a soft, dry cloth after each use to remove dust and dirt.
- For stubborn grime, use a slightly damp cloth with mild soap, then dry thoroughly.
- Avoid using harsh chemicals or abrasive cleaners, as these can damage the finish and internal components.
- Keep sand and grit away from leg locks and moving parts. If exposed to sand, carefully clean all affected areas.
4.2 Storage
- When not in use, retract all leg sections and fold the tripod for compact storage.
- Store the tripod in its provided carrying case to protect it from dust, moisture, and impacts.
- Store in a cool, dry place away from direct sunlight and extreme temperatures.

Image: The Benro carrying case, designed for convenient and protective storage and transport of the tripod system.
5. Troubleshooting
| Problem | Possible Cause | Solution |
|---|---|---|
| Tripod is unstable or wobbles. | Leg locks are not fully tightened; legs are not evenly extended; mid-level spreader not engaged; uneven ground. | Ensure all leg locks are secure. Extend legs evenly. Engage and adjust the mid-level spreader. Adjust leg lengths to level the tripod on uneven surfaces. |
| S6PRO head movements are not smooth. | Fluid drag settings are too high or too low; head is dirty; counterbalance not set correctly. | Adjust the fluid drag control knobs to the desired resistance. Clean the head if dirt is present. Adjust counterbalance to match camera weight. |
| Camera not securely attached to the head. | Quick release plate not fully engaged or locked; screw on quick release plate is loose. | Ensure the quick release plate is fully seated and its locking mechanism is engaged. Tighten the screw connecting the camera to the quick release plate. |
| Leg sections are difficult to extend or retract. | Dirt or debris in the twist locks or leg sections. | Clean the leg sections and twist locks thoroughly. Avoid forcing the mechanisms. |
6. Specifications
| Feature | Detail |
|---|---|
| Brand | Benro |
| Model Name | A573TBS6PRO |
| Material | Aluminum |
| Item Weight | 11 Pounds (approx. 5 kg) |
| Weight Limit | 13.2 Pounds (6 kg) |
| Maximum Height | 75 Centimeters (approx. 29.5 inches) |
| Number of Leg Sections | 3 |
| Tripod Head Type | Pistol Grip Heads (S6PRO Video Head) |
| Special Features | Compact, Portable, Dual-Tube Design, Mid-Level Spreader, Convertible Feet |
7. Warranty & Support
7.1 Warranty Information
This Benro product is covered by a 5-year Benro USA Warranty. Please retain your proof of purchase for warranty claims. The warranty covers manufacturing defects and workmanship under normal use. It does not cover damage caused by misuse, accidents, unauthorized modifications, or normal wear and tear.
7.2 Customer Support
For technical assistance, warranty service, or to inquire about replacement parts, please contact Benro customer support. Refer to the official Benro website or your purchase documentation for the most current contact information.
Benro Official Website: www.benro.com


