
Introduction
Thank you for choosing the Mac Allister MPWP1800-2 Pressure Washer. This manual provides essential information for the safe and efficient operation, maintenance, and troubleshooting of your new pressure washer. Please read this manual thoroughly before using the product and keep it for future reference.
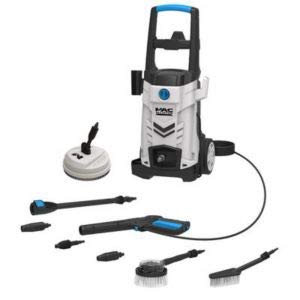
Image: Mac Allister MPWP1800-2 Pressure Washer. This image shows the compact design of the pressure washer unit, typically featuring the main body, hose connections, and power cord.
Safety Information
Always observe basic safety precautions when using electrical appliances to reduce the risk of fire, electric shock, and personal injury.
- Read all instructions: Familiarize yourself with the controls and proper use of the pressure washer.
- Wear appropriate safety gear: Always wear eye protection, hearing protection, and protective clothing.
- Electrical safety: Ensure the power supply matches the specifications on the product label. Use a ground fault circuit interrupter (GFCI) for protection against electric shock. Do not operate with damaged cords or plugs.
- Water connections: Connect the pressure washer to a cold water supply only. Do not use hot water.
- Keep children and pets away: Do not allow children or untrained persons to operate the pressure washer.
- Avoid spraying people or animals: The high-pressure spray can cause serious injury.
- Maintain a firm grip: The spray gun can recoil when activated.
- Disconnect power: Always unplug the pressure washer from the power outlet before performing any maintenance or when not in use.
Package Contents
Verify that all items are present and undamaged. If any parts are missing or damaged, contact your retailer.
- Mac Allister MPWP1800-2 Pressure Washer Unit
- High-Pressure Hose
- Spray Gun
- Lance with Adjustable Nozzle
- Detergent Tank (if applicable)
- Water Inlet Connector
- Nozzle Cleaning Pin
- User Manual
Setup
- Assemble the Unit: Attach the handle and any wheels if they are not pre-assembled. Ensure all connections are secure.
- Connect Water Supply:
- Connect a garden hose (minimum 1/2 inch diameter) to the water inlet connector on the pressure washer.
- Ensure the garden hose is free of kinks and has a steady water flow.
- Turn on the water supply fully.
- Connect High-Pressure Hose:
- Attach one end of the high-pressure hose to the high-pressure outlet on the pressure washer.
- Attach the other end of the high-pressure hose to the spray gun. Tighten all connections securely by hand.
- Attach Lance and Nozzle:
- Insert the lance into the spray gun and twist until it locks into place.
- Select the desired nozzle and attach it to the end of the lance.
- Prime the Pump:
- With the water supply on, squeeze the trigger on the spray gun to release air from the system.
- Allow water to flow through the gun until a steady stream without air bubbles is achieved. This typically takes 30-60 seconds.
- Release the trigger.
- Connect Power: Plug the power cord into a grounded electrical outlet. Ensure the outlet is protected by a GFCI.
Operating Instructions
- Starting the Pressure Washer:
- Ensure the water supply is fully open and the pump is primed.
- Turn the ON/OFF switch to the "ON" position. The motor will start.
- Point the spray gun at the cleaning surface, keeping a safe distance.
- Squeeze the trigger to begin spraying. The motor will run continuously while the trigger is pressed.
- Using Detergent (if applicable):
- Fill the detergent tank with pressure washer safe detergent.
- Attach the detergent nozzle (usually a black or low-pressure nozzle) to the lance.
- The pressure washer will automatically draw detergent when operating at low pressure.
- After applying detergent, switch back to a high-pressure nozzle and rinse the surface thoroughly.
- Stopping the Pressure Washer:
- Release the trigger on the spray gun. The motor will stop.
- Turn the ON/OFF switch to the "OFF" position.
- Turn off the water supply.
- Squeeze the spray gun trigger to release any remaining pressure in the system.
- Disconnect the power cord from the outlet.
Maintenance
Regular maintenance ensures optimal performance and extends the life of your pressure washer. Always disconnect power and water supply before performing maintenance.
- Clean Nozzles: Use the provided nozzle cleaning pin to clear any blockages from the nozzle orifice. Rinse with water.
- Inspect Hoses and Connections: Regularly check the high-pressure hose, garden hose, and all connections for wear, leaks, or damage. Replace damaged parts immediately.
- Clean Water Inlet Filter: The water inlet filter prevents debris from entering the pump. Remove and rinse it periodically.
- Storage:
- Drain all water from the pump, hoses, and spray gun before storing.
- Store the pressure washer in a dry, frost-free area.
- For prolonged storage, especially in freezing temperatures, use a pump protector/antifreeze solution.
Troubleshooting
| Problem | Possible Cause | Solution |
|---|---|---|
| Motor does not start |
|
|
| Low or no pressure |
|
|
| Water leaks |
|
|
Specifications
| Feature | Detail |
|---|---|
| Brand | Mac Allister |
| Model Number | MPWP1800-2 |
| Maximum Pressure | 130 Bars |
| Power Source | Electric Cable |
| Tank Volume | 7.33 Liters |
| Compliant Specifications | CE |
| Color | White, Black |
| ASIN | B082FR35FP |
Warranty and Support
For warranty information, technical support, or to order replacement parts, please refer to the warranty card included with your product or visit the official Mac Allister website. Keep your proof of purchase for warranty claims.
Contact Information: Please refer to the contact details provided in your product packaging or on the manufacturer's official website for customer service.