1. Introduction
This manual provides essential information for the safe and efficient installation, operation, and maintenance of your Lennox C37-38A-2F-1/15Y29 3 TON AC/HP Upflow Cased A Coil. Please read these instructions thoroughly before proceeding with any procedures. Proper installation and maintenance are crucial for optimal performance and longevity of the unit.
2. Safety Information
General Safety Precautions
- Installation and servicing must be performed by qualified, experienced technicians.
- Disconnect all electrical power to the unit before performing any maintenance or service.
- Handle refrigerants with care. Only certified personnel should work with refrigerants.
- Wear appropriate personal protective equipment (PPE) such as gloves and eye protection.
- Ensure proper ventilation when working in enclosed spaces.
WARNING: This product contains a chemical known to the State of California to cause cancer, birth defects or other reproductive harm. For more information, visit www.P65Warnings.ca.gov.
3. Product Overview
Product Description
The Lennox C37-38A-2F-1/15Y29 is a 3-ton cased A-coil designed for upflow AC/HP systems. It is compatible with both R-22 and R-410A refrigerants and features a factory-installed RFC orifice metering device. This coil is an essential component for heat exchange in your HVAC system.
Key Features and Specifications
- Airflow: Upflow configuration, 1200 CFM
- Refrigerant Compatibility: R-22 / R-410A
- Metering Device: RFC Orifice (Factory installed orifice size: 0.073)
- Connection Size: 3/8" x 3/4" Sweat
- Overall Dimensions: 24-1/2"H x 14-1/2"W x 21"D

Image: Top-front view of the Lennox A-Coil, showing the internal coil structure and copper lines.
4. Setup & Installation
Pre-Installation Checks
- Verify that the coil model matches the system requirements.
- Inspect the unit for any shipping damage. Report any damage immediately.
- Ensure the installation area is clear and provides adequate space for servicing.
- Confirm that all necessary tools and materials are available.
Physical Installation
This A-coil is designed for upflow applications. It should be installed above the furnace or air handler in a vertical orientation, ensuring proper drainage for condensate. The casing provides protection and facilitates integration into the ductwork.
Refrigerant Connections
The coil features 3/8" and 3/4" sweat connections for the refrigerant lines. Ensure all connections are clean and properly brazed to prevent leaks. The unit is compatible with both R-22 and R-410A refrigerants. The factory-installed RFC orifice is sized for optimal performance with the specified refrigerant type. Consult the outdoor unit's specifications for correct refrigerant charge and line set sizing.
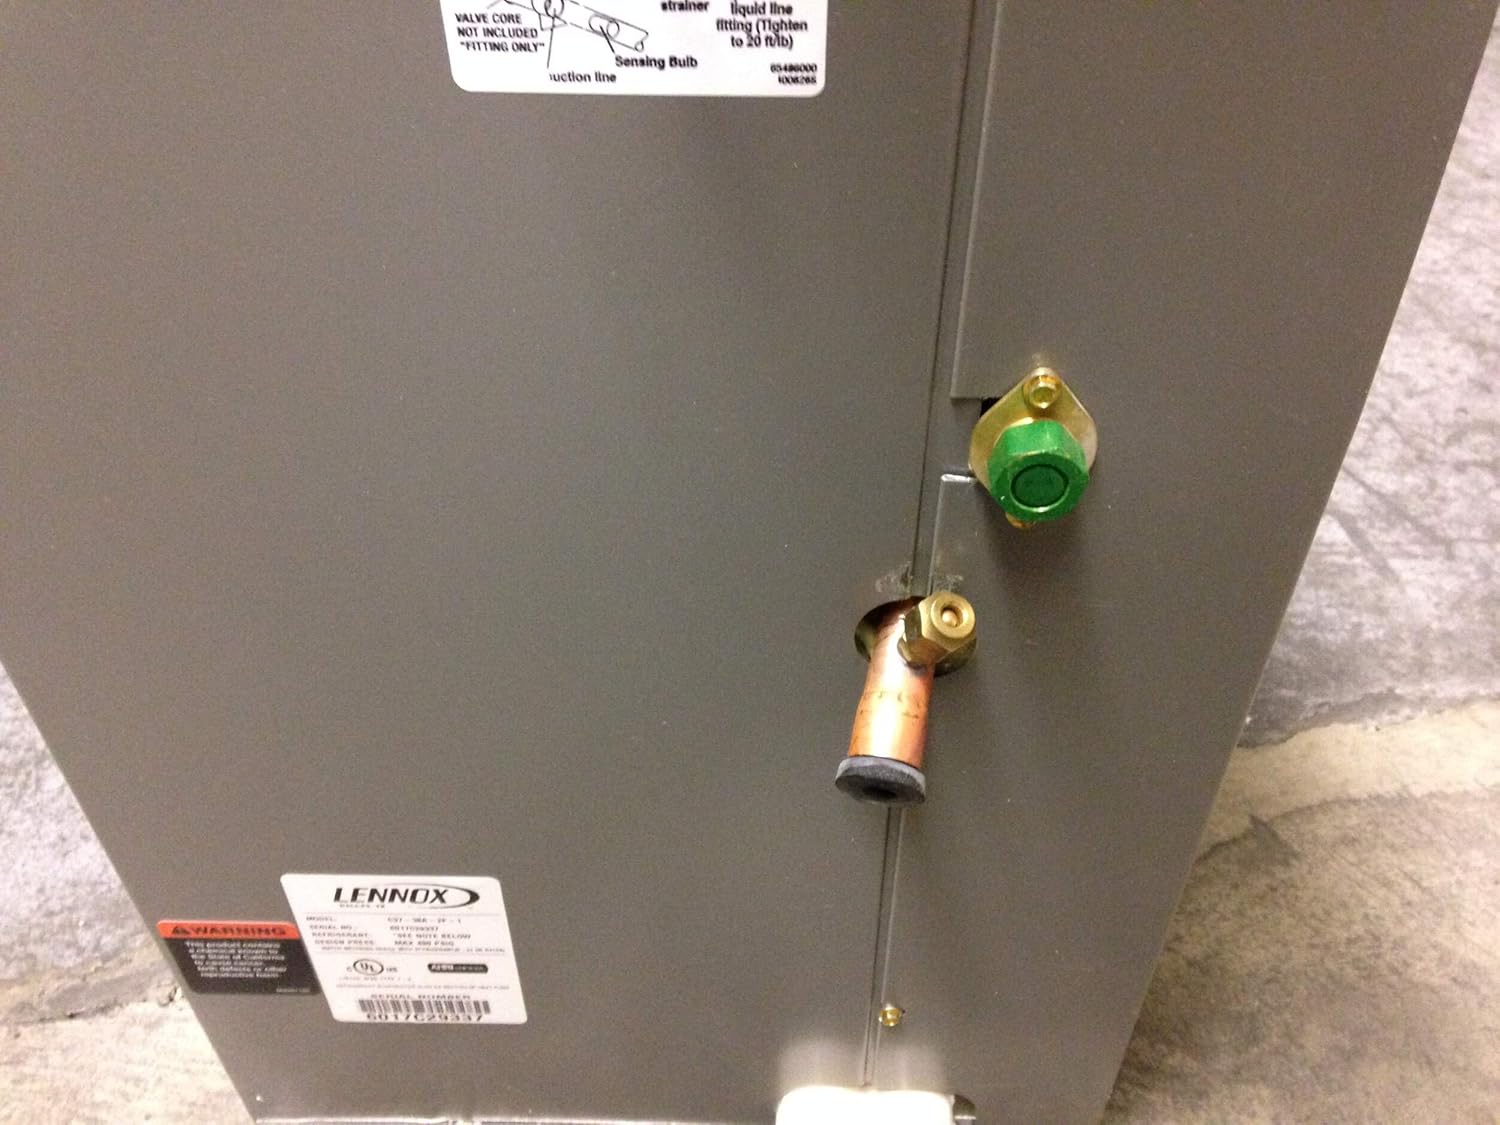
Image: Close-up view of the refrigerant line connections and service ports on the side of the Lennox A-Coil.
5. Operating Instructions
Once properly installed and charged by a qualified technician, the Lennox A-coil operates in conjunction with your outdoor condensing unit and indoor air handler/furnace to provide cooling or heating. The coil facilitates the transfer of heat between the refrigerant and the indoor air stream. No direct user interaction is required for the coil's operation beyond ensuring the overall HVAC system is functioning correctly.
- Ensure the thermostat is set to the desired mode (Cool or Heat) and temperature.
- Verify that the air filter in the air handler/furnace is clean to ensure proper airflow over the coil.
- Listen for unusual noises or observe any signs of refrigerant leaks (e.g., ice formation on lines).
6. Maintenance
Regular maintenance is essential for the efficient and reliable operation of your A-coil. It is recommended that a qualified HVAC technician perform annual inspections and servicing.
Recommended Maintenance Tasks:
- Air Filter Replacement: Regularly replace or clean the air filter in your air handler/furnace according to the manufacturer's recommendations. A dirty filter restricts airflow and reduces coil efficiency.
- Coil Cleaning: Annually, or as needed, have a technician inspect and clean the evaporator coil. Dirt and debris on the coil fins can impede heat transfer.
- Condensate Drain Inspection: Check the condensate drain pan and line for blockages or algae growth. Clear any obstructions to ensure proper drainage and prevent water damage.
- Refrigerant Level Check: A technician should verify the refrigerant charge during annual service. Incorrect charge can lead to reduced performance and potential system damage.
7. Troubleshooting
If you experience issues with your HVAC system, consult a qualified HVAC technician. Attempting repairs without proper training and tools can be dangerous and may void your warranty. Below are some common symptoms and potential causes related to the A-coil:
- Poor Cooling/Heating: Could indicate low refrigerant charge, dirty coil, or restricted airflow due to a clogged filter.
- Water Leaks: Often caused by a clogged condensate drain line or pan.
- Ice on Coil or Refrigerant Lines: Typically a sign of low refrigerant, restricted airflow, or a faulty metering device.
- Unusual Noises: May indicate issues with the air handler fan, ductwork, or other system components, rather than the coil itself.
8. Specifications
Detailed technical specifications for the Lennox C37-38A-2F-1/15Y29 A-Coil:
| Specification | Value |
|---|---|
| Model Number | C37-38A-2F-1 |
| Tonnage | 3 TON |
| Airflow Configuration | Upflow |
| CFM | 1200 |
| Refrigerant Compatibility | R-22 / R-410A |
| Metering Device | RFC Orifice (Factory Installed Orifice Size: 0.073) |
| Connection Size | 3/8" x 3/4" Sweat |
| Overall Dimensions (H x W x D) | 24-1/2" x 14-1/2" x 21" |
| Item Weight | 49 pounds |
| Design Pressure | MAX 480 PSIG |

Image: Product label showing model number, refrigerant compatibility, design pressure, and UL/AHRI certifications.
For product registration or further details, you may refer to the serial number: S6017C29337.

Image: Shipping box label displaying the model number and serial number S6017C29337.
9. Warranty Information
This Lennox A-coil is covered by a manufacturer's warranty. Specific warranty terms and conditions may vary. Please refer to the warranty documentation provided with your unit or contact your authorized Lennox dealer for detailed information regarding coverage, duration, and claims procedures. Keep your proof of purchase and installation records for warranty purposes.
10. Support & Contact
For technical assistance, service, or parts inquiries, please contact a qualified HVAC professional or your authorized Lennox dealer. They have the expertise and resources to provide accurate diagnostics and repairs for your system.
For general information about Lennox products, visit the official Lennox website.