1. Introduction
This manual provides detailed instructions for the safe and effective operation of your NIDAGE A010-D Industrial Dual Lens Endoscope. Please read this manual thoroughly before use and retain it for future reference. This industrial endoscope is designed for visual inspection in hard-to-reach areas, featuring a dual-lens system, high-resolution display, and robust waterproof construction.
2. Product Features
- Dual Lens System: Equipped with both front and side cameras for comprehensive viewing without additional accessories.
- High-Resolution Display: Features a 4.3-inch IPS screen for clear, detailed images and videos.
- 1080P Video Capture: Records high-definition video and captures still images.
- Adjustable LED Lights: Seven integrated LED lights with adjustable brightness for optimal illumination in dark environments.
- IP67 Waterproof Probe: The camera probe is rated IP67, making it suitable for use in wet or submerged conditions.
- 32GB Micro SD Card: Includes a 32GB card for ample storage of inspection data.
- 16FT Semi-Rigid Cable: Provides flexibility and reach for various inspection tasks.
- Rechargeable Battery: Built-in 2800mAh battery offers 3-4 hours of continuous operation.

Figure 2.1: Overview of the NIDAGE A010-D Industrial Dual Lens Endoscope.

Figure 2.2: Close-up of the dual camera probe, highlighting the front and side lenses for versatile inspection.

Figure 2.3: The 4.3-inch IPS screen provides a clear and wide viewing angle for detailed inspections.
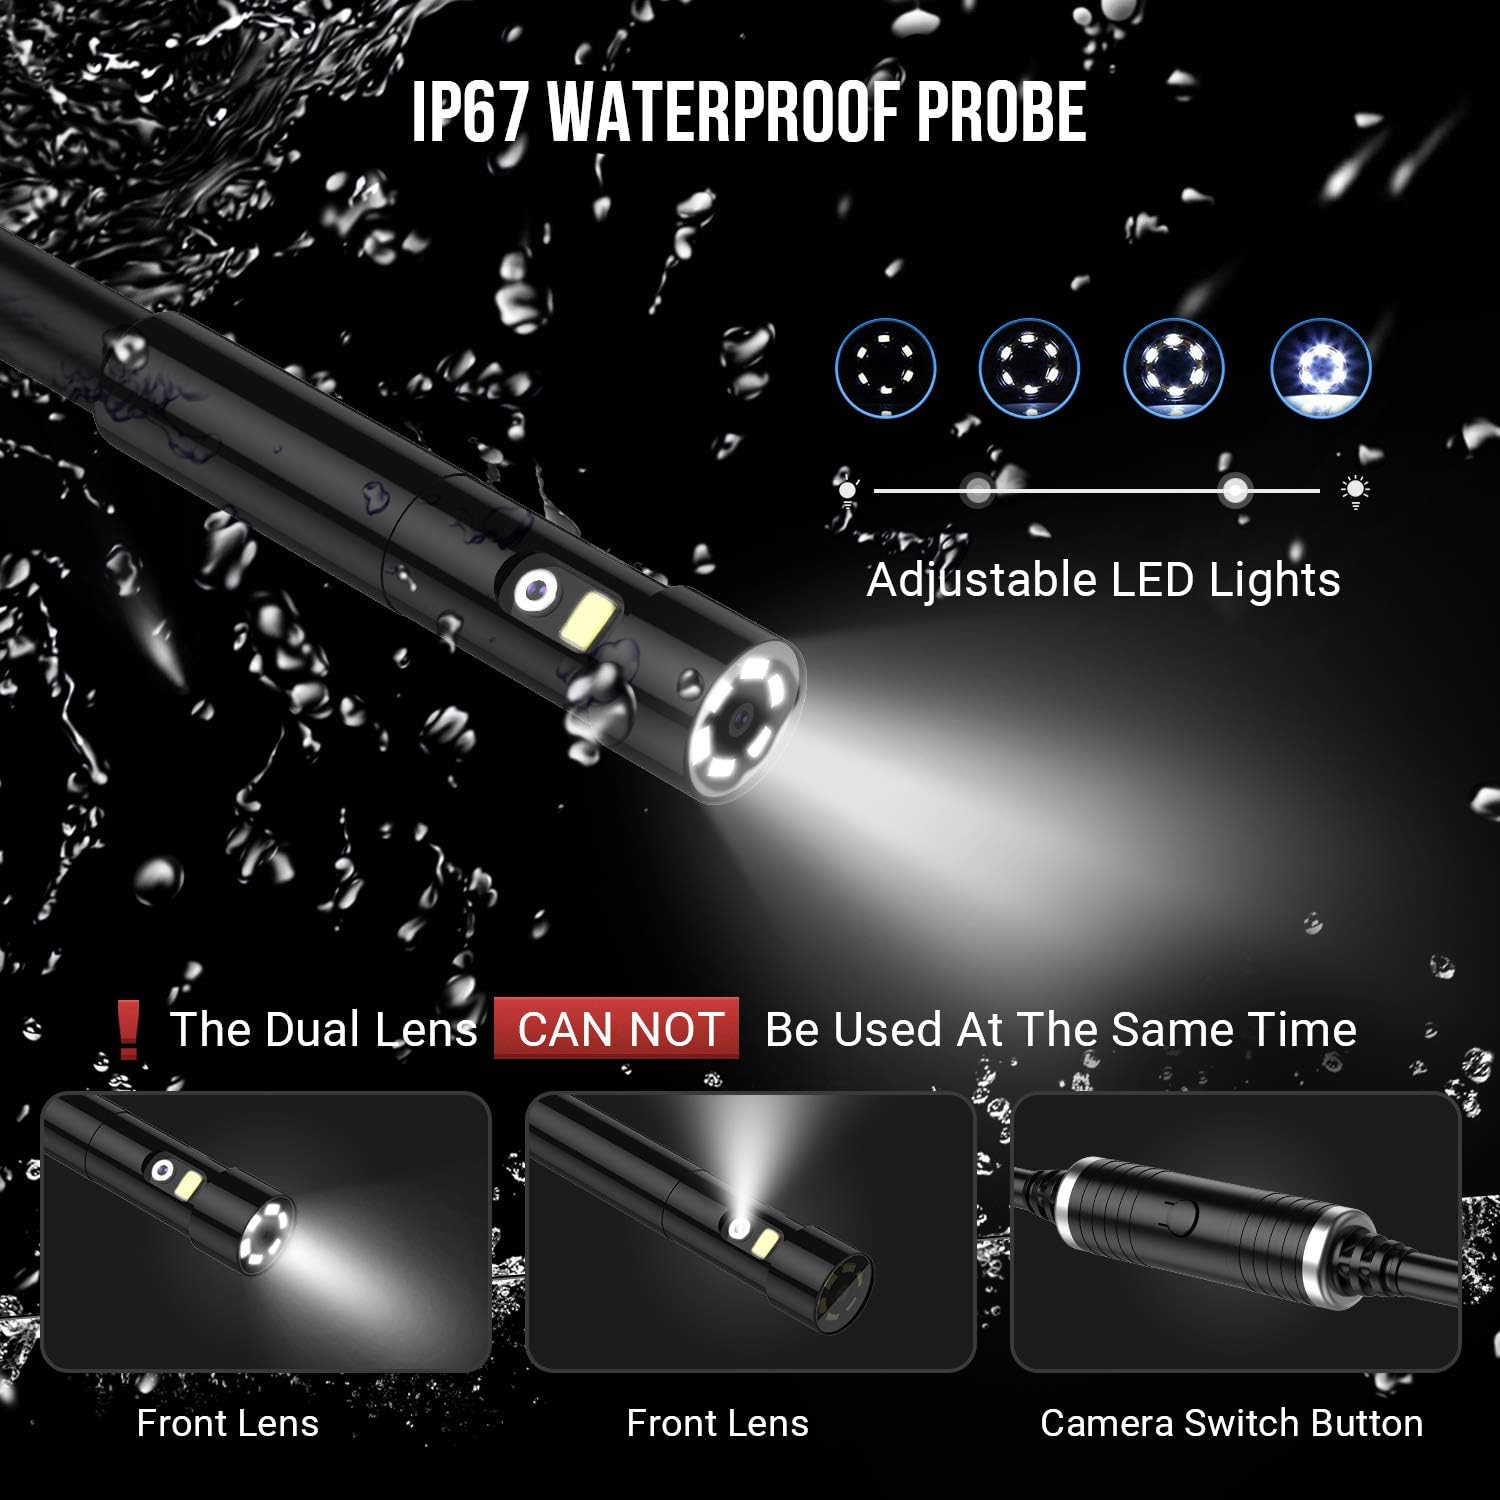
Figure 2.4: The display unit illustrating the two modes of camera viewing: front view and side view.

Figure 2.5: The IP67 waterproof probe with adjustable LED lights, ensuring visibility in various conditions. Note: The dual lenses cannot be used simultaneously.

Figure 2.6: The endoscope display unit connected for charging, indicating a 2800mAh rechargeable battery providing 3-4 hours of continuous use.

Figure 2.7: Examples of the endoscope in use for inspecting plumbing, automotive engines, and industrial machinery.

Figure 2.8: An illustration detailing the internal optical structure of the endoscope camera lens.
3. Setup
- Charge the Device: Before first use, fully charge the endoscope using the provided USB cable. The charging indicator will show progress.
- Insert Micro SD Card: Ensure the 32GB Micro SD card is properly inserted into the designated slot on the display unit.
- Connect Probe: Securely connect the semi-rigid camera probe to the display unit.
- Power On: Press and hold the power button to turn on the device.
4. Operating Instructions
- Power On/Off: Press and hold the power button for 2-3 seconds to turn the device on or off.
- Adjust LED Lights: Use the dedicated light adjustment button (often marked with a light bulb icon) to cycle through different brightness levels for the LED lights on the camera probe.
- Switch Cameras: To switch between the front and side cameras, locate the camera switch button (often marked with a camera icon or 'M' for mode) and press it. The active camera view will change on the screen.
- Capture Photos: Press the photo capture button (often marked with a camera icon) to take a still image. Images are saved to the Micro SD card.
- Record Videos: Press the video record button (often marked with a video camera icon) to start recording. Press it again to stop recording. Videos are saved to the Micro SD card.
- Review Media: Access the gallery or playback mode to view captured photos and videos. Use the navigation buttons to browse.
- Data Transfer: Connect the endoscope to a computer via USB to transfer files from the Micro SD card. Alternatively, remove the Micro SD card and insert it into a card reader.
5. Maintenance
- Cleaning the Probe: After each use, especially in dirty or wet environments, gently wipe the camera probe with a soft, damp cloth. For stubborn grime, a mild, non-abrasive cleaner can be used. Ensure the probe is dry before storage.
- Cleaning the Screen: Use a soft, lint-free cloth to clean the display screen. Avoid harsh chemicals that may damage the screen surface.
- Storage: Store the endoscope in a cool, dry place, away from direct sunlight and extreme temperatures. Use the provided carrying case to protect the device from physical damage.
- Battery Care: To prolong battery life, avoid fully discharging the battery frequently. Recharge the device regularly, even if not in use for extended periods.
6. Troubleshooting
| Problem | Possible Cause | Solution |
|---|---|---|
| Device does not power on. | Low battery; loose connection. | Charge the battery fully. Ensure the power button is pressed and held correctly. |
| No image on screen. | Probe not connected; camera mode issue. | Ensure the camera probe is securely connected. Press the camera switch button to activate a camera. |
| Image is too dark/bright. | LED light brightness setting. | Adjust the LED light brightness using the dedicated button. |
| Cannot save photos/videos. | SD card full or not inserted. | Check if the Micro SD card is inserted correctly. Delete old files or replace the card if full. |
| Poor image quality. | Dirty lens; insufficient lighting. | Clean the camera lens. Increase LED light brightness. Ensure proper focal distance. |
7. Specifications
- Model Number: A010-D
- Brand: NIDAGE
- Screen Size: 4.3 Inches
- Video Capture Resolution: 1080p
- Water Resistance Level: IP67 (Probe)
- Cable Length: 16FT (Semi-Rigid)
- Media Type: Micro SD Card (32GB included)
- Connectivity Technology: USB
- Sensor Type: CMOS
- Light Sensitivity: 100-6400
- Battery: 2800mAh Rechargeable
- Color: Black
8. Warranty and Support
NIDAGE products are manufactured to high-quality standards. For warranty information, technical support, or service inquiries, please refer to the contact information provided with your product packaging or visit the official NIDAGE website. Please retain your proof of purchase for warranty claims.