LOFTEK LK001
LOFTEK Submersible LED Lights Instruction Manual
Model: LK001
Introduction
Thank you for choosing LOFTEK Submersible LED Lights. This manual provides essential information for the safe and effective use of your new LED lights. Please read it thoroughly before installation and operation.
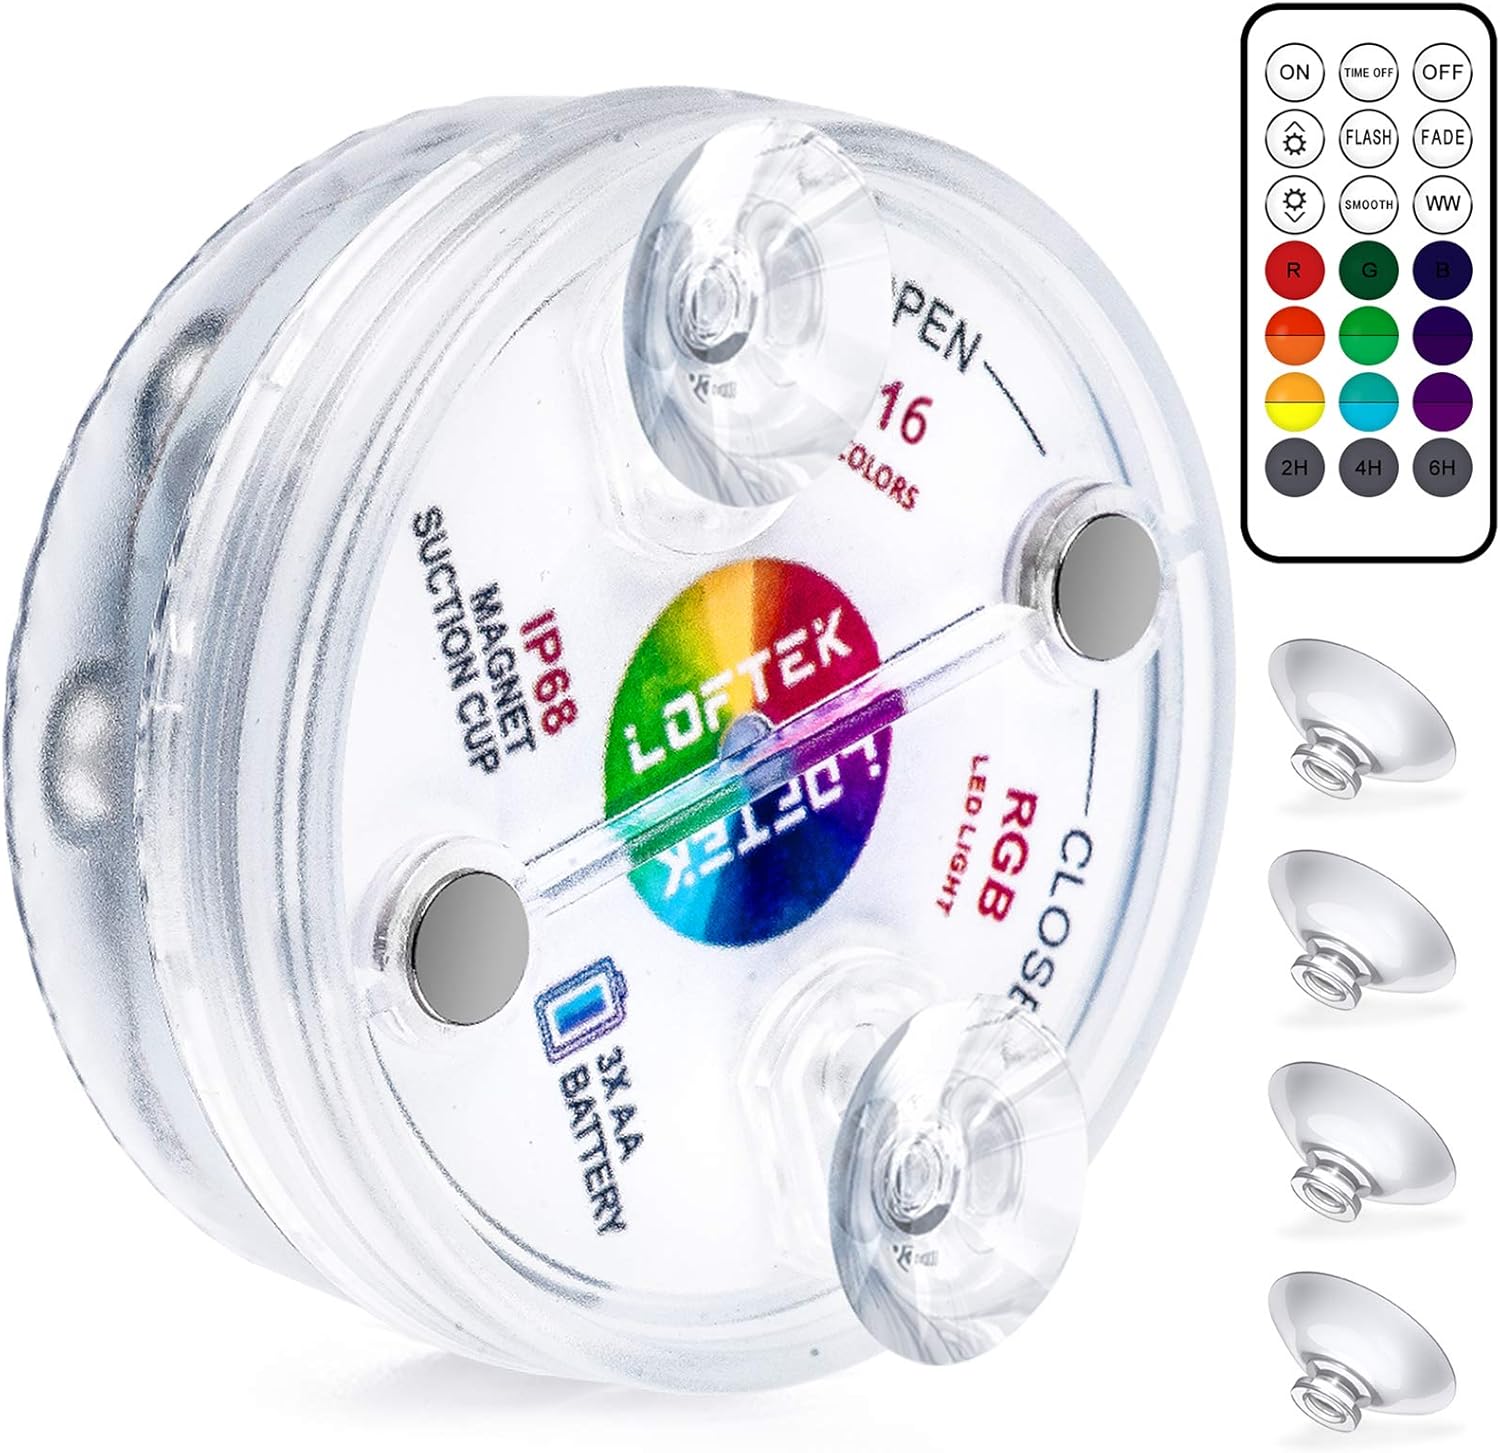
Image: LOFTEK Submersible LED Light, showcasing its compact design and bright LEDs.
Package Contents
Ensure all items are present in your package:
- 1x LOFTEK Submersible LED Light (batteries NOT included for the light unit)
- 1x RF Remote Controller (CR2 battery included)
- 4x Suction Cups
- 1x User Manual
Note: If any items are missing or damaged, please contact LOFTEK customer support for assistance.
Specifications
| Feature | Detail |
|---|---|
| Brand | LOFTEK |
| Model Name | LK001 |
| Light Source | 13 LED beads |
| Water Resistance | IP68 Waterproof |
| Power Source | 3x AA Batteries (for light, not included) |
| Remote Control Battery | 1x CR2 Battery (included) |
| Control Method | RF Remote Control |
| Remote Range (Air) | Up to 200ft / 61m |
| Remote Range (Water) | Up to 16.4ft / 5m |
| Colors | 16 Dynamic Colors |
| Modes | Flash, Fade, Smooth |
| Timer Options | 2H, 4H, 6H, 24H |
| Special Features | Dimmable, Memory Function, Magnets & Suction Cups |
| Material | Acrylonitrile Butadiene Styrene (ABS) |
| Product Dimensions | 3"L x 3"W x 1.3"H |
| Item Weight | 5.6 ounces |
Setup Instructions
1. Installing Batteries in the LED Light Unit
- Carefully twist open the light unit counter-clockwise to access the battery compartment.
- Insert 3x AA batteries (not included) into the compartment, ensuring correct polarity (+/-).
- Twist the light unit clockwise to close it. Screw lightly to ensure a full waterproof seal. The light should illuminate automatically if connection is proper.
Video: Demonstrates how to install batteries into the LOFTEK submersible LED light unit and ensure a waterproof seal. It also highlights the use of AA batteries for longer life and the importance of proper sealing.
Important: Ensure the sealing ring is properly seated and the unit is tightly screwed to maintain IP68 waterproof rating. Mind the gap during installation. Using rechargeable AA batteries is recommended to save money and reduce waste.
2. Attaching the Light Unit
The LOFTEK LED lights offer two attachment methods:
- Magnets: The light unit has built-in magnets for attachment to iron surfaces.
- Suction Cups: For non-magnetic or smooth surfaces, attach the provided suction cups to the back of the light unit.
Video: Illustrates the installation of suction cups onto the submersible LED light and demonstrates the strength of the magnets for secure attachment to various surfaces.

Image: Close-up view of the LOFTEK submersible LED light, highlighting the integrated magnets and the attachment points for suction cups, ensuring versatile placement.
Operating Instructions
Using the RF Remote Control
The LOFTEK LED lights are controlled by an RF (Radio Frequency) remote, offering a wider control range and no need to aim directly at the light unit.

Image: The RF remote control for LOFTEK LED lights, showing various buttons for color, mode, brightness, and timer settings.
- ON/OFF: Press to turn the lights on or off.
- Color Selection: Choose from 16 static colors using the color buttons.
- Brightness Adjustment: Use the brightness up/down buttons to adjust light intensity.
- Dynamic Modes:
- FLASH: Rapidly cycles through colors.
- FADE: Smoothly transitions between colors.
- SMOOTH: Offers a gentle, continuous color change.
- Timer Settings: Set the lights to turn off automatically after 2H, 4H, 6H, or 24H.
Note: The RF remote has a range of up to 200ft (61m) in air and 16.4ft (5m) in water. Pool water can significantly absorb the signal, so get closer to the lights for optimal control. One RF remote can control multiple lights.

Image: LOFTEK LED lights illuminating a pool at night, demonstrating their vibrant colors and underwater use.
Maintenance
- Battery Replacement: When replacing batteries in the light unit, always wipe out any water from the compartment and ensure the sealing ring is clean and properly seated before re-sealing.
- Cleaning: Clean the light units with a soft, damp cloth. Avoid abrasive cleaners or solvents.
- Storage: If storing the lights for an extended period, remove the batteries from both the light unit and the remote control to prevent leakage.
Caution: The remote control is NOT waterproof. Keep it dry at all times.
Troubleshooting
| Problem | Solution |
|---|---|
| Light not turning on. | Check if batteries are inserted correctly with proper polarity. Replace with new batteries if necessary. Ensure the unit is tightly sealed. |
| Remote not working. | Check the CR2 battery in the remote and replace if needed. Ensure you are within the effective remote range (closer in water). |
| Water inside the light unit. | Immediately remove batteries and allow the unit to dry completely. Ensure the sealing ring is clean and properly seated before re-sealing. If the issue persists, contact customer support. |
| Lights not sticking with suction cups. | Ensure the surface is clean and smooth. Press firmly to remove air bubbles. For rougher surfaces, consider using the magnetic attachment if applicable. |
Warranty and Support
LOFTEK products come with a limited warranty. For specific warranty details or if you encounter any issues with your product, please contact LOFTEK customer support. We are committed to providing a satisfying solution for any defective items or concerns.
For support, please refer to the contact information provided on the product packaging or the official LOFTEK website.