Introduction
This manual provides detailed instructions for the installation, operation, and maintenance of your Ibergrif M22136 single-lever pull-out kitchen faucet. Please read this manual thoroughly before installation and use to ensure proper function and longevity of the product. Keep this manual for future reference.

Image: The Ibergrif M22136 pull-out kitchen faucet in chrome finish.
Safety Information
Observe the following safety precautions during installation and use:
- Always turn off the main water supply before beginning any installation or maintenance.
- Wear appropriate personal protective equipment, such as safety glasses and gloves.
- Ensure all connections are secure to prevent leaks.
- If you are unsure about any part of the installation, consult a qualified plumber.
- Do not use abrasive cleaners or harsh chemicals on the faucet finish.
Package Contents
Verify that all components are present before starting installation:
- 1 x Kitchen Faucet (Ibergrif M22136)
- 1 x Mixer Tap Washer Kit
- 1 x Pull-Out Hose
- 3 x Hose Pipes (Hot/Cold water supply lines and sprayer hose)
- Mounting hardware (nuts, washers, counterweight)
Specifications
| Model Number | M22136 |
| Brand | Ibergrif |
| Finish | Chrome |
| Material | Stainless Steel, Brass |
| Installation Method | Single-Hole, Deck Mount |
| Number of Handles | 1 (Single-Lever) |
| Flow Rate | 1.5 Gallons per minute |
| Spout Height | 8.6 Inches (219 mm) |
| Spout Depth | 20 Centimeters (256 mm from center) |
| Hose Length (Pull-Out) | 180 Centimeters (400 mm visible pull-out) |
| Special Features | 360° Rotatable Spout, Dual-Function Sprayer, Cold Start Function |
| Product Dimensions (L x W x H) | 50 x 25 x 10 cm |
| Weight | 2.3 Kilograms |

Image: Detailed dimensions of the Ibergrif M22136 kitchen faucet, showing spout height, reach, and pull-out hose length.
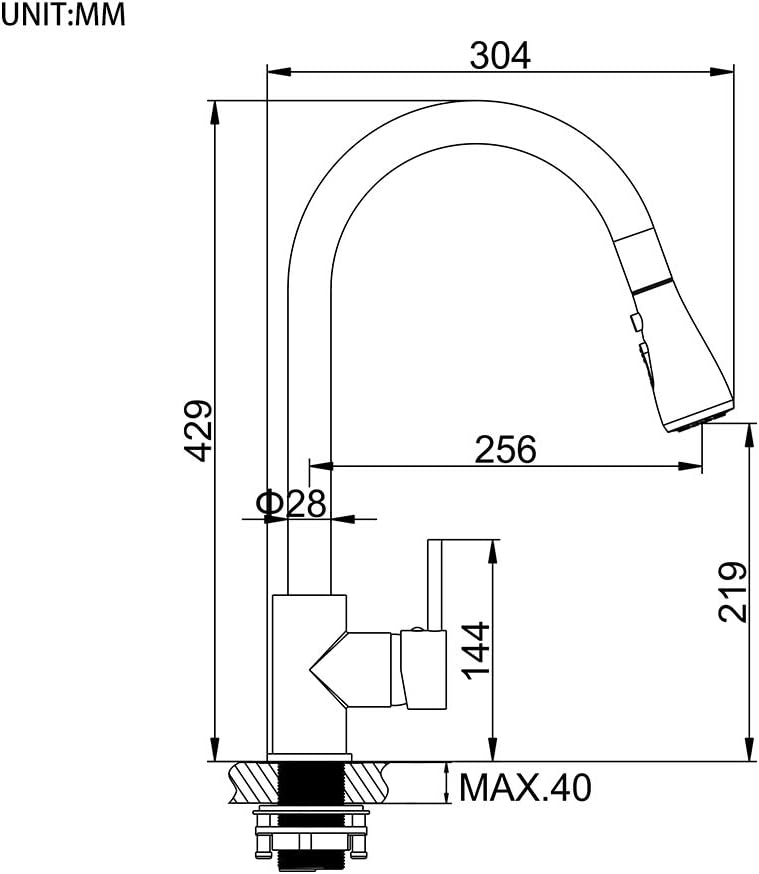
Image: Technical drawing illustrating the faucet's measurements in millimeters, including mounting hole diameter (Ø35mm) and maximum counter thickness (MAX.40).
Setup and Installation
Tools Required (Not Included):
- Adjustable wrench
- Phillips head screwdriver
- Basin wrench (optional, for tight spaces)
- Plumber's putty or silicone sealant
- Flashlight
- Bucket and towels
Pre-Installation Steps:
- Turn off the main water supply to your kitchen.
- Clear the area under the sink for easy access.
- Remove your old faucet, if applicable. Clean the sink surface thoroughly.
Installation Procedure:

Image: Visual guide for the installation process, showing key steps from mounting to hose connection.
- Step 1: Mount the Faucet
Insert the faucet body into the single mounting hole on your sink or countertop. Ensure the rubber gasket is properly seated between the faucet base and the sink surface to prevent leaks. The mounting hole diameter should be approximately 35mm.
- Step 2: Secure the Faucet
From underneath the sink, slide the metal washer and mounting nut onto the threaded shank of the faucet. Tighten the nut securely using a basin wrench or adjustable wrench. Do not overtighten.
- Step 3: Connect the Sprayer Hose
Connect the pull-out sprayer hose to the designated connection point on the faucet's underside. Ensure a tight seal. The image shows connecting the pull-out hose to the main faucet body.
- Step 4: Install the Counterweight
Attach the counterweight to the pull-out sprayer hose. Position it approximately 6-8 inches below the connection point to ensure the sprayer retracts smoothly. The image shows the counterweight being clipped onto the hose.
- Step 5: Connect Water Supply Lines
Connect the hot (H) and cold (C) water supply lines from the faucet to your home's hot and cold water valves. Ensure the connections are tight. The image illustrates the hot and cold water lines, along with the pull-out hose, ready for connection.
After installation, slowly turn on the main water supply and check for any leaks. Run the faucet for a few minutes to flush out any debris.
Operating Instructions
Water Flow and Temperature Control:
- On/Off and Flow: Lift the single lever handle to turn on the water and control the flow rate.
- Temperature: Move the lever to the left for hot water and to the right for cold water.
- Cold Start Feature: The faucet is designed with a cold start function. When the lever is in the central position, only cold water flows, saving energy by preventing the water heater from activating unnecessarily. Hot water is accessed by moving the lever to the left.

Image: Illustration of the cold start feature, showing the lever position for cold water (center) and hot water (left), indicating energy savings and reduced noise.
Sprayer Functions:
- Pull-Out Sprayer: Grasp the sprayer head and pull it out from the spout. The flexible hose allows for extended reach.
- Dual-Function Spray Head: Press the button on the sprayer head to switch between two spray modes:
- Stream Mode: For everyday cleaning and filling pots.
- Spray Mode: A powerful spray for heavy-duty rinsing.
- Retraction: After use, the counterweight on the hose will help retract the sprayer head back into the spout.

Image: Close-up of the dual-function spray head, illustrating the stream and spray modes and highlighting the easy-clean rubber nozzles.

Image: The pull-out sprayer in action, demonstrating its extended reach and universal rotation for flexible use in the sink.
360° Spout Rotation:
The faucet spout can rotate 360 degrees, providing full range of motion for versatile use in your kitchen sink.
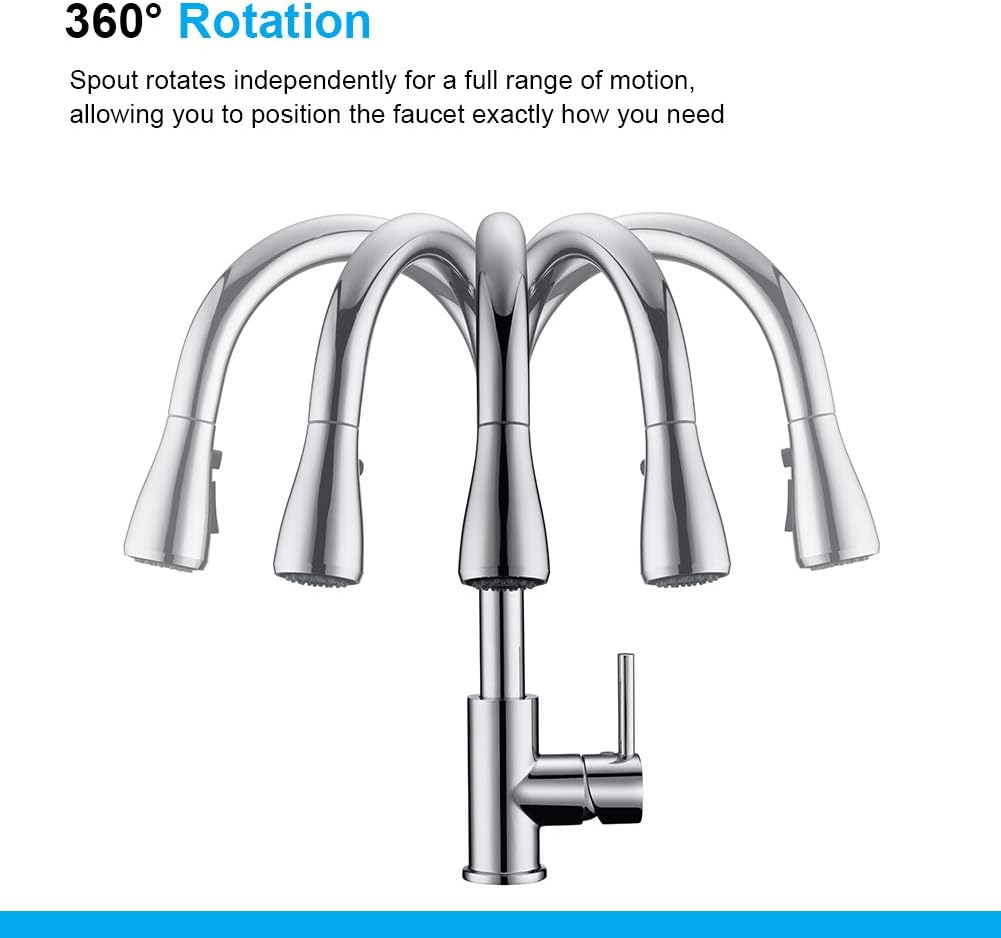
Image: Visual representation of the faucet's 360-degree spout rotation, allowing for flexible positioning.
Maintenance
Cleaning the Faucet Finish:
- Clean the faucet regularly with a soft cloth and mild soap and water.
- Rinse thoroughly and dry with a soft cloth to prevent water spots.
- Avoid abrasive cleaners, harsh chemicals, or scouring pads, as these can damage the chrome finish. The chrome finish is designed to resist water spots and fingerprints.
Cleaning the Sprayer Nozzles:
- Over time, mineral deposits (limescale) may accumulate on the rubber nozzles of the spray head.
- To clean, simply rub your finger across the rubber nozzles to dislodge any deposits. This helps maintain a consistent water flow.
Troubleshooting
| Problem | Possible Cause | Solution |
|---|---|---|
| Low Water Flow |
|
|
| Leaks from Faucet Base |
|
|
| Sprayer Does Not Retract Fully |
|
|
| Water Temperature Issues |
|
|
Warranty and Support
Information regarding specific warranty terms for the Ibergrif M22136 faucet is not available in this document. For warranty claims, technical support, or replacement parts, please contact Ibergrif customer service directly or refer to the product packaging for detailed warranty information.
You can visit the Ibergrif store on Amazon for more product information: Ibergrif Amazon Store


