1. Introduction
The Mopar Tire Service Kit is designed for temporary repair and inflation of a single punctured tire. This kit provides a solution for roadside tire emergencies, allowing you to seal small punctures and reinflate the tire to a safe pressure, enabling you to drive to the nearest service station for a permanent repair. It features an integrated inflator system and a sealant for effective temporary repair.
This kit is an Original Equipment Manufacturer (OEM) part, ensuring it meets factory specifications and quality standards for reliable performance.
2. Safety Information
DANGER / PELIGRO: POISON. HARMFUL OR FATAL IF SWALLOWED. RESPIRATORY AND SKIN SENSITIZER.
CAUTION: CONTENTS HARMFUL.
- Do not swallow.
- Avoid breathing dust.
- Do not eat, drink, or smoke when using this product.
- Wear protective gloves.
- Keep out of reach of children.
First Aid Treatment:
- Contains ethylene glycol 107-21-1, natural rubber latex 9006-04-6.
- IF SWALLOWED: Call a POISON CONTROL CENTER or doctor immediately. Rinse mouth. Do not induce vomiting.
- IF INHALED: Remove person to fresh air and keep comfortable for breathing.
- IF ON SKIN: Wash with plenty of water.
Dispose of contents and container in accordance with applicable regulations.
WARNING: This product contains a chemical known to the State of California to cause cancer and birth defects or other reproductive harm.

Image: Warning label on the Mopar Tire Service Kit, detailing safety precautions and first aid information.
3. Package Contents
Your Mopar Tire Service Kit includes the following components:
- Integrated Tire Inflator Unit with Pressure Gauge
- Sealant Bottle (integrated or replaceable, 15.2 fl oz / 450 mL)
- Power Cable with 12V Adapter
- Inflation Hose with Tire Valve Connector
- Various Adapters for inflation (e.g., for sports equipment)

Image: The Mopar Tire Service Kit, displaying the inflator unit with its pressure gauge and control dial.
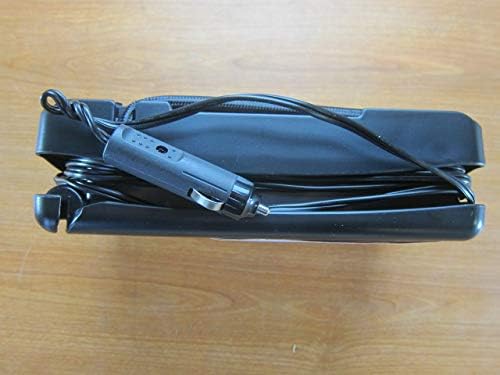
Image: The coiled power cable with a 12V adapter, stored neatly with the kit.

Image: Close-up of the inflation hose and various adapters stored within the kit.
4. Setup and Operating Instructions
This kit is intended for temporary road tire repair only. For collapsible spare tires, refer to your vehicle's owner's manual if equipped.
For Road Tire Repair:
- Read Manual: Familiarize yourself with these instructions and your vehicle's owner's manual regarding tire repair.
- Inspect Tire: Locate the puncture. This kit is designed for small punctures in the tire tread. Do not use if the tire sidewall is damaged or if the puncture is larger than approximately 1/4 inch (6 mm).
- Connect Power: Plug the 12V power adapter into your vehicle's accessory power outlet.
- Start Engine: Start your vehicle's engine to ensure adequate power supply to the inflator.
- Select Sealant Mode: Rotate the orange selector dial on the unit to the 'sealant' position (indicated by the tire icon with sealant flowing).
- Connect Hose: Securely attach the inflation hose to the tire valve stem.
- Power On: Press the power button on the unit to begin inflation and sealant injection.
- Inflate and Monitor: Inflate the tire to 26 PSI (1.8 Bar). The inflation process should take between 1 minute 15 seconds and 15 minutes. Do not exceed the recommended pressure.
- Drive Immediately: After inflation, immediately drive the vehicle for approximately 5 miles (8 km) at a speed not exceeding 50 mph (80 km/h) to allow the sealant to distribute and seal the puncture effectively.
- Recheck Pressure: Stop the vehicle and recheck the tire pressure. If the pressure is maintained at 26 PSI (1.8 Bar) or above, proceed to a service station for permanent repair.
- If Pressure Drops: If the tire pressure has dropped significantly, repeat steps 5-9. If the tire still does not hold air, the puncture may be too large for this kit. Do not drive the vehicle. Seek professional roadside assistance.

Image: Step-by-step visual instructions for temporary road tire repair.
For Collapsible Spare Tire Inflation (If Equipped):
If your vehicle is equipped with a collapsible spare tire, this kit can be used to inflate it. Ensure the orange selector dial is set to the 'air only' position (indicated by the air pump icon) before connecting and inflating. Inflate to the pressure specified in your vehicle's owner's manual, typically 60 PSI (4.2 Bar).
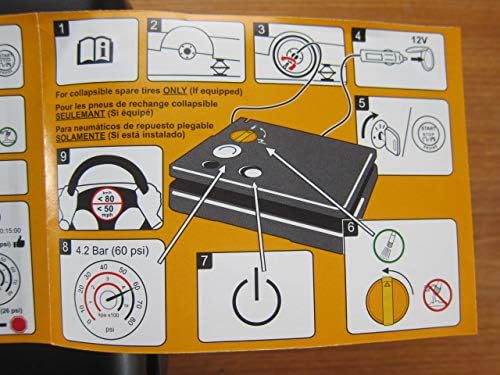
Image: Step-by-step visual instructions for inflating a collapsible spare tire.
5. Maintenance
- Sealant Replacement: The sealant bottle is designed for single use for tire repair. After use, or if the sealant has expired, the bottle must be replaced. Refer to your Mopar dealer for replacement sealant bottles.
- Unit Cleaning: Keep the inflator unit clean and free from dirt and debris. Wipe with a damp cloth as needed.
- Storage: Store the kit in a cool, dry place, away from direct sunlight and extreme temperatures. Ensure it is securely stored in your vehicle to prevent damage.
6. Troubleshooting
- Unit Does Not Turn On:
- Ensure the 12V power adapter is fully inserted into the vehicle's accessory outlet.
- Verify the vehicle's engine is running.
- Check the vehicle's fuse for the accessory power outlet.
- Tire Not Inflating / Sealant Not Dispensing:
- Confirm the inflation hose is securely connected to the tire valve stem.
- Ensure the orange selector dial is correctly set to the 'sealant' mode for repair or 'air only' for inflation without sealant.
- The puncture may be too large or located in the sidewall, preventing effective sealing.
- Tire Pressure Drops After Driving:
- The puncture may be too large or irregularly shaped for the sealant to provide a lasting temporary seal.
- Do not attempt to drive further. Seek professional roadside assistance.
7. Specifications
| Brand | Mopar |
| Model Number | 4726542AD .9 |
| Voltage | 12 Volts (DC) |
| Power Source | Battery Powered (via 12V vehicle outlet) |
| Recommended Uses | Tire Inflation, Temporary Tire Seal |
| Special Feature | Portable |
| Sealant Volume | 15.2 fl oz (450 mL) |
| Unit Count | 1.0 Count |
8. Warranty Information
For specific warranty details regarding your Mopar Tire Service Kit, please refer to the documentation included with your purchase or contact Mopar customer service directly. Warranty terms may vary based on region and purchase date.
9. Support
If you require further assistance, have questions about the operation of your Mopar Tire Service Kit, or need to order replacement parts (such as sealant bottles), please contact Mopar customer support or visit your authorized Mopar dealer.
For the most up-to-date contact information, please visit the official Mopar website or consult your vehicle's owner's manual.