GJS Gourmet PPC771, Y6D-AF-36
GJS Gourmet 6-Quart Replacement Rubber Gasket Instruction Manual
For Emeril Lagasse Pressure Cooker PPC771 and Pressure AirFryer Y6D-AF-36
Introduction
This manual provides instructions for the proper installation, maintenance, and troubleshooting of your GJS Gourmet 6-Quart Replacement Rubber Gasket. This gasket is designed for compatibility with the Emeril Lagasse Pressure Cooker PPC771 and the Emeril Lagasse Pressure AirFryer Y6D-AF-36. Regular replacement of the sealing gasket is crucial for the safe and efficient operation of your pressure cooking appliance.
Safety Information
- Always ensure the gasket is correctly seated before operating the pressure cooker.
- Inspect the gasket for any signs of wear, cracks, or deformation before each use.
- Replace the gasket every 18-24 months, or sooner if damage is observed, to maintain optimal sealing and safety.
- Use only genuine replacement parts designed for your specific appliance model.
Product Overview
The GJS Gourmet Replacement Rubber Gasket is a critical component for maintaining the pressure seal in compatible 6-quart Emeril Lagasse pressure cookers and air fryers. It is manufactured from durable, food-grade silicone to ensure longevity and safe food preparation.

Figure 1: The GJS Gourmet 6-Quart Replacement Rubber Gasket. This image displays the circular silicone gasket, which is essential for creating an airtight seal in pressure cooking appliances.
Setup and Installation
- Preparation: Ensure your pressure cooker or air fryer is unplugged and completely cooled. Remove the lid from the appliance.
- Remove Old Gasket: Carefully pull the old rubber gasket from the inner rim of the pressure cooker lid. It should detach with moderate effort. Inspect the groove where the gasket sits for any food debris or residue and clean thoroughly.
- Install New Gasket: Position the new GJS Gourmet replacement gasket into the groove on the underside of the lid. Ensure it is seated evenly and securely all the way around the rim. The gasket should fit snugly without any gaps or twists.
- Verification: Once installed, gently run your finger along the gasket to confirm it is flat and fully inserted into the groove. A properly installed gasket is crucial for maintaining pressure.

Figure 2: Diagram illustrating the correct placement of the sealing gasket within the pressure cooker lid's inner rim. The red ring indicates the gasket's position.
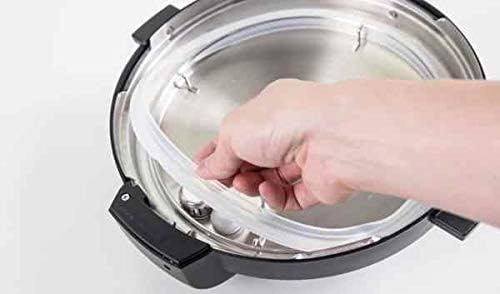
Figure 3: A hand demonstrating the process of inserting the silicone gasket into the designated groove on the underside of a pressure cooker lid.
Operating Considerations
Once the gasket is correctly installed, the pressure cooker or air fryer can be operated according to its original manufacturer's instructions. The gasket's function is to create an airtight seal, allowing pressure to build safely within the appliance. A new gasket may initially feel slightly stiffer than a worn one, but it will conform with use.
Maintenance
- Cleaning: After each use, remove the gasket from the lid and wash it with warm, soapy water. Rinse thoroughly and allow it to air dry completely before re-installing or storing.
- Inspection: Regularly inspect the gasket for any signs of wear, such as cracks, tears, hardening, or permanent deformation.
- Replacement Frequency: It is recommended to replace the rubber gasket every 18 to 24 months, or more frequently if the appliance is used often, or if any signs of damage or reduced sealing performance are observed.
- Storage: Store the gasket flat and away from direct sunlight or extreme temperatures to prevent premature degradation.
Troubleshooting
| Issue | Possible Cause | Solution |
|---|---|---|
| Steam leaking from lid during operation | Gasket improperly seated, worn, or damaged. | Ensure gasket is fully and evenly seated. Inspect for damage and replace if necessary. |
| Lid difficult to close or open | New gasket stiffness, or gasket not properly aligned. | Ensure gasket is correctly installed. Apply a thin layer of cooking oil to the gasket for easier sealing. |
| Pressure not building | Gasket not sealing effectively due to wear or improper installation. | Re-seat the gasket. If issue persists, replace the gasket. |
If troubleshooting steps do not resolve the issue, consult the original appliance manufacturer's manual or contact their customer support.
Specifications
- Brand: GJS Gourmet
- Material: Silicone (Food-Grade)
- Color: Clean (Translucent)
- Shape: Round
- Compatibility: 6-Quart Emeril Lagasse Pressure Cooker PPC771, 6-Quart Emeril Lagasse Pressure AirFryer Y6D-AF-36, 6-Quart Emeril Lagasse Pressure AirFryer Plus Y6D-AF-68B
- Item Weight: Approximately 2.39 ounces
- Package Dimensions: Approximately 8.7 x 5.71 x 1.81 inches
- UPC: 727040670337
Customer Support
For further assistance or inquiries regarding this product, please visit the GJS Gourmet Store on Amazon.
Related Documents - PPC771, Y6D-AF-36
 |
Emeril Lagasse Pressure AirFryer Manual: Cooking Guide for 6 & 8 Quart Models (Y6D-AF-36, Y8D-AF-36) Comprehensive owner's manual for the Emeril Lagasse Pressure AirFryer, covering operation, safety, features, and cooking instructions for both 6-quart (Y6D-AF-36) and 8-quart (Y8D-AF-36) models. Learn how to pressure cook, air fry, sous vide, make yogurt, and can food with detailed guides and cooking charts. |
 |
Emeril Lagasse Pressure AirFryer Duet Y8D-AF-36 Owner's Manual Comprehensive owner's manual for the Emeril Lagasse Pressure AirFryer Duet (Model Y8D-AF-36, 8 qt.), covering safety instructions, parts, features, operating procedures for pressure cooking, air frying, sous vide, yogurt making, canning, troubleshooting, and care. |
 |
Emeril Lagasse Pressure AirFryer Duet Owner's Manual Comprehensive owner's manual for the Emeril Lagasse Pressure AirFryer Duet, detailing safety precautions, parts, features, operating instructions for pressure cooking, air frying, sous vide, yogurt making, canning, troubleshooting, and care. |
 |
Emeril Lagasse Pressure Cooker Plus Owner's Manual This owner's manual provides essential safety instructions, operating procedures, parts and accessories information, troubleshooting tips, and canning guidelines for the Emeril Lagasse Pressure Cooker Plus models PPC771, PPC772, and PPC772P. |
 |
Emeril Lagasse Pressure Cooker Plus Owner's Manual | Models PPC771, PPC772, PPC772P User guide for the Emeril Lagasse Pressure Cooker Plus, covering safety instructions, operating procedures, features, troubleshooting, and canning guides for models PPC771, PPC772, and PPC772P. |
 |
Emeril Lagasse AirFryer Quick Start Guide A quick start guide for the Emeril Lagasse AirFryer, detailing the 5 essential steps for its initial use, including unpacking, cleaning, loading, operating, and detaching the basket. |