ProfiCare PC-BSR 3042
ProfiCare PC-BSR 3042 Robot Vacuum Cleaner Instruction Manual
Model: PC-BSR 3042
1. Introduction
Thank you for choosing the ProfiCare PC-BSR 3042 Robot Vacuum Cleaner. This manual provides essential information for the safe and efficient operation, maintenance, and troubleshooting of your new appliance. Please read these instructions thoroughly before first use and keep them for future reference.
The ProfiCare PC-BSR 3042 is designed to independently clean various hard floor surfaces and short-pile carpets, effectively removing dirt, dust, crumbs, and pet hair. Its extra-flat design allows for cleaning under furniture, and its quiet operation ensures minimal disturbance.
2. Safety Instructions
Always observe the following safety precautions to prevent injury or damage to the appliance:
- Read all instructions carefully before operating the appliance.
- This appliance is intended for indoor household use only.
- Do not allow children to play with the appliance. Supervise children and individuals with reduced physical, sensory, or mental capabilities when the appliance is in use.
- Do not immerse the appliance, power adapter, or remote control in water or other liquids.
- Use only the original power adapter supplied with the appliance.
- Do not use the appliance to pick up flammable or combustible materials, hot ashes, or sharp objects.
- Ensure the dustbin and filter are correctly installed before operation.
- Keep hair, loose clothing, fingers, and all parts of the body away from openings and moving parts.
- The appliance features automatic stair detection. However, always exercise caution near stairs or elevated surfaces.
- If the appliance is damaged, do not operate it. Contact customer support for assistance.
3. Package Contents
Please check that all items are present and in good condition:
- ProfiCare PC-BSR 3042 Robot Vacuum Cleaner
- Power Adapter
- Remote Control
- Side Brushes (2 pre-installed, 2 extra)
- HEPA Filter (pre-installed)
- Cleaning Brush for Filter
- Instruction Manual
4. Product Overview
Familiarize yourself with the components of your robot vacuum cleaner.
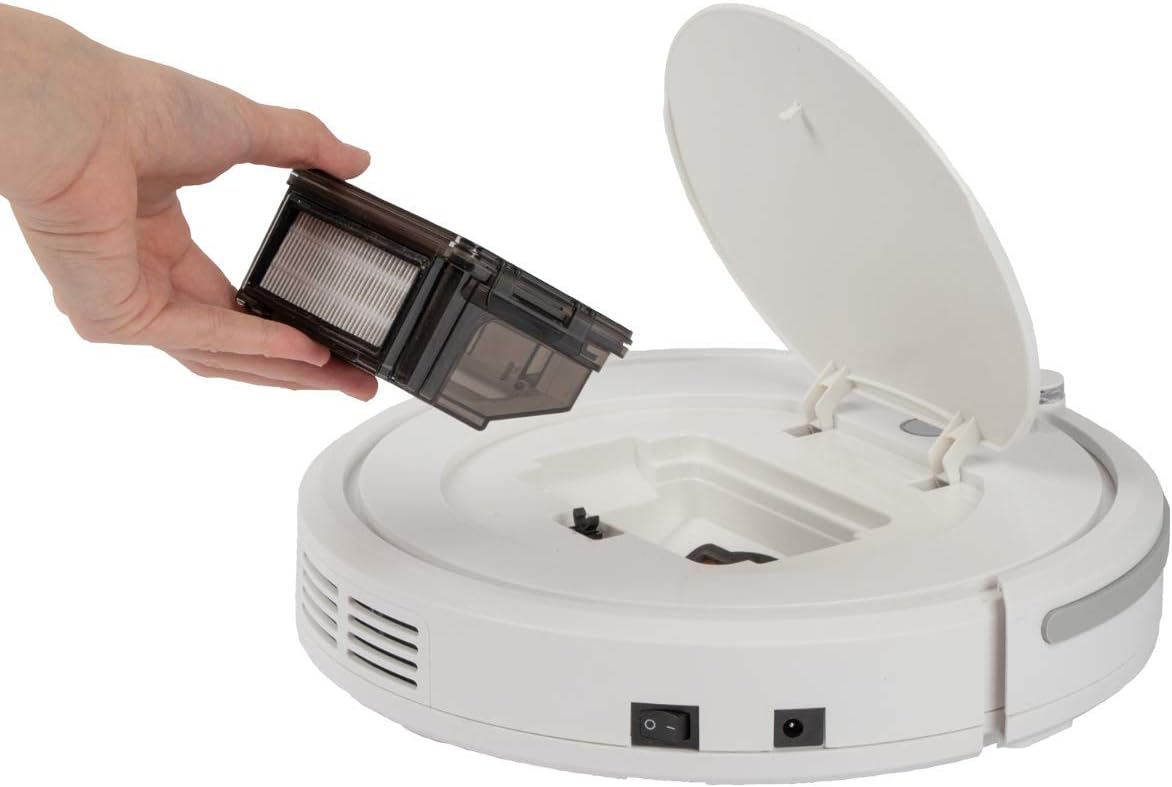
Figure 4.1: Top view of the robot vacuum cleaner, showing the main power button, HEPA filter indicator, and remote sensor area.

Figure 4.2: The multi-function remote control for operating the robot vacuum cleaner.
Main Unit Components:
- Power Button: Located on the top surface for manual start/stop.
- Dustbin Compartment: Houses the removable dustbin and HEPA filter.
- Side Brushes: Two rotating brushes for sweeping debris into the vacuum's path.
- Charging Port: For connecting the power adapter.
- Infrared Sensors: For obstacle detection and stair avoidance.
- Drive Wheels: Rubberized and spring-mounted for smooth movement across various surfaces.
Remote Control Functions:
- Start/Pause: Initiates or pauses cleaning.
- Directional Arrows: Manually guides the robot.
- FOCUS (Spot Cleaning): Directs the robot to clean a specific area intensively.
- RANDOM (Random Cleaning): Robot cleans in a random pattern.
- AUTO (Systematic Cleaning): Robot cleans in a systematic pattern.
- RESPOND: Locates the robot.
5. Setup
5.1. Charging the Battery
- Connect the power adapter to the charging port on the side of the robot vacuum cleaner.
- Plug the power adapter into a wall outlet.
- Allow the robot to charge for approximately 5 hours before its first use. The charging indicator light will show the charging status.
5.2. Installing Side Brushes
The robot comes with two side brushes pre-installed. If replacement is needed:
- Turn the robot vacuum cleaner upside down.
- Align the new side brush with the brush post and press down until it clicks into place. Ensure the brushes are securely attached.
5.3. Preparing the Cleaning Area
- Remove any large obstacles, loose cables, or delicate items from the floor.
- Ensure doors to areas you want cleaned are open, and doors to areas you want to avoid are closed.
6. Operating the Robot Vacuum Cleaner
6.1. Starting a Cleaning Cycle
You can start the robot in two ways:
- Manual Start: Press the power button on the top of the robot.
- Remote Control Start: Press the "Start/Pause" button on the remote control.
The robot will begin cleaning in its default mode (Systematic or Random, depending on the last setting).
6.2. Selecting Cleaning Modes
Use the remote control to select a specific cleaning program:
- AUTO (Systematic Cleaning): The robot cleans in a structured, back-and-forth pattern to cover the entire area efficiently.
- RANDOM (Random Cleaning): The robot navigates randomly, changing direction upon encountering obstacles.
- FOCUS (Spot Cleaning): The robot cleans a concentrated area in a spiral pattern, ideal for heavily soiled spots.
6.3. Pausing and Resuming
Press the "Start/Pause" button on the robot or remote control to pause the cleaning cycle. Press it again to resume.
6.4. Stopping the Robot
To stop the robot completely, press and hold the power button on the robot until it turns off, or press the "Start/Pause" button on the remote and then the power button on the robot.
6.5. Timer Function
The remote control includes a timer function to schedule cleaning times. Refer to the remote control section in this manual for detailed instructions on setting the timer.
6.6. Stair Detection
The robot is equipped with infrared sensors that automatically detect stairs and prevent it from falling. Ensure these sensors are kept clean for optimal performance.
7. Maintenance
Regular maintenance ensures optimal performance and extends the lifespan of your robot vacuum cleaner.
7.1. Emptying and Cleaning the Dustbin

Figure 7.1: Removing the dustbin for emptying and cleaning.
- Turn off the robot vacuum cleaner.
- Open the top cover of the robot.
- Grasp the handle of the dustbin and lift it out.
- Open the dustbin and empty its contents into a waste bin.
- Rinse the dustbin with water if necessary, ensuring it is completely dry before reinstallation.
7.2. Cleaning the HEPA Filter
The HEPA filter is located inside the dustbin. Clean it regularly to maintain suction power.
- Remove the dustbin as described above.
- Carefully remove the HEPA filter from the dustbin.
- Use the provided cleaning brush to remove dust and debris from the filter. Do not wash the HEPA filter with water unless specified by the manufacturer.
- Reinsert the clean HEPA filter into the dustbin and then place the dustbin back into the robot.
7.3. Cleaning Side Brushes
Periodically check and clean the side brushes for tangled hair or debris.
- Turn off the robot and flip it over.
- Gently pull the side brushes upwards to remove them.
- Remove any hair or debris wrapped around the brushes or brush posts.
- Reattach the brushes by pressing them down onto their posts until they click.
7.4. Cleaning Sensors and Wheels
Wipe the infrared sensors (located around the bumper and underneath the robot) and the drive wheels with a clean, dry cloth to ensure proper navigation and movement.
8. Troubleshooting
If you encounter issues with your robot vacuum cleaner, refer to the following table for common problems and solutions.
| Problem | Possible Cause | Solution |
|---|---|---|
| Robot does not turn on. | Battery is low or depleted. | Charge the robot for 5 hours. |
| Robot stops unexpectedly. | Battery is low; Obstacle detected; Wheels/brushes jammed. | Charge the robot; Remove obstacles; Clean wheels and brushes. |
| Poor cleaning performance. | Dustbin full; Filter clogged; Side brushes worn or dirty. | Empty dustbin; Clean/replace filter; Clean/replace side brushes. |
| Robot does not charge. | Power adapter not connected; Faulty adapter/port. | Ensure secure connection; Try a different outlet; Contact support. |
| Robot falls down stairs. | Stair sensors are dirty or blocked. | Clean the stair sensors thoroughly. |
9. Specifications
Technical details for the ProfiCare PC-BSR 3042 Robot Vacuum Cleaner:

Figure 9.1: Dimensions of the robot vacuum cleaner.
| Feature | Detail |
|---|---|
| Model Number | 330420 |
| Battery Type | Ni-MH |
| Battery Voltage | 14.4 V |
| Battery Capacity | 1500 mAh |
| Battery Run Time | Up to 90 minutes |
| Battery Charge Time | Approx. 5 hours |
| Noise Level | Approx. 61 dB |
| Dimensions (Diameter x Height) | 290 mm x 75 mm |
| Weight | 1.9 kg |
| Filter Type | HEPA Filter |
| Cleaning Programs | 3 (Random, Systematic, Spot) |
| Special Features | Automatic stair detection, Mechanical furniture barrier, Remote control, Timer function |
| Surface Recommendation | Hard floors, short-pile carpets |
10. Warranty and Support
10.1. Manufacturer's Warranty
This product is covered by a manufacturer's warranty. Please refer to the warranty card included in your package or contact ProfiCare customer service for specific terms and conditions. Spare parts availability is typically 2 years from the date of purchase.
10.2. Customer Support
For technical assistance, troubleshooting beyond this manual, or warranty claims, please contact your retailer or the ProfiCare customer support team. Contact information can usually be found on the product packaging or the official ProfiCare website.
Ask a question about this manual
Ask about setup, troubleshooting, compatibility, parts, safety, or missing instructions. Manuals+ will review the question and use this page’s manual context to help answer it.