PHYSEN 1-Black
PHYSEN Wireless Driveway Motion Detector Alarm Kit (Model 1-Black) User Manual
Your guide to installation, operation, and maintenance.
1. Introduction
The PHYSEN Wireless Driveway Motion Detector Alarm Kit provides a reliable solution for monitoring your property. This system includes a wireless motion sensor and a plug-in receiver, designed to alert you to movement in your driveway, garden, or other outdoor areas. With adjustable sensitivity, multiple chime options, and a wide operating range, it enhances your home security and awareness.
2. Package Contents
Please check the box for the following items:
- 1 x Wireless Motion Sensor
- 1 x Plug-in Alarm Receiver
- Mounting Screws and Anchors
- User Manual
Note: 4 x AA batteries for the motion sensor are not included and must be purchased separately.
3. Product Overview
3.1. Components
The system consists of two main components: the wireless motion sensor and the plug-in alarm receiver. The sensor detects movement, while the receiver provides audible and visual alerts.

Figure 1: Wireless Motion Sensor and Plug-in Alarm Receiver Components
3.2. Key Features
- Wireless Range: Up to 200 meters (650 feet) in open areas.
- Adjustable Sensitivity: 3 levels (3.4m/10ft, 5.8m/20ft, 9.1m/30ft) to minimize false alarms.
- Chime Options: 58 selectable melodies.
- Volume Levels: 5 adjustable levels (0-110 dB), including mute mode.
- Visual Alert: LED flash on receiver.
- Expandable System: Supports additional sensors and receivers.
- Memory Function: Retains settings after power loss.
- Weatherproof Sensor: IP55 rated for outdoor use, operating from -4°F to 140°F (-20°C to 60°C).

Figure 2: Sensor IP55 Rating and Temperature Range
4. Setup and Installation
4.1. Sensor Battery Installation
The motion sensor requires 4 AA batteries (not included).
- Open the back cover of the motion sensor using a small screwdriver.
- Insert 4 AA batteries, ensuring correct polarity (+/-).
- Locate the main power switch inside the battery compartment and slide it to the 'ON' position (usually to the right).
- Close the back cover securely.
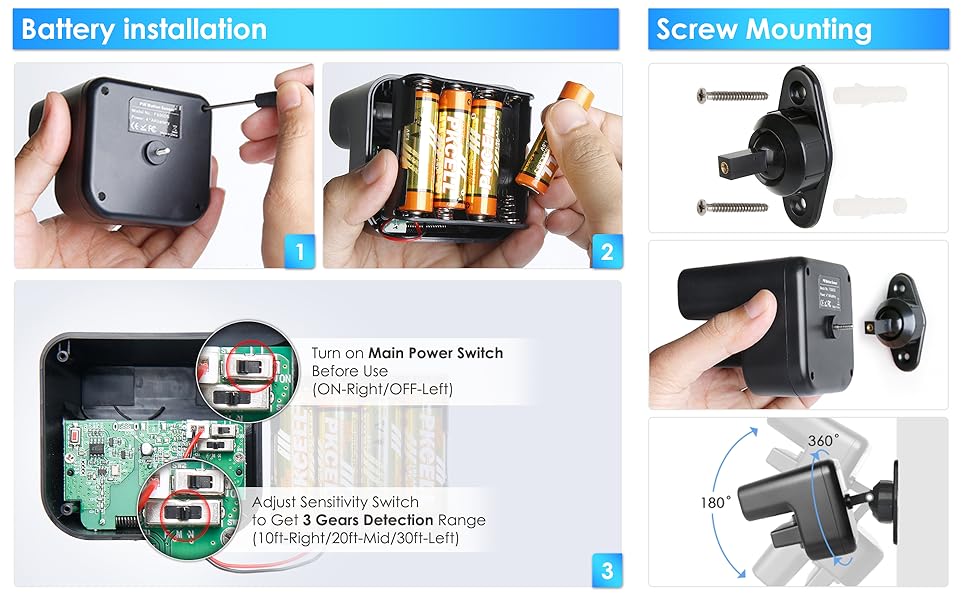
Figure 3: Battery Installation and Internal Switches
4.2. Sensor Mounting
Mount the sensor in your desired outdoor location, such as a driveway, walking path, or front door area. The sensor should be positioned to detect heat movements (e.g., people, large animals, vehicles).
- Choose a mounting location that provides a clear line of sight to the detection area and is protected from direct sunlight if possible.
- Use the provided screws and anchors to securely attach the rotatable mounting base to a wall or post.
- Attach the motion sensor to the mounting base.
- Adjust the sensor's angle using the rotatable ball-and-socket joint to cover the desired detection zone. The detection angle is 60° horizontally and 30° vertically.
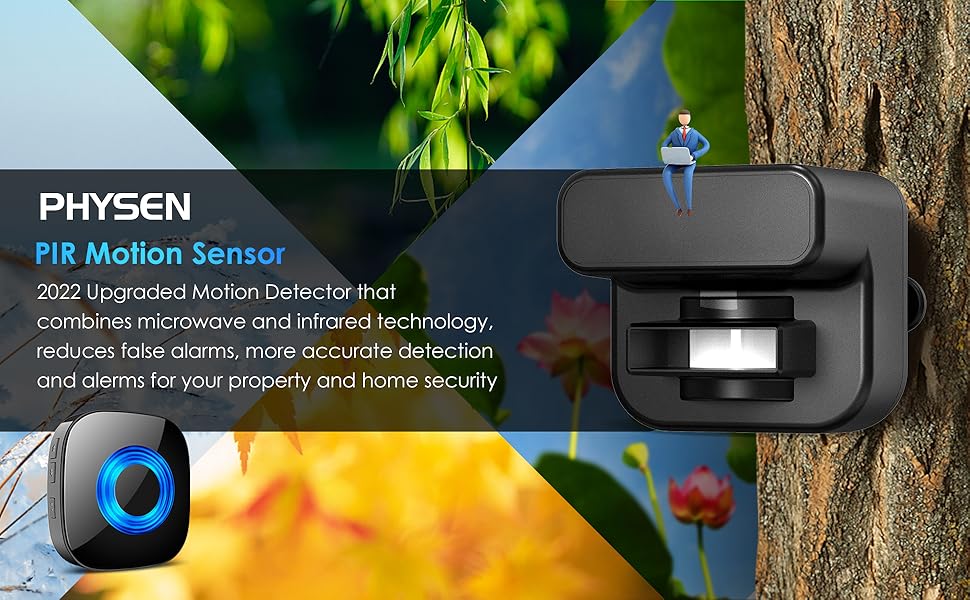
Figure 4: Sensor Placement and Detection Range
4.3. Receiver Placement
Plug the alarm receiver into a standard electrical outlet indoors, within the wireless range of the motion sensor. Ensure it is placed where the chime can be easily heard.

Figure 5: Plug-in Alarm Receiver Features
5. Operating Instructions
5.1. Pairing Sensor and Receiver
If the sensor and receiver are not already paired, or if you wish to pair additional sensors/receivers:
- Plug the receiver into a power socket.
- On the receiver, long-press the 'Volume' button for 5-7 seconds until you hear a 'Ding' sound, indicating it has entered pairing mode. The LED indicator will flash.
- Within 5 seconds of entering pairing mode, wave your hand in front of the motion sensor to trigger it. The sensor will send a signal to the receiver.
- The receiver will play the selected chime, confirming successful pairing.

Figure 6: Pairing and Chime Selection Steps
5.2. Adjusting Sensitivity
The motion sensor has a 3-level adjustable sensitivity switch located inside the battery compartment. This allows you to set the detection range to prevent false alarms in different environments.
- 10ft (3.4m): Low sensitivity, suitable for narrow entrances or to avoid detecting small animals.
- 20ft (5.8m): Medium sensitivity, standard detection range.
- 30ft (9.1m): High sensitivity, for wider areas.
To adjust, open the sensor's back cover and slide the sensitivity switch to your desired setting (Left for 10ft, Mid for 20ft, Right for 30ft).
5.3. Changing Chimes and Volume
The receiver features 'Up' and 'Down' buttons for selecting chimes and a 'Volume' button for adjusting sound levels.
- Chime Selection: Press the 'Up' or 'Down' button on the receiver to cycle through the 58 available melodies.
- Volume Adjustment: Press the 'Volume' button repeatedly to cycle through 5 volume levels (0-110 dB).

Figure 7: Receiver Volume and Chime Controls
5.4. Mute Mode
To activate mute mode, cycle through the volume levels until the sound is off (0 dB). In this mode, the receiver's LED will still flash when triggered, providing a visual alert without sound.
6. Maintenance
- Cleaning: Wipe the sensor and receiver with a soft, dry cloth. Do not use abrasive cleaners or solvents.
- Battery Replacement: Replace the 4 AA batteries in the motion sensor when the performance degrades or if the sensor stops transmitting. Always use fresh batteries of the same type.
- Environmental Considerations: While the sensor is weatherproof, avoid placing it in locations where it is constantly submerged in water or exposed to extreme physical impact.
7. Troubleshooting
| Problem | Possible Cause | Solution |
|---|---|---|
| Sensor not triggering / Receiver not alarming | 1. Sensor batteries low or dead. 2. Main power switch inside sensor is OFF. 3. Sensor and receiver are not paired. 4. Sensor is out of range. 5. Obstruction blocking sensor's view. | 1. Replace batteries. 2. Turn the main power switch ON. 3. Re-pair the sensor and receiver (see Section 5.1). 4. Move receiver closer to sensor or reposition sensor. 5. Clear any obstructions. |
| False alarms | 1. Sensitivity too high. 2. Sensor detecting small animals or moving foliage. 3. Sensor exposed to direct sunlight or heat sources. | 1. Adjust sensitivity to a lower level (see Section 5.2). 2. Reposition sensor to avoid detecting unwanted movement. 3. Relocate sensor to a shaded area or away from heat sources. |
| Receiver not responding to button presses | Receiver is unplugged or power outage. | Ensure receiver is securely plugged into a working outlet. |
If you encounter persistent issues, please refer to the 'Reliable After-Sales Service' information in Section 9 for further assistance.
8. Specifications
| Feature | Detail |
|---|---|
| Product Dimensions (L x W x H) | 15 x 10 x 7.5 cm (5.9 x 3.9 x 3 inches) |
| Weight | 260 grams (0.57 lbs) |
| Manufacturer | PHYSEN |
| Item Model Number | 1-Black |
| Brand | PHYSEN |
| Color | Black |
| Power Source (Sensor) | 4 x AA Batteries (not included) |
| Power Source (Receiver) | AC Plug-in |
| Maximum Wireless Range | 200 meters (650 feet) in open area |
| PIR Detection Range | Adjustable: 3.4m (10ft), 5.8m (20ft), 9.1m (30ft) |
| Detection Angle (Horizontal) | 60 degrees |
| Detection Angle (Vertical) | 30 degrees |
| Volume Levels | 5 (0-110 dB) |
| Chimes | 58 |
| Operating Temperature | -4°F to 140°F (-20°C to 60°C) |
| Waterproof Rating (Sensor) | IP55 |
| Recommended Uses | Entry monitoring, light activation, motion alarms, energy management |
9. Warranty and Support
PHYSEN offers a 30-day free return policy and a 2-year warranty for this product. Customer support is available 24/7. If you experience any issues that cannot be resolved using the troubleshooting guide, please contact PHYSEN customer service for assistance or replacement.
Before contacting support, ensure you have followed the pairing and setup instructions carefully, including checking the internal main power switch and battery installation.
10. Safety Information
- Do not attempt to disassemble or repair the device yourself. This may void the warranty and cause damage.
- Keep the device away from extreme temperatures, humidity, and corrosive substances.
- Dispose of old batteries responsibly according to local regulations.
- Ensure the receiver is plugged into a suitable power outlet.
- Keep out of reach of children.
Ask a question about this manual
Ask about setup, troubleshooting, compatibility, parts, safety, or missing instructions. Manuals+ will review the question and use this page’s manual context to help answer it.