1. Introduction
Thank you for choosing the Ibergrif M22109 3-Way Water Filter Tap. This manual provides essential information for the safe installation, operation, and maintenance of your new kitchen tap. Please read these instructions thoroughly before installation and retain them for future reference.
2. Safety Information
- Always turn off the main water supply before beginning any installation or maintenance work.
- If you are unsure about any part of the installation process, consult a qualified plumber.
- Ensure all connections are secure to prevent leaks.
- Do not use abrasive cleaners or harsh chemicals on the tap's finish, as this may cause damage.
- This product is designed for domestic kitchen use.
3. Product Overview and Features
The Ibergrif M22109 is a versatile 3-way kitchen tap designed to deliver hot, cold, and filtered water from a single unit, optimizing space and convenience in your kitchen.
Key Features:
- 3-Way Functionality: Provides standard hot and cold water, plus a dedicated filtered water outlet.
- Energy Saving Cold Start System: When the main handle is in the central position, only cold water flows, preventing unnecessary activation of your water heater.
- 360° Swivel Spout: Offers flexibility and ease of use for various sink configurations.
- Two Independent Outlets: Separate internal channels for filtered water prevent mixing with tap water.
- Durable Construction: Made from solid brass with a chrome finish for longevity and corrosion resistance.
- Splash-Free Aerator: Reduces water waste while maintaining adequate pressure.

Figure 3.1: Front view of the Ibergrif M22109 3-Way Water Filter Tap. This image displays the tap's chrome finish, the main swivel spout, and the two control handles for hot/cold and filtered water.

Figure 3.2: Diagram illustrating the separate water flow paths within the 3-way tap. Red indicates hot water, blue indicates cold water, and light blue indicates filtered water, connecting to an external filter system.

Figure 3.3: Illustration explaining the Kelogic cold start system. When the handle is centered, only cold water flows, saving energy by not engaging the water heater.

Figure 3.4: Dimensional drawing of the tap, showing a total height of 12.6 inches (320mm) and a spout height of 11 inches (281mm). The spout reach is 10 inches (255mm).
4. Installation Guide
Before starting, ensure you have all the components listed in the "Included Components" section and the necessary tools (e.g., adjustable wrench, screwdriver, PTFE tape). Turn off the main water supply before proceeding.
Included Components:
- 1 x Filtered Kitchen Tap
- 1 x Installation kits (gaskets, nuts, mounting hardware)
- 2 x Hose pipes (G3/8" for hot and cold water)
- 1 x Filtered water connection hose (1/4" quick connect)

Figure 4.1: All components included in the package: the tap body, mounting hardware, hot and cold water hoses, and the filtered water connection.
Installation Steps:
- Prepare the Sink Hole: Ensure your sink has a single hole with a diameter of approximately 35mm for the tap base.
- Attach Hoses to Tap Body: Carefully screw the hot, cold, and filtered water hoses into their respective ports on the tap's base. Ensure the rubber seals are correctly seated.
- Insert Tap into Sink Hole: Place the tap body through the sink hole. Ensure the base gasket is positioned correctly between the tap and the sink surface.
- Secure the Tap: From underneath the sink, slide the rubber washer, metal washer, and then the fixing nut onto the threaded shaft of the tap. Tighten the fixing nut securely using the provided tool or an appropriate wrench.
- Connect Water Supplies: Connect the hot and cold water hoses to your existing hot and cold water supply lines. Use PTFE tape on threaded connections to ensure a watertight seal.
- Connect Filtered Water: Connect the filtered water hose (typically 1/4" quick connect) to your under-sink water filtration system.
- Test for Leaks: Slowly turn on the main water supply and check all connections for leaks. Operate both the hot/cold and filtered water functions to ensure proper flow and no drips.

Figure 4.2: Visual guide for installation. Step 1 shows attaching hoses, Step 2 shows inserting the tap into a 35mm hole, Step 3 shows securing the tap from underneath, and Step 4 shows connecting the hot (H), cold (C), and filtered water lines.

Figure 4.3: Detailed view of the tap's underside, showing the threaded shaft and connection points for the water hoses.

Figure 4.4: Close-up of the mounting thread and securing mechanism, including the brass nut and screws for stable installation.
5. Operation
The Ibergrif M22109 tap features two distinct handles for controlling water flow.
- Hot and Cold Water: The main lever handle (typically on the right) controls the flow and temperature of standard tap water.
- Move the handle forward to increase flow.
- Move the handle to the right for cold water.
- Move the handle to the left for hot water.
- The "cold start" feature ensures that when the handle is in the central position, only cold water is dispensed, saving energy.
- Filtered Water: The smaller handle (typically on the left) controls the flow of filtered water.
- Push the handle forward or turn it to activate the filtered water flow.
- This water is delivered through a separate internal channel and aerator.
- Swivel Spout: The tap's spout can swivel 360 degrees, allowing for flexible positioning over single or double sinks.

Figure 5.1: The tap's main handle indicating a 90-degree range of motion for temperature control, and the 360-degree swivel capability of the spout.
6. Maintenance
Regular cleaning and maintenance will ensure the longevity and optimal performance of your tap.
- Cleaning the Finish:
- Clean the chrome finish regularly with a soft cloth and mild soap and water.
- Rinse thoroughly and dry with a soft cloth to prevent water spots.
- Avoid abrasive cleaners, scouring pads, or harsh chemicals (e.g., ammonia-based cleaners, bleach) as these can damage the finish.
- Cleaning the Aerators:
- Over time, mineral deposits can build up in the aerators, reducing water flow.
- Unscrew the aerator caps at the end of the spout.
- Rinse the mesh screens under running water or soak them in a vinegar solution to remove mineral deposits.
- Reassemble the aerators securely.
- Checking for Leaks: Periodically inspect all connections under the sink for any signs of leaks. Tighten connections if necessary, but do not overtighten.
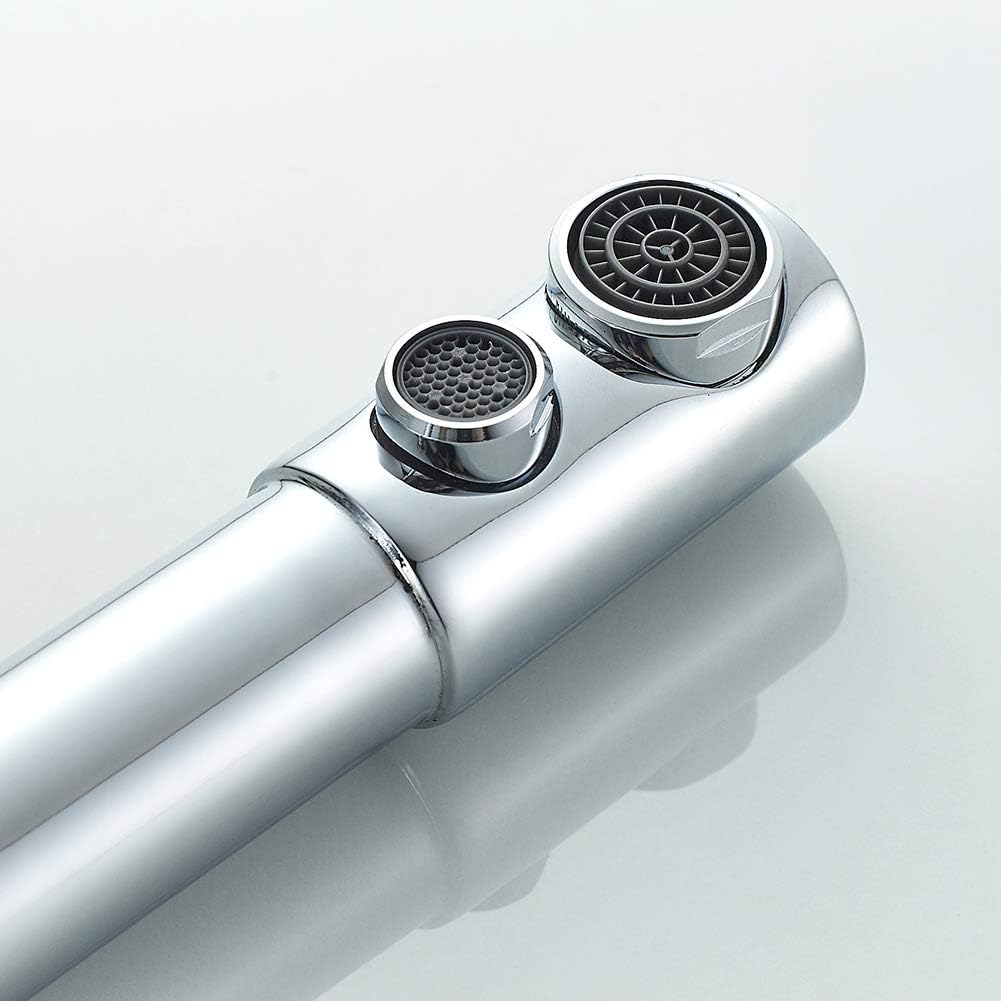
Figure 6.1: Close-up view of the two aerators at the end of the spout, one for standard tap water and one for filtered water. These can be removed for cleaning.
7. Troubleshooting
| Problem | Possible Cause | Solution |
|---|---|---|
| Low Water Flow | Clogged aerator, partially closed stopcock, low water pressure in the household. | Clean the aerators (refer to Maintenance section). Ensure stopcocks under the sink are fully open. Check household water pressure. |
| Leaking from Tap Base | Loose mounting nut, damaged gasket. | Ensure the mounting nut under the sink is securely tightened. Check if the base gasket is properly seated and undamaged. |
| Leaking from Hose Connections | Loose connections, missing or damaged washers, insufficient PTFE tape. | Tighten hose connections. Ensure all washers are present and in good condition. Apply PTFE tape to threaded connections if necessary. |
| No Filtered Water Flow | Filter system off, clogged filter, kinked filtered water hose. | Check your under-sink filter system is operational. Replace the filter if it's due. Inspect the filtered water hose for kinks. |
8. Specifications
| Feature | Detail |
|---|---|
| Model Number | M22109 |
| Brand | Ibergrif |
| Material | Brass |
| Finish | Chrome |
| Colour | Silver |
| Installation Method | Single Hole, Deck Mount |
| Number of Handles | 2 |
| Spout Height | 11 Inches (281mm) |
| Product Dimensions | 42 x 21 x 5 cm (approx.) |
| Item Weight | 2 kg |
| Hose Connection | G3/8" (Hot/Cold), 1/4" (Filtered) |
| Special Feature | Swiveling Spout, Cold Start System |
9. Warranty and Support
Ibergrif products are manufactured to high-quality standards. For specific warranty details, please refer to the warranty card included with your purchase or visit the official Ibergrif website. If you encounter any issues or require technical assistance, please contact Ibergrif customer support.
Manufacturer: Ibergrif Griferias S.L
For further assistance, please visit the Ibergrif Store on Amazon.


