Introduction
Thank you for choosing the Globe Electric Ultra Slim 4-inch LED Recessed Light. This manual provides detailed instructions for the safe installation, operation, and maintenance of your new lighting fixture. Please read all instructions carefully before beginning installation and retain this manual for future reference.

Image: The complete Globe Electric Ultra Slim 4-inch LED Recessed Light kit, showing the light fixture, integrated cables, junction box, and an inline dimmer switch.
Important Safety Information
- Always turn off the power at the circuit breaker before beginning installation.
- Consult a qualified electrician if you are unsure about the installation process.
- Ensure all electrical connections are made in accordance with local codes and ordinances.
- Do not install this fixture with wet hands or while standing on a wet surface.
- This product is designed for indoor use. While water resistant, it is not intended for direct water exposure.
- Do not attempt to modify the fixture or its components.
Package Contents
Verify that all components are present before beginning installation:
- Ultra Slim 4-inch LED Recessed Light Fixture
- Remote Junction Box with integrated LED connect cable
- Quick Connectors (pre-installed in junction box)
- Instruction Manual (this document)
Setup and Installation
Follow these steps for proper installation of your recessed light fixture:
Step 1: Prepare the Installation Area
- Turn off power at the circuit breaker.
- Determine the desired location for the light fixture. Ensure there is sufficient clearance above the ceiling for the junction box and fixture.
- Using the provided template (if included, or measure the fixture diameter), cut a 4-inch (10.16 cm) diameter hole in the ceiling. Refer to the dimensions image below for precise measurements.
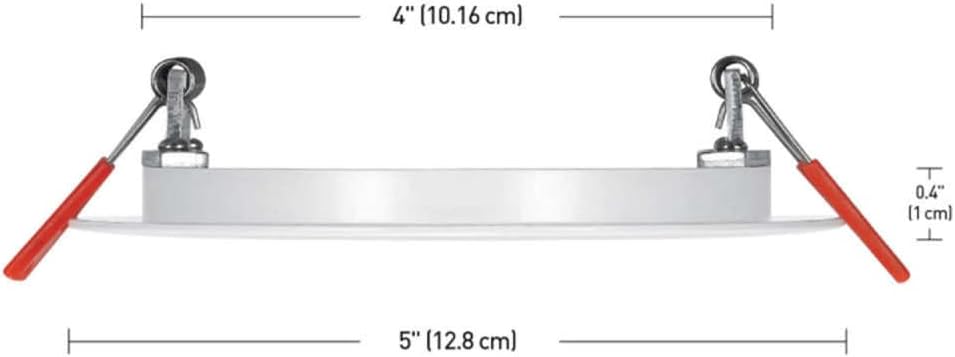
Image: Detailed dimensions of the recessed light fixture, indicating a 4-inch (10.16 cm) diameter and a slim profile of 0.4 inches (1 cm) in thickness.
Step 2: Electrical Connections
- Open the remote junction box.
- Connect the household electrical wires to the quick connectors inside the junction box. Typically, this involves connecting the black wire to black, white wire to white, and ground wire to ground.
- Ensure all connections are secure. The "PUSH & CLICK" quick connectors allow for easy and reliable installation.
- Close the junction box cover.

Image: The low-profile junction box with its cover open, showing the integrated LED connect cable and the "PUSH & CLICK" quick connectors for household wiring.
Step 3: Install the Light Fixture
- Connect the integrated LED cable from the junction box to the light fixture. Ensure the connection is firm.
- Push the spring clips on the side of the recessed light fixture upwards.
- Insert the light fixture into the prepared hole in the ceiling. The spring clips will automatically secure the fixture in place.
- Position the junction box above the ceiling, ensuring it is not pinched or damaged.
Operating Instructions
Once installed, restore power at the circuit breaker. Your Globe Electric Ultra Slim LED Recessed Light is now ready for use.
- Power On/Off: Control the light using your wall switch.
- Dimming: This fixture is compatible with most standard LED dimmers. Adjust the dimmer switch to achieve your desired brightness level. The product supports color temperature adjustment via a compatible dimmer, allowing you to select from various white light settings (e.g., warm white to daylight).

Image: An example installation of multiple recessed lights in a modern kitchen, demonstrating their aesthetic integration into the ceiling.
Maintenance
The Globe Electric Ultra Slim LED Recessed Light requires minimal maintenance.
- Cleaning: Ensure power is off before cleaning. Wipe the fixture with a soft, dry, or slightly damp cloth. Do not use abrasive cleaners or solvents.
- LED Longevity: The integrated LED is designed for long life and does not require replacement.
Troubleshooting
| Problem | Possible Cause | Solution |
|---|---|---|
| Light does not turn on. | No power to the fixture. Loose wiring connection. Faulty wall switch. | Check circuit breaker. Verify all wire connections are secure (ensure power is off first). Test the wall switch. |
| Light flickers. | Incompatible dimmer switch. Loose wiring. | Ensure your dimmer is compatible with LED fixtures. Check wiring connections (ensure power is off first). |
| Light is dim. | Dimmer setting is too low. | Adjust the dimmer to a higher setting. |
Specifications
| Model Number | 91497 |
| Brand | Globe Electric |
| Fixture Type | Ultra Slim LED Recessed Light / Canless Downlight |
| Size | 4 inch (10.16 cm) |
| Wattage | 9 watts (60 watts incandescent equivalent) |
| Brightness | 540 Lumens |
| Light Source | Integrated LED |
| Color Temperature | Adjustable (via compatible dimmer) |
| Material | Plastic / Metal |
| Installation Type | Flush Mount, Recessed |
| Indoor/Outdoor Usage | Indoor |
| Water Resistance Level | Water Resistant |
| Item Weight | 1.1 Pounds (approx. 0.5 kg) |
| UPC | 058219914977 |
Warranty Information
This Globe Electric product comes with a manufacturer's warranty. For specific details regarding the warranty period and coverage, please refer to the documentation included with your purchase or visit the official Globe Electric website. Keep your proof of purchase for warranty claims.
Customer Support
If you have any questions, require technical assistance, or need to report an issue with your Globe Electric Ultra Slim LED Recessed Light, please contact Globe Electric customer support.
- Website: Visit the official Globe Electric website for FAQs, support resources, and contact information.
- Contact: Refer to the product packaging or the Globe Electric website for phone numbers or email addresses for customer service.