
Product Overview
Thank you for choosing the Nano RS RS110 Adjustable Counterweight Monitor Stand. This stand is designed to provide a stable and ergonomic solution for your monitor, featuring adjustable height, swivel, tilt, and rotation capabilities. It also includes integrated USB and audio ports for enhanced convenience. Please read this manual carefully before installation and use to ensure proper setup and operation.

The Nano RS RS110 monitor stand in a typical desk setup, showcasing its design and functionality with a mounted monitor and peripherals.
Setup and Installation
Package Contents
Before beginning assembly, ensure all parts are present and undamaged. If any parts are missing or damaged, please contact customer support.
- Monitor Stand Base and Column
- Monitor Mounting Plate (VESA compatible)
- Support Legs (x4)
- Assembly Screws and Washers
- Hex Key / Wrench
- USB 3.0 Cable
Assembly Instructions
Follow these steps to assemble your Nano RS RS110 monitor stand:
- Attach the Support Legs: Securely attach the four support legs to the main stand column using the provided screws. Ensure they are firmly tightened for stability.
- Install the VESA Mounting Plate: Attach the VESA mounting plate to the top of the stand column. Use the provided screws and screwdriver to secure it.
- Connect the USB Cable: Connect the included USB 3.0 cable from the stand's base to your computer's USB port to enable the integrated USB and audio connections.
- Mount Your Monitor: Carefully align your VESA-compatible monitor with the mounting plate. Use the appropriate screws to secure the monitor to the plate. Ensure the monitor is centered and stable.
- Adjust Counterweight (if necessary): The stand features an adjustable counterweight. If your monitor is heavier or lighter, you may need to adjust the tension using the provided hex key to ensure smooth height adjustments. Turn the adjustment screw clockwise to increase tension for heavier monitors, and counter-clockwise to decrease tension for lighter monitors.
Official assembly video for the Nano RS RS110 monitor stand, demonstrating step-by-step installation.

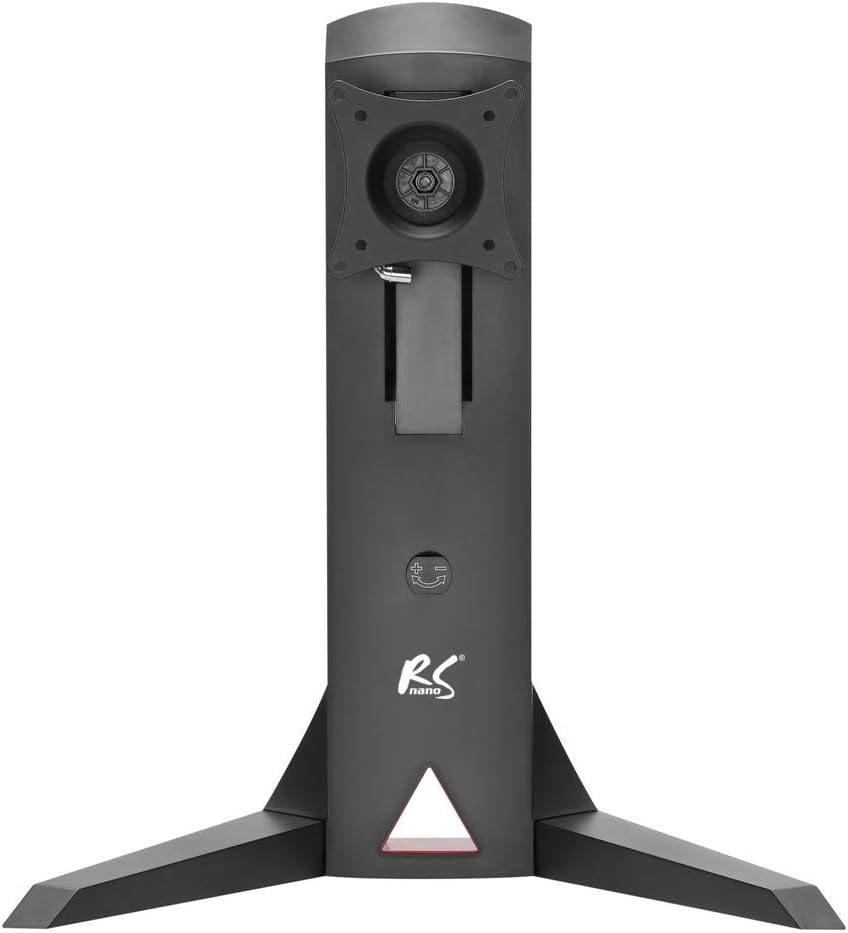
The back of the monitor stand, highlighting the VESA mounting interface and the channel for routing cables neatly.
Operating Instructions
Adjusting Monitor Height
The Nano RS RS110 allows for smooth vertical adjustment of your monitor. Gently push or pull the monitor up or down to achieve your desired ergonomic height. The counterweight system will help maintain the position.
Swivel, Tilt, and Rotate Functions
- Tilt: The monitor can be tilted up or down by +/-10 degrees. Gently push the top or bottom of the monitor to adjust the vertical angle.
- Swivel: The monitor can swivel left or right by +/-180 degrees. Rotate the monitor horizontally to share your screen or adjust your viewing angle.
- Rotate: The monitor can be rotated 360 degrees from landscape to portrait orientation.
USB and Audio Connections
The stand features two integrated USB 3.0 ports, a headphone jack, and a microphone jack for convenient access. Connect your peripherals directly to the stand for easy connectivity.

Detail of the integrated connectivity options on the monitor stand, including USB 3.0 ports and audio jacks for convenient access.
Cable Management
Utilize the integrated cable management system to route and organize your monitor and peripheral cables. This helps maintain a tidy workspace and prevents cable clutter.
Demonstration of the cable management feature, showing how power and data cables can be organized through the stand's central column.
Maintenance
To ensure the longevity and optimal performance of your Nano RS RS110 monitor stand, follow these simple maintenance guidelines:
- Cleaning: Use a soft, damp cloth to wipe down the stand. Avoid abrasive cleaners or solvents that could damage the finish.
- Check Connections: Periodically check all screws and connections to ensure they remain tight and secure. Retighten if necessary.
- Lubrication: No special lubrication is required for the moving parts. If you notice any stiffness, ensure no debris is obstructing the mechanism.
Troubleshooting
If you encounter any issues with your monitor stand, refer to the following table for common problems and solutions:
| Problem | Possible Cause | Solution |
|---|---|---|
| Monitor is unstable or wobbles. | Loose screws; uneven surface; incorrect leg attachment. | Ensure all assembly screws are tightened. Place the stand on a flat, stable surface. Verify legs are correctly installed. |
| Monitor does not stay at desired height. | Counterweight tension is incorrect for monitor weight. | Adjust the counterweight tension using the hex key. Turn clockwise for heavier monitors, counter-clockwise for lighter monitors. |
| USB ports or audio jacks are not working. | USB 3.0 cable not connected to computer; faulty cable; driver issue. | Ensure the stand's USB 3.0 cable is securely connected to an active USB port on your computer. Try a different USB port or cable. Check computer's device manager for driver issues. |
| Difficulty with swivel, tilt, or rotation. | Mechanism is too tight; obstruction. | Check for any physical obstructions. The joints are designed to be firm; apply gentle, steady pressure. Do not force movements. |
Specifications
Detailed specifications for the Nano RS RS110 Monitor Stand:
| Feature | Detail |
|---|---|
| Model | RS110 |
| Compatible Monitor Size | 17" to 32" |
| Maximum Monitor Weight | 8 kg |
| VESA Compatibility | 75x75 mm, 100x100 mm |
| Height Adjustment Range | 32 cm to 45 cm (from desk surface to VESA center) |
| Tilt Angle | +/-10 degrees |
| Swivel Angle | +/-180 degrees |
| Rotation | 360 degrees (Portrait/Landscape) |
| Integrated Ports | 2x USB 3.0, Headphone Jack, Microphone Jack |
| Color | Black |
| Material | Metal |
| Item Weight | 8 kg |
| Item Dimensions (LxWxH) | 62 x 15 x 25 cm |

A detailed technical diagram illustrating the dimensions of the monitor stand and its adjustable features, including tilt (+/-10 degrees), swivel (+/-180 degrees), and height range (320mm to 450mm).
Warranty and Support
NanoRS products are manufactured to high-quality standards. This product is covered by a manufacturer's warranty against defects in materials and workmanship. For specific warranty terms and conditions, please refer to the warranty card included with your product or visit the official NanoRS website.
If you require technical assistance, have questions about installation, or need to report a defect, please contact NanoRS customer support through the following channels:
- Website: Visit the official NanoRS website for FAQs and support contact information.
- Email: Refer to your product packaging or warranty card for the customer support email address.
- Phone: Check the NanoRS website for regional support phone numbers.
Please have your product model (RS110) and purchase information ready when contacting support.