Ninja OP500EU
Ninja Foodi MAX 9-in-1 Multi-Cooker User Manual
Model: OP500EU
Important Safety Information
Please read all instructions before using your Ninja Foodi MAX Multi-Cooker to ensure safe and proper operation. Keep this manual for future reference.
- Always ensure the pressure lid is properly sealed before pressure cooking.
- Do not immerse the main unit in water or other liquids.
- Use only Ninja-recommended accessories.
- Keep hands and face clear of the steam release valve when releasing pressure.
- Always unplug the appliance when not in use and before cleaning.
Product Overview
The Ninja Foodi MAX 9-in-1 Multi-Cooker combines the functions of a pressure cooker and an air fryer, along with several other cooking modes, to provide versatile meal preparation.
Components
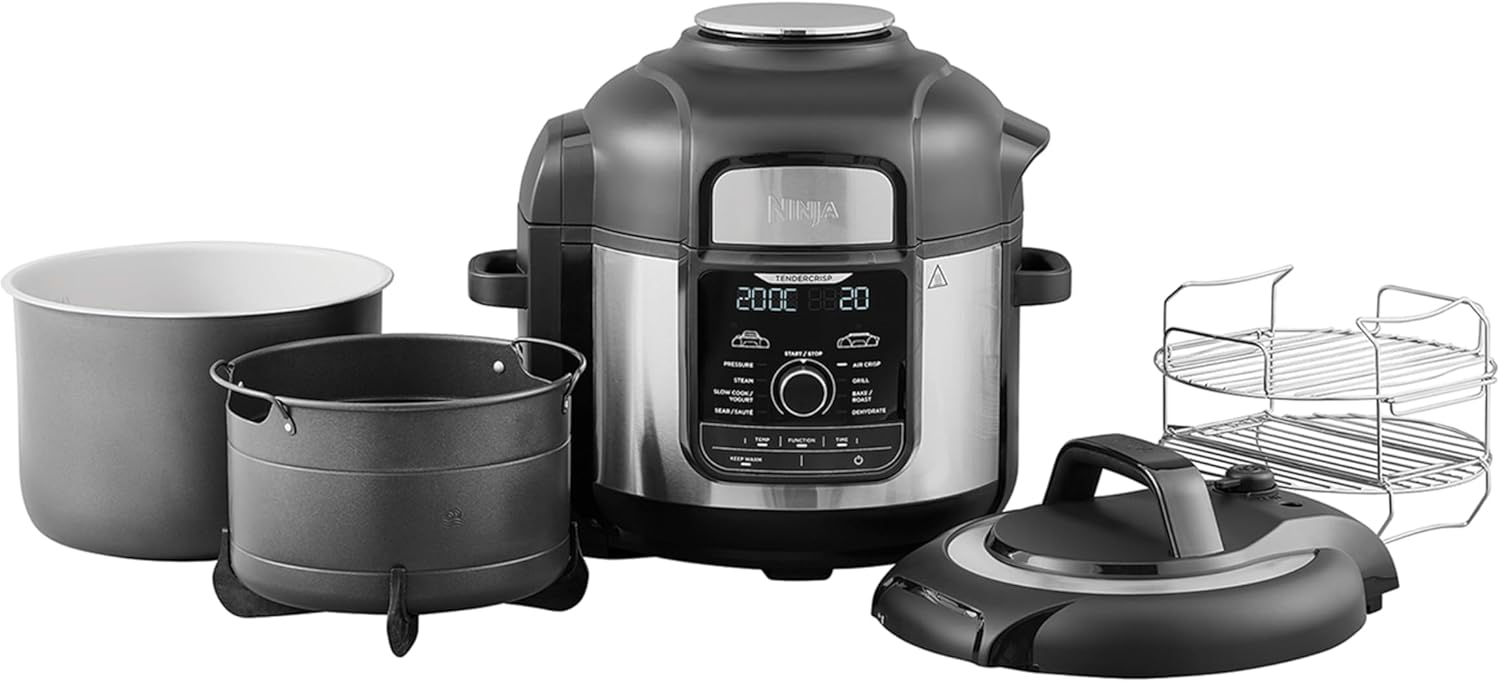
The Ninja Foodi MAX comes with several key components to facilitate its various cooking functions:
- Main Unit: The base of the appliance containing the heating elements and control panel.
- Pressure Lid: Used for pressure cooking, steaming, slow cooking, and yogurt functions. Features a pressure release valve and a sealing gasket.
- Crisping Lid: Attached to the main unit, used for air crisping, baking, roasting, and grilling.
- 7.5L Cooking Pot: Non-stick pot where food is cooked.
- 4.7L Cook & Crisp Basket: Used for air frying and crisping.
- Reversible Rack: For steaming, baking, and grilling.
Control Panel

The intuitive control panel allows you to select cooking functions, adjust time and temperature, and start/stop cooking. Key controls include:
- Function Dial: Rotate to select from 9 cooking functions.
- TEMP/TIME Buttons: Adjust cooking temperature and time.
- START/STOP Button: Begins or ends a cooking cycle.
- KEEP WARM Button: Activates the keep warm function after cooking.
- Power Button: Turns the unit on or off.
Setup
Unpacking
Carefully remove all packaging materials and accessories from the box. Ensure all components listed in the "Product Overview" section are present. It is recommended to keep the packaging for storage or future transport.
Initial Cleaning
Before first use, wash the cooking pot, Cook & Crisp basket, reversible rack, and pressure lid gasket in warm, soapy water. Rinse thoroughly and dry completely. Wipe the main unit with a damp cloth.
Operating Instructions
The Ninja Foodi MAX offers 9 versatile cooking functions. Always ensure the correct lid is used for the selected function.
General Operation
- Place the main unit on a clean, dry, level surface.
- Insert the cooking pot into the main unit.
- Add ingredients according to your recipe.
- Select the desired cooking function using the dial.
- Adjust temperature and time using the TEMP/TIME buttons.
- Press START/STOP to begin cooking.
Specific Cooking Functions
Pressure Cook
Use the pressure lid for this function. Pressure cooking allows for faster cooking times while tenderizing food.
This video demonstrates the pressure cooking function of the Ninja Foodi MAX. It shows how the appliance uses pressurized steam to cook food quickly and efficiently, resulting in tender and moist dishes. The video highlights the internal cooking process and the secure sealing of the pressure lid.
Steps:
- Add liquid to the cooking pot as per recipe requirements.
- Place ingredients in the pot or on the reversible rack.
- Close the pressure lid and ensure the pressure release valve is in the SEAL position.
- Select "Pressure Cook" and set time/pressure level.
- Once cooking is complete, allow natural pressure release or use quick release as directed by your recipe.
Air Crisp (Air Fry)
Use the crisping lid for this function. Achieve crispy results with little to no oil.

This image shows a whole chicken that has been cooked using the Air Crisp function, demonstrating the golden-brown, crispy finish achievable with the Ninja Foodi MAX. The chicken is placed within the Cook & Crisp basket, ready to be removed.
Steps:
- Place ingredients in the Cook & Crisp basket.
- Close the crisping lid.
- Select "Air Crisp" and set temperature/time.
- The unit will preheat, then begin cooking. Shake or toss ingredients halfway through for even crisping.
TenderCrisp Technology
This unique feature allows you to pressure cook food to tender perfection, then finish it with a crispy, golden exterior using the Air Crisp function. This is ideal for whole chickens, roasts, and other large cuts of meat.

This image illustrates the transition step in the TenderCrisp process, where the user is shown placing the crisping lid onto the multi-cooker after the pressure cooking phase is complete. This prepares the unit for the air crisping stage to achieve a golden finish.
Steps:
- Pressure cook your food as desired using the pressure lid.
- Once pressure cooking is complete and pressure is released, carefully remove the pressure lid.
- Close the crisping lid.
- Select "Air Crisp" (or Bake/Roast/Grill depending on desired finish) and set temperature/time to achieve crispiness.
Other Functions
- Slow Cook: Use the pressure lid. Ideal for tenderizing meats and developing rich flavors over extended periods.
- Steam: Use the pressure lid with the reversible rack. Perfect for vegetables, fish, and dumplings.
- Bake/Roast: Use the crisping lid. For cooking cakes, casseroles, and roasting meats or vegetables.
- Sear/Sauté: Use the crisping lid (or no lid). For browning meats and sautéing vegetables directly in the cooking pot.
- Grill: Use the crisping lid with the reversible rack. For grilling smaller items like chicken breasts or burgers.
- Yogurt: Use the pressure lid. For making homemade yogurt.
- Dehydrate: Use the crisping lid with the reversible rack. For drying fruits, vegetables, and making jerky.
Maintenance and Cleaning
Regular cleaning ensures the longevity and optimal performance of your Ninja Foodi MAX.
- Before Cleaning: Always unplug the unit and allow it to cool completely.
- Cooking Pot, Cook & Crisp Basket, Reversible Rack: These parts are dishwasher safe. For best results, hand-wash with warm, soapy water.
- Pressure Lid: Hand-wash the lid and its components (sealing gasket, anti-clog cap, pressure release valve) with warm, soapy water. Inspect the gasket regularly for cracks or damage.
- Crisping Lid: Wipe the inside of the crisping lid with a damp cloth or sponge. Do not immerse in water.
- Main Unit: Wipe the exterior of the main unit with a clean, damp cloth. Do not immerse in water.
Troubleshooting
| Problem | Possible Cause | Solution |
|---|---|---|
| Unit not turning on. | Not plugged in; power outlet issue. | Ensure power cord is securely plugged into a grounded outlet. Check circuit breaker. |
| Pressure not building. | Pressure lid not sealed; pressure release valve in VENT position; insufficient liquid. | Ensure lid is fully closed and sealed. Turn valve to SEAL. Add more liquid if necessary. |
| Food not crisping. | Crisping lid not fully closed; Cook & Crisp basket overloaded; insufficient cooking time/temperature. | Ensure crisping lid is fully closed. Do not overload basket. Increase time or temperature. |
| Error codes on display. | Specific internal issue. | Refer to the full troubleshooting guide on the Ninja website or contact customer support. |
Specifications
- Model: OP500EU
- Capacity: 7.5 Litres (Cooking Pot), 4.7 Litres (Cook & Crisp Basket)
- Power: 1760 Watts
- Voltage: 240 Volts
- Dimensions (L x W x H): 38 x 42 x 35 cm
- Weight: 9.9 Kilograms
- Material: Brushed Stainless Steel / Ceramic Coated Cooking Pots / Plastic
- Functions: Pressure Cook, Air Crisp, Slow Cook, Steam, Bake/Roast, Sear/Sauté, Grill, Yogurt, Dehydrate
Warranty and Support
Your Ninja Foodi MAX Multi-Cooker is covered by a limited warranty. Please refer to the warranty card included with your purchase for specific terms and conditions.
For customer support, replacement parts, or additional recipe ideas, please visit the official Ninja website or contact their customer service line.
Official Website: www.ninjakitchen.com
Contact Information: Refer to your regional Ninja support details.
Ask a question about this manual
Ask about setup, troubleshooting, compatibility, parts, safety, or missing instructions. Manuals+ will review the question and use this page’s manual context to help answer it.