HoldPeak HP-870P
HoldPeak HP-870P KW Power Meter Clamp Meter User Manual
Model: HP-870P (YF-US-870P)
1. Introduction
The HoldPeak HP-870P is a versatile and robust KW Power Meter Clamp Meter designed for comprehensive electrical testing. This device combines the functions of an AC/DC Voltmeter, Ammeter, and Multimeter, capable of measuring active power, apparent power, reactive power, active energy, temperature, and frequency. Its high accuracy, large LCD display with backlight, and auto power-off feature make it an essential diagnostic tool for professionals and enthusiasts in various fields, including electronic product manufacturing, computer component inspection, automobile maintenance, home appliance installation, and general electrical maintenance.
2. Safety Information
Please read and understand all safety information and operating instructions before using this meter. Failure to do so may result in injury or damage to the meter or equipment under test.
General Safety Precautions:
- Always observe local and national safety codes.
- Do not use the meter if it appears damaged or if the insulation on the test leads is compromised.
- Do not apply more than the rated voltage, as marked on the meter, between the terminals or between any terminal and earth ground.
- Use extreme caution when working with voltages above 60V DC or 30V AC RMS. Such voltages pose a shock hazard.
- Keep your fingers behind the finger guards on the test leads during measurements.
- Remove the test leads from the meter before opening the battery cover.
- Ensure the rotary switch is in the correct position for the desired measurement before connecting the test leads.
- Do not operate the meter in explosive gas, vapor, or dust environments.
3. Product Overview
Key Features:
- Multifunctionality: Measures active power, apparent power, reactive power, AC/DC voltage, AC/DC current, temperature, frequency, power factor, and active energy.
- High Display Count: 9999 counts display for precise readings.
- LCD Backlight: Ensures clear visibility of data even in low-light conditions.
- Data Hold: Freezes the displayed reading for convenient recording.
- Auto Range: Automatically selects the appropriate measurement range.
- Max/Min Function: Records maximum and minimum values during a measurement session.
- Auto Power Off: Conserves battery life by automatically shutting down after a period of inactivity.
- Large Jaw Caliber: 1.77 inches (45mm) jaw opening to accommodate thick cables.
- Safety Rating: Double insulation safety rating.
Package Contents:
The HoldPeak HP-870P package includes the following items:
- 1 x Digital Clamp Multimeter (HP-870P)
- 2 x Test Leads (Red and Black)
- 1 x Carrying Bag
- 1 x Temperature Probe
- 1 x 9V (6F22) Battery

Figure 3.1: The HoldPeak HP-870P Clamp Meter shown with its complete set of accessories, including test leads, temperature probe, 9V battery, and carrying bag.
Panel Layout:
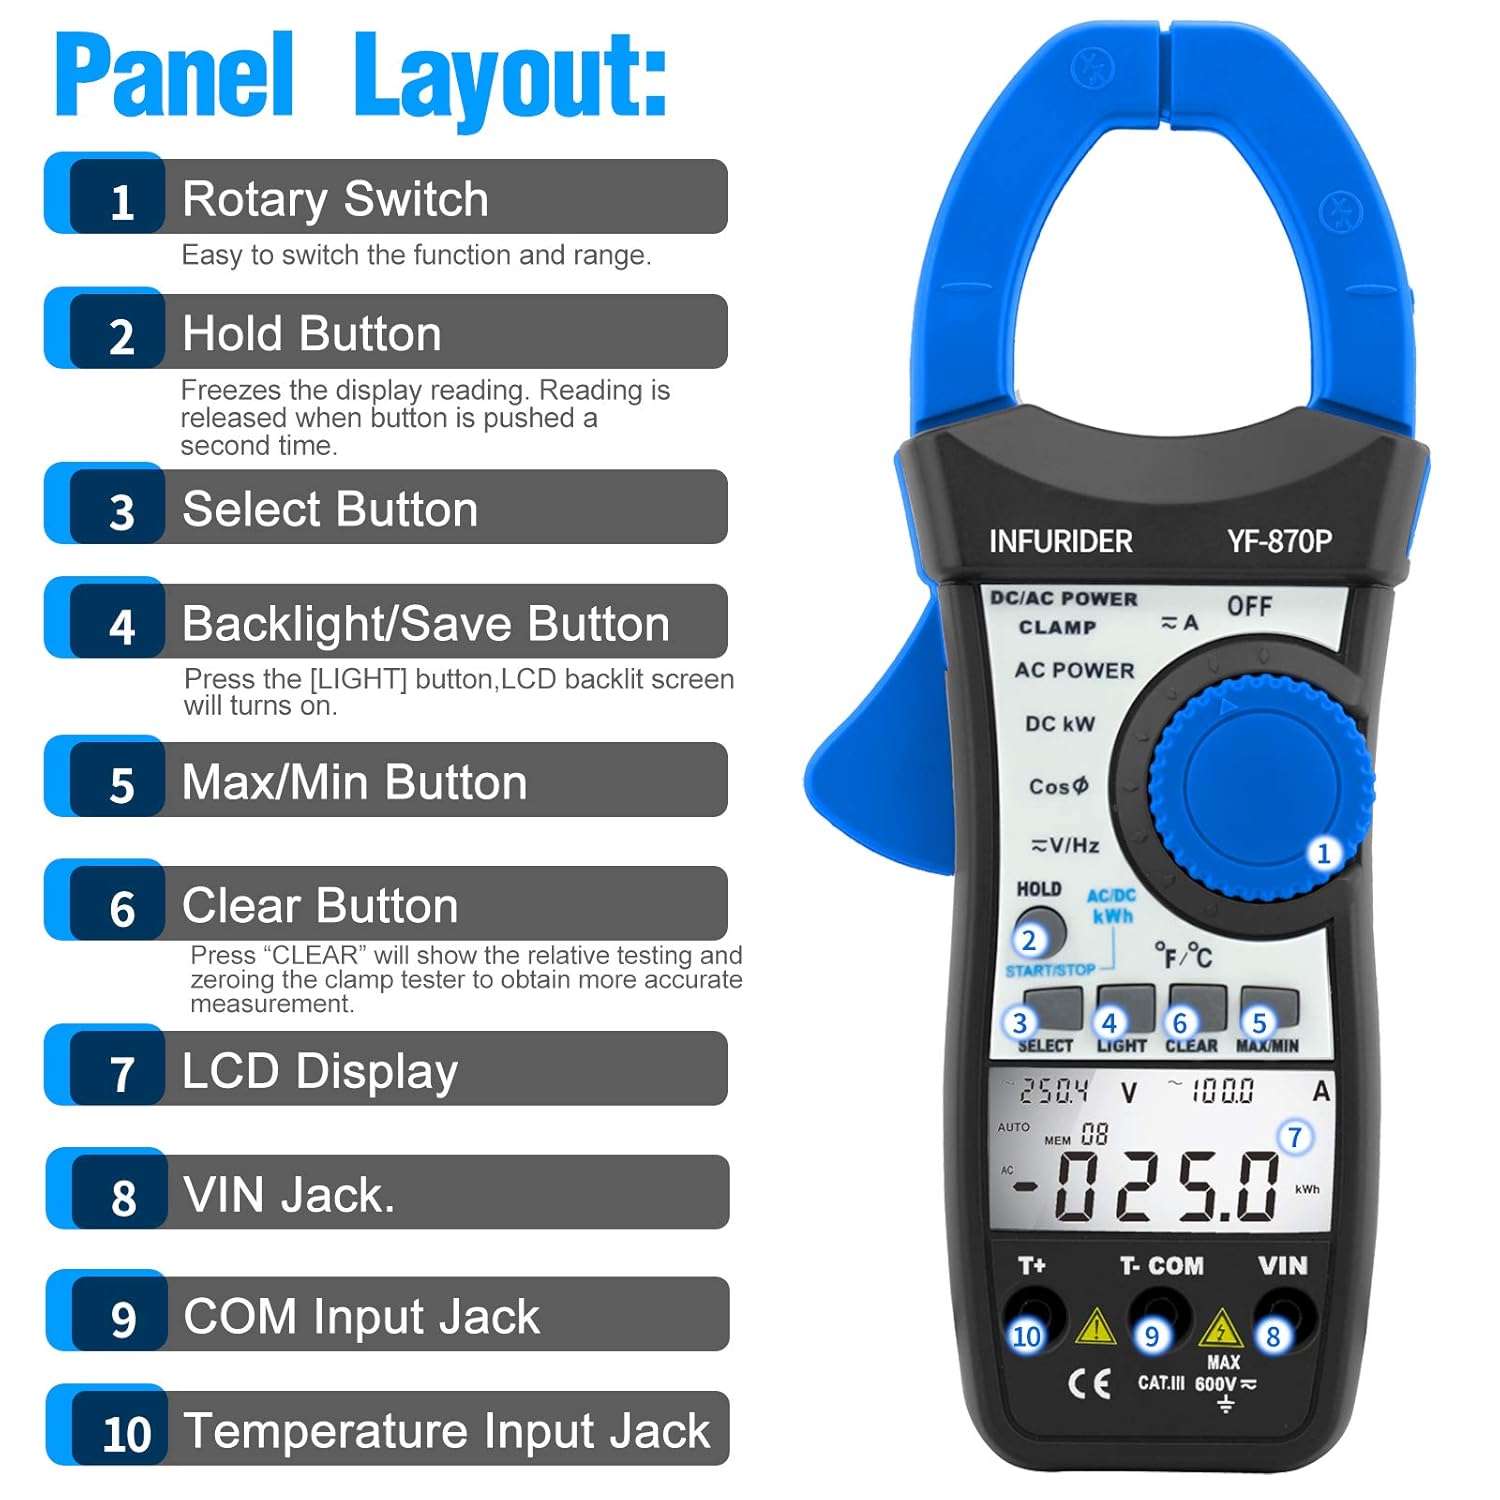
Figure 3.2: Detailed view of the HP-870P clamp meter's front panel, indicating the location and function of each control and input jack.
- Rotary Switch: Used to select the desired measurement function and range.
- Hold Button: Freezes the current display reading. Press again to release.
- Select Button: Toggles between different measurement modes within a single rotary switch position (e.g., AC/DC, temperature units).
- Backlight/Save Button: Press to turn on the LCD backlight.
- Max/Min Button: Toggles between maximum, minimum, and current readings.
- Clear Button: Used to clear relative testing or zero the clamp tester for more accurate measurements.
- LCD Display: Shows measurement readings, units, and function indicators.
- VIN Jack: Input terminal for voltage and other measurements (typically for red test lead).
- COM Input Jack: Common input terminal (typically for black test lead).
- Temperature Input Jack: Dedicated input for the temperature probe.
4. Setup
Battery Installation:
- Ensure the meter is turned OFF.
- Locate the battery compartment on the back of the meter.
- Use a screwdriver to open the battery cover.
- Insert the provided 9V (6F22) battery, observing the correct polarity (+ and -).
- Replace the battery cover and secure it with the screw.
Connecting Test Leads:
- For voltage, resistance, frequency, and other measurements requiring test leads: Insert the black test lead into the COM input jack and the red test lead into the VIN input jack.
- For temperature measurements: Insert the temperature probe into the dedicated Temperature Input Jack.
5. Operating Instructions
General Operation:
- Power On/Off: Rotate the rotary switch from the OFF position to any desired function to turn the meter ON. To turn OFF, rotate the switch back to the OFF position.
- LCD Backlight: Press the LIGHT button to activate the display backlight. Press again to turn it off.
- Data Hold: Press the HOLD button to freeze the current reading on the display. Press again to release.
- Auto Power Off: The meter will automatically power off after a period of inactivity to save battery. To disable this feature temporarily, refer to the full user manual.
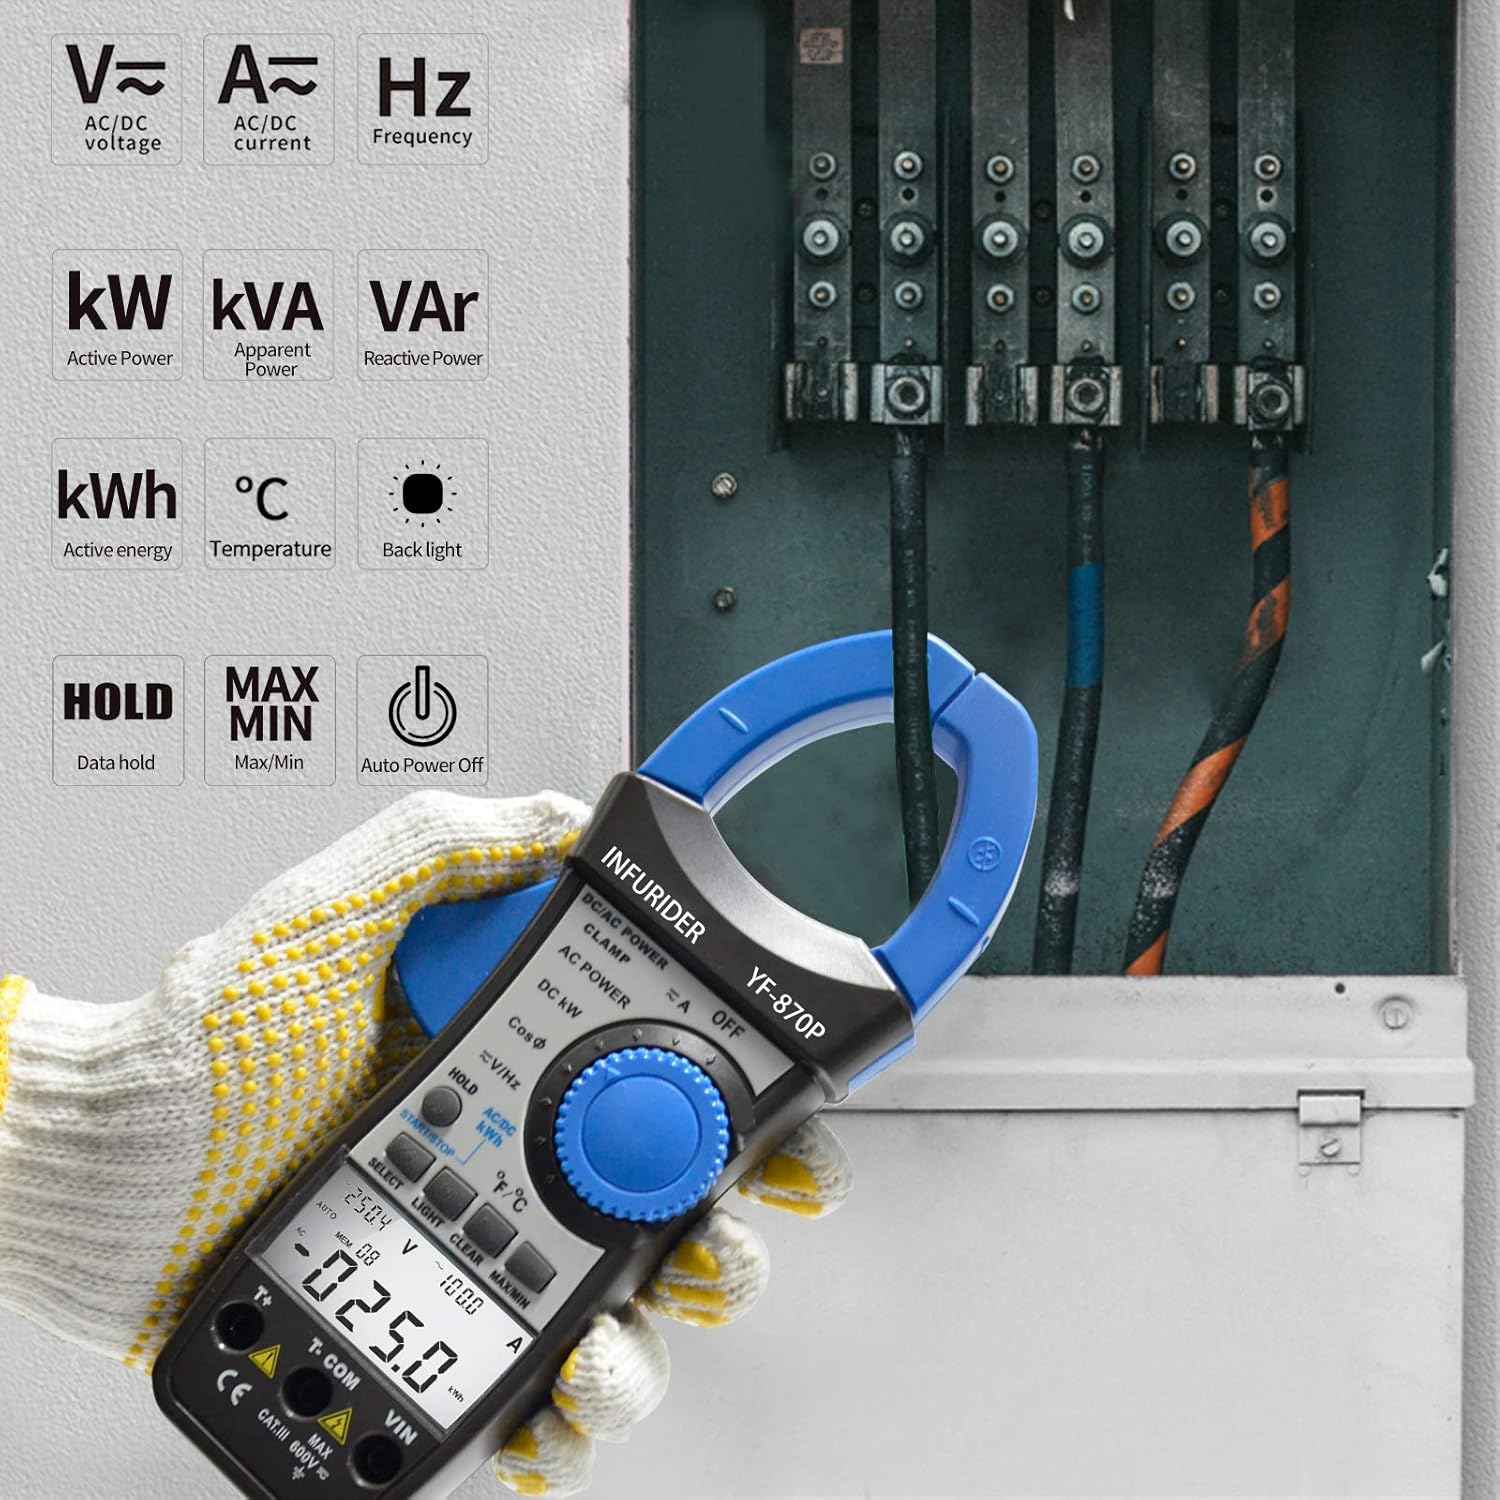
Figure 5.1: The HP-870P clamp meter displaying various measurement functions such as AC/DC voltage, current, frequency, active power (kW), apparent power (kVA), reactive power (VAr), active energy (kWh), and temperature (°C).
Measurement Functions:
AC/DC Voltage Measurement:
- Set the rotary switch to the V≈ (AC Voltage) or V— (DC Voltage) position.
- Connect the black test lead to the COM jack and the red test lead to the VIN jack.
- Connect the test probes in parallel to the circuit or component under test.
- Read the voltage value on the LCD display.
AC/DC Current Measurement (Clamp Function):
- Set the rotary switch to the A≈ (AC Current) or A— (DC Current) position.
- Open the clamp jaws by pressing the trigger.
- Enclose only one conductor of the circuit within the clamp jaws. Ensure the jaws are fully closed.
- Read the current value on the LCD display.
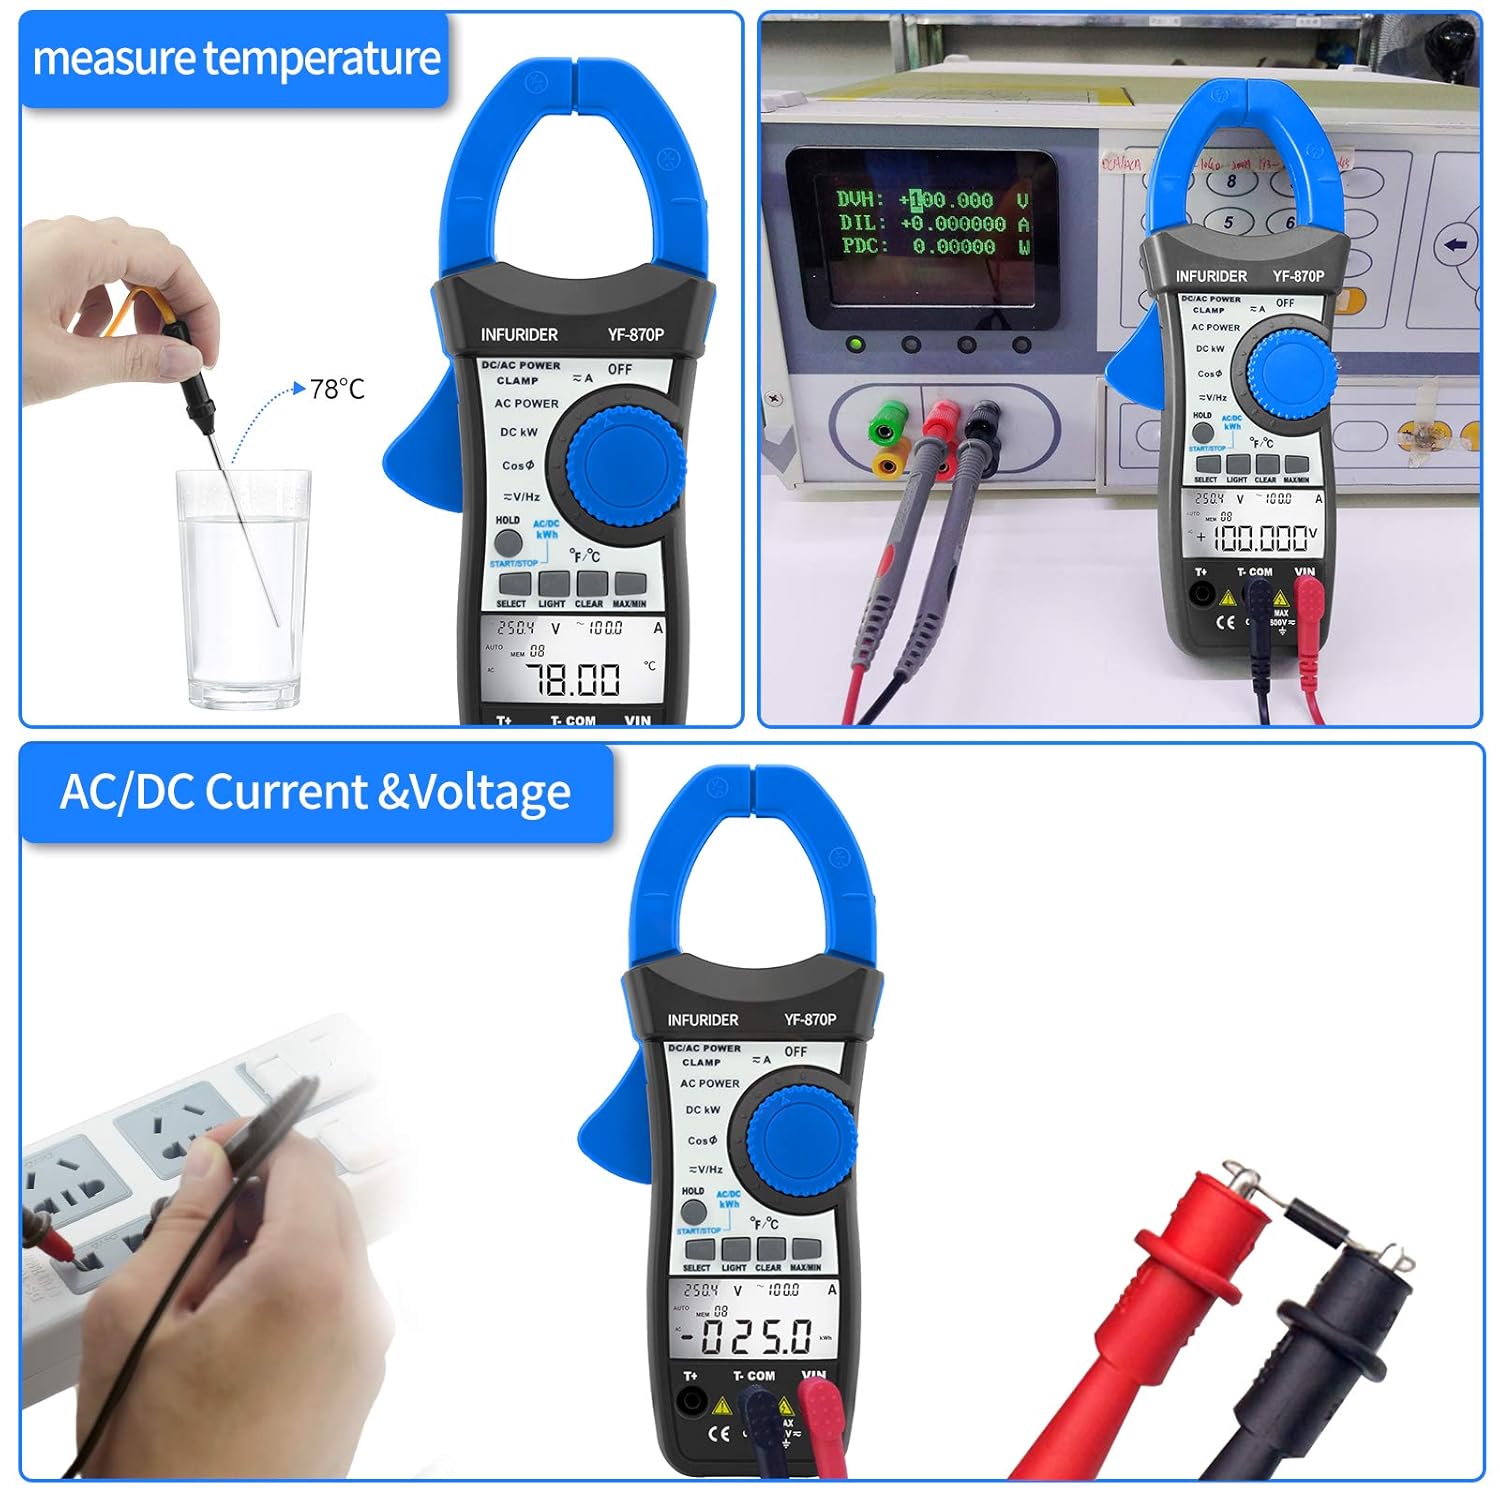
Figure 5.2: Demonstrates the HP-870P's capability to measure temperature using the included probe and to measure AC/DC current and voltage by connecting the test leads to a power outlet.
Power Measurement (Active, Apparent, Reactive):
- Set the rotary switch to the DC KW or AC POWER position.
- Connect the test leads as required for voltage measurement and clamp the jaws around the current-carrying conductor.
- Use the SELECT button to cycle through Active Power (KW), Apparent Power (KVA), and Reactive Power (KVAr) readings.
Active Energy Measurement (kWh):
- Set the rotary switch to the AC/DC KWH position.
- Connect the test leads and clamp the jaws as for power measurement.
- The meter will display the accumulated active energy.
Temperature Measurement:
- Set the rotary switch to the ℃/℉ position.
- Insert the temperature probe into the dedicated temperature input jack.
- Place the tip of the temperature probe on or in the object whose temperature is to be measured.
- Use the SELECT button to toggle between Celsius (℃) and Fahrenheit (℉).
Frequency Measurement:
- Set the rotary switch to the V≈/Hz position.
- Connect the test leads to the circuit where frequency is to be measured.
- Read the frequency value in Hertz (Hz) on the LCD display.
Power Factor Measurement:
- Set the rotary switch to the CosΦ position.
- Connect the test leads and clamp the jaws as for power measurement.
- The power factor value will be displayed.

Figure 5.3: Illustrates the 40mm jaw caliber of the HP-870P, allowing measurement on larger conductors, and highlights the large LCD screen for clear observation of measurement data, along with the meter's overall dimensions.
6. Maintenance
Cleaning:
- Wipe the case with a damp cloth and mild detergent. Do not use abrasives or solvents.
- Keep the terminals clean to ensure proper contact.
Battery Replacement:
When the battery symbol appears on the LCD display, the battery needs to be replaced. Refer to the Battery Installation section (4.1) for instructions.
Storage:
- If the meter is not to be used for a long period, remove the battery to prevent leakage and damage to the meter.
- Store the meter in a cool, dry place, away from direct sunlight and extreme temperatures.
- Use the provided carrying bag for protection during storage and transport.
7. Troubleshooting
If the meter does not operate correctly, check the following common issues before seeking service.
| Problem | Possible Cause | Solution |
|---|---|---|
| Meter does not power on. | Dead or incorrectly installed battery. | Replace battery or check polarity. |
| No reading or "OL" displayed. | Overload, incorrect range, or open circuit. | Select higher range (if not auto-ranging), check circuit continuity, ensure proper connection. |
| Inaccurate readings. | Low battery, dirty terminals, or external interference. | Replace battery, clean terminals, move away from strong electromagnetic fields. |
| Backlight not working. | Low battery or backlight function not activated. | Replace battery, press the LIGHT button. |
8. Specifications
| Measurement Function | Range / Accuracy |
|---|---|
| Active Power | 99.99KW / 100KW~300KW (3% of rdg + 12dgt) |
| Apparent Power | 99.99KVA~245KVA (3% of rdg + 15dgt) |
| Reactive Power | 0.01VAr~120KVAr (3% of rdg + 15dgt) |
| AC/DC Voltage | 1.0~600V (1.0% of rdg + 8dgt) |
| AC/DC Current | 1.0~999.9A (2.5% of rdg + 15dgt) |
| Temperature | -20℃~1370℃ (-4℉~2498℉) (3% of rdg + 2dgt) |
| Frequency | 45Hz~250MHz (0.1% + 5dgt) |
| Power Factor | ±0.05 |
| Active Energy | 0~99.99kwh (3% of rdg + 10dgt), 100~700kwh (3% of rdg + 5dgt) |
General Specifications:
- Display: 9999 Counts LCD
- Jaw Caliber: 1.77 inches (45mm)
- Battery Type: 9V (6F22)
- Dimensions: 225 x 97 x 40mm
- Weight: 450g
- Safety Standard: CE
9. Warranty Information
Please refer to the manufacturer's official website or the warranty card included with your product for detailed warranty terms and conditions. Typically, HoldPeak products come with a limited warranty covering defects in materials and workmanship for a specified period from the date of purchase.
10. Customer Support
For technical assistance, troubleshooting beyond this manual, or service inquiries, please contact HoldPeak customer support through their official website or the contact information provided in your product packaging. When contacting support, please have your product model number (HP-870P) and purchase details ready.
Ask a question about this manual
Ask about setup, troubleshooting, compatibility, parts, safety, or missing instructions. Manuals+ will review the question and use this page’s manual context to help answer it.