1. Introduction
This manual provides essential information for the safe installation, operation, and maintenance of your Carver Tubs SR7148 Whirlpool Water Massage Bathtub. Please read all instructions carefully before installation and use to ensure proper function and longevity of your product.
The Carver Tubs SR7148 is a modern acrylic fiberglass whirlpool bathtub designed for a deep, relaxing soak. It features 12 adjustable jets for a targeted water massage experience.

Figure 1: Top-down view of the SR7148 Whirlpool Bathtub.
2. Safety Information
- Electrical Safety: The bathtub motor operates on 120V. A dedicated 20 AMP GFCI (Ground Fault Circuit Interrupter) breaker is required for each power supply connected to the bathtub. Ensure all electrical connections are performed by a qualified electrician in accordance with local codes.
- Motor Ventilation: The motor is mounted on the left-hand side of the bathtub. It must be accessible and properly ventilated to prevent overheating. Do not obstruct airflow to the motor.
- Water Temperature: Do not exceed 104°F (40°C) water temperature. Prolonged immersion in hotter water can cause hyperthermia.
- Chemicals: Avoid using harsh chemicals or abrasive cleaners on the bathtub surface or jets, as this can damage the acrylic and fiberglass finish.
- Children and Individuals with Health Conditions: Supervise children at all times. Consult a physician before use if you have health conditions such as heart disease, high blood pressure, diabetes, or are pregnant.
3. Setup and Installation
The Carver Tubs SR7148 is designed for drop-in installation. Proper preparation and professional installation are recommended.
3.1 Site Preparation
- Rough-In Dimensions: 69 inches (Length) x 46 inches (Width) x 22 inches (Height).
- Deck Cut-Out: 69 inches (Length) x 46 inches (Width).
- Finished Deck Height: 22 inches.
- Motor Access: Ensure adequate access and ventilation for the motor located on the left-hand side.
- Level Surface: The installation surface must be level and capable of supporting the weight of the bathtub filled with water and occupants.
3.2 Plumbing and Electrical
- Drainage: Connect the bathtub to a standard drain system. The bathtub features a quick drain system and arched no-flex PVC pipes to ensure complete drainage.
- Overflow Hole: The overflow hole is undrilled. It can be drilled upon request during manufacturing.
- Electrical Connection: As noted in Safety Information, a dedicated 20 AMP GFCI breaker is required for each 120V power supply.
3.3 Setting the Bathtub
A 3-inch sand mix mortar or concrete bed is required for setting the bathtub to ensure proper support and stability.

Figure 2: Top View Dimensions and Electrical Data.
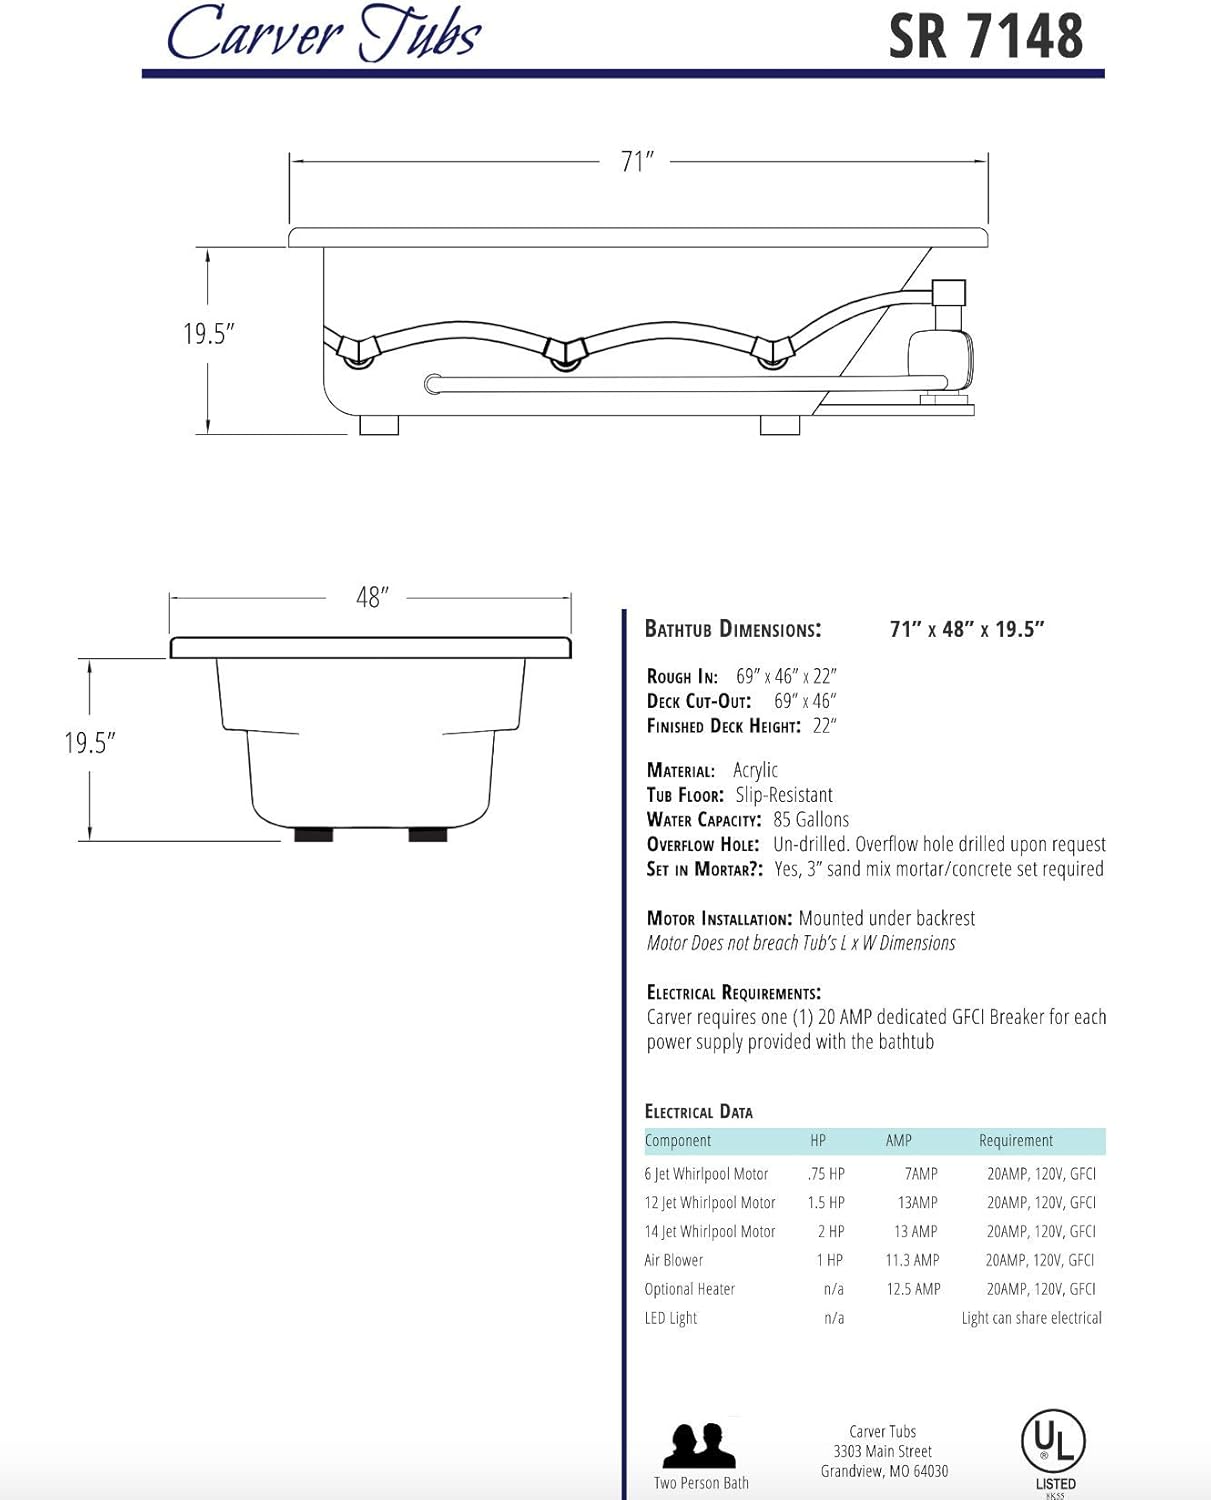
Figure 3: Side View Dimensions.
4. Operating Instructions
4.1 Filling the Bathtub
Ensure the drain is closed. Fill the bathtub with water to a level above the highest jets. Do not overfill.
4.2 Activating Whirlpool Jets
Once the bathtub is filled, locate the control button for the whirlpool system. Press the button to activate the 12 adjustable jets. The jets will begin to circulate water, providing a massage.
4.3 Adjusting Jet Flow and Angle
Each whirlpool jet can be adjusted to control the flow of water and the angle of intake. To adjust, simply rotate the jet from fully open to completely closed, and pivot to direct the water flow as desired. This allows for a customized massage experience targeting specific stress points.

Figure 4: Adjustable Whirlpool Jet Mechanism.
4.4 Draining the Bathtub
After use, open the drain to empty the bathtub. The exclusive "V" body design jets force water to drain from the whirlpool plumbing, ensuring a dry, clean system.

Figure 5: Quick Drain System and Arched No-Flex PVC Pipe.
5. Maintenance
5.1 Cleaning the Bathtub Surface
The high-quality acrylic with reinforced fiberglass ensures scratch durability and an effortless clean. Use a soft cloth and non-abrasive, mild liquid cleaner. Rinse thoroughly with water after cleaning. Avoid abrasive pads or cleaners containing ammonia, bleach, or harsh chemicals.
5.2 Cleaning the Jets
The jet bodies can be removed for thorough cleaning. They are dishwasher safe. Regularly clean the jets to prevent mineral buildup and ensure optimal performance.
5.3 Slip-Resistant Texture
The bathtub bottom features a special slip-resistant texture. Clean this area gently to maintain its integrity.
6. Troubleshooting
- Jets Not Activating:
- Ensure the bathtub is filled with water above the jet level.
- Check the GFCI breaker for the power supply; reset if tripped.
- Verify all electrical connections are secure.
- Weak Jet Flow:
- Ensure jets are fully open and not partially closed.
- Clean jets for any blockages or mineral buildup.
- Check motor ventilation to prevent overheating, which can reduce performance.
- Slow Drainage:
- Ensure the drain stopper is fully open.
- Check for any obstructions in the drain.
For issues not resolved by these steps, please contact Carver Tubs customer support.
7. Specifications
| Feature | Detail |
|---|---|
| Model Number | SR7148 |
| Brand | Carver Tubs |
| Product Dimensions (L x W x H) | 71" x 48" x 19.5" |
| Capacity | 85 Gallons |
| Material | Acrylic, Fiberglass |
| Style | 12 Jet Whirlpool |
| Installation Type | Drop-In |
| Shape | Rectangular |
| Color | White |
| Finish Type | Polished |
| Voltage | 120 Volts |
| Item Weight | 202 pounds |
| Special Features | Adjustable Whirlpool Jets, Slip-Resistant Bottom, Neck Support, Backrest, Armrest, Quick Drain System |
8. Warranty and Support
Carver Tubs is committed to providing high-quality products and customer satisfaction. For specific warranty details, please refer to the documentation provided with your purchase or contact Carver Tubs directly.
Returns: This product is eligible for 30-day easy returns.
Customer Support: For any questions regarding installation, operation, maintenance, or troubleshooting, please contact Carver Tubs customer support. Contact information can typically be found on the manufacturer's website or your purchase invoice.


