1. Introduction
Thank you for choosing the Jansite 10 Inch Full Touch Screen Mirror Dash Cam. This device is designed to enhance your driving safety and provide reliable recording of your journeys. Featuring dual 1080P HD cameras for both front and rear views, super night vision, and a responsive full touch screen, it offers comprehensive surveillance and ease of use. This manual provides detailed instructions for installation, operation, maintenance, and troubleshooting to ensure optimal performance of your dash cam.
2. What's in the Box
Please check the contents of your package to ensure all items are present:
- 1 x 1080P Mirror Dash Cam (Main Unit)
- 1 x 1080P Rear Camera
- 1 x 10m Backup Camera Cable (33ft)
- 1 x Car Charger
- Rubber Straps for mounting
- User Manual
3. Setup & Installation
3.1. Inserting the SD Card
Before installation, insert a compatible Micro SD card (up to 128GB, not included) into the designated slot on the main dash cam unit. Ensure the card is inserted correctly until it clicks into place.
3.2. Installing the Mirror Dash Cam
- Place the mirror dash cam over your existing rearview mirror.
- Use the provided rubber straps to securely fasten the dash cam to your existing mirror. Ensure it is tightly secured to prevent movement during driving.
- Adjust the front camera lens to capture the desired view of the road ahead. The stretchable front cam allows for flexible positioning.

3.3. Installing the Rear Camera
- Mount the IP68 waterproof rear camera on the back of your car, typically above the license plate. If you prefer to mount it inside on the rear windshield, an extra bracket may be required (not included).
- Route the 10-meter (33ft) backup camera cable from the rear camera to the main mirror dash cam unit. Carefully tuck the cable along the car's headliner, A-pillar, and door gaps to conceal it and prevent interference.
- Connect the red wire of the rear camera cable to the positive lead of your car's reversing light. This enables the parking assist feature when reversing.
- Plug the rear camera cable into the designated port on the main mirror dash cam unit.

3.4. Power Connection
- Connect the car charger to the main mirror dash cam unit.
- Plug the car charger into your vehicle's cigarette lighter port.
- Start your vehicle to power on the dash cam. It should automatically begin recording.
3.5. Installation Video Guide
For a visual guide on the installation process, please refer to the video below:
4. Operating Instructions
4.1. Power On/Off
- The dash cam will automatically power on and begin recording when your vehicle starts.
- To manually turn off the display screen while recording continues, short press the Power button.
4.2. Touch Screen Interface
The 10-inch full touch screen provides intuitive control:
- Switching Views: Slide left and right on the screen to switch between front camera view, rear camera view, or a split-screen display of both.
- Adjusting View Angle: Scroll up and down on the touchscreen to adjust the vertical viewing angle of the active camera.
- Adjusting Brightness: Slide left and right on the screen (when not switching views) to adjust the display brightness.

4.3. Recording Modes & Features
- Loop Recording: Ensures continuous recording by overwriting the oldest files when the memory card is full.
- G-Sensor: Automatically detects sudden collisions or impacts and locks the current video footage to prevent it from being overwritten.
- 24H Parking Monitor: When enabled (requires an extra ACC hardwire kit, not included), the dash cam will automatically start recording a locked video for approximately 20 seconds if it detects a collision while parked.
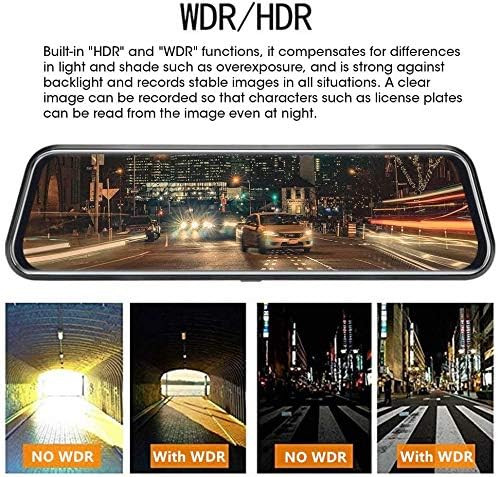
- Super Night Vision: Both front and rear 1080P cameras provide enhanced night vision in low-light conditions, utilizing WDR/HDR technology and a Starvis sensor with a 6-glass lens for clearer images.
- Parking Assist: When shifting into 'R' (reverse) gear, the screen automatically displays the rear camera's perspective with guidelines to assist with safe parking.

4.4. Voice Control
The dash cam supports voice commands for hands-free operation. Refer to the video below for a demonstration of voice control features:
4.5. Playback & File Management
Access recorded videos and images directly on the touch screen. Files are typically organized by date and time. Locked files (from G-sensor activation or parking monitor) are stored separately to prevent accidental deletion.
5. Maintenance
- Cleaning: Use a soft, dry cloth to clean the screen and camera lenses. Avoid abrasive materials or harsh chemicals.
- SD Card Formatting: Regularly format your Micro SD card (at least once a month) to ensure optimal performance and prevent data corruption. This can usually be done through the dash cam's settings menu.
- Firmware Updates: Check the Jansite official website periodically for any available firmware updates to improve performance and add new features.
6. Troubleshooting
- Dash Cam Not Powering On: Ensure the car charger is securely connected to both the dash cam and the car's cigarette lighter port. Check if the vehicle's power outlet is functioning.
- Recording Issues: Verify that the Micro SD card is inserted correctly and has sufficient free space. Format the SD card if necessary. Check the loop recording settings.
- Rear Camera Not Displaying: Ensure the rear camera cable is securely connected to both the rear camera and the main unit. Check the wiring to the reverse light if the parking assist feature is not working.
- Screen Freezing/Unresponsive: Try resetting the device (if a reset button is available, use a thin pin). If the issue persists, contact customer service.
- Poor Night Vision: Ensure camera lenses are clean. Verify that WDR/HDR settings are enabled in the menu.
7. Specifications
| Feature | Specification |
|---|---|
| Brand | Jansite |
| Model Name | RM |
| Screen Size | 10 Inches |
| Display Type | LCD |
| Control Method | Touch |
| Front Video Resolution | 1080p HD |
| Rear Video Resolution | 1080p HD |
| Front Field of View | 170 Degrees |
| Rear Field of View | 140 Degrees |
| Special Features | Loop Recording, Night Vision (WDR/HDR), G-Sensor, Parking Monitor, Parking Assist |
| Connectivity Technology | USB |
| Supported Storage | Micro SD card up to 128GB (not included) |
| Rear Camera Cable Length | 10 meters (33ft) |
| Item Weight | 64 Grams |
| Batteries | 1 Lithium Ion battery required (included) |
| UPC | 741376144744 |
8. Warranty & Support
Jansite is committed to providing high-quality products and excellent customer service. Your Jansite Mirror Dash Cam comes with a standard warranty (please refer to your purchase documentation for specific terms and duration).
For any questions, technical support, or warranty claims, please do not hesitate to contact our customer service team. We offer 24-hour customer service to assist you.
- Customer Service: Available 24/7
- Contact Information: Please refer to your product packaging or the official Jansite website for the most up-to-date contact details.


