
1. Overview
The GOTOTOP Mini Handheld Sewing Machine is a compact and portable device designed for quick repairs, alterations, and small sewing projects. Its lightweight and cordless design makes it ideal for home use, travel, and on-the-go mending. This manual provides essential information for safe and effective operation of your sewing machine.
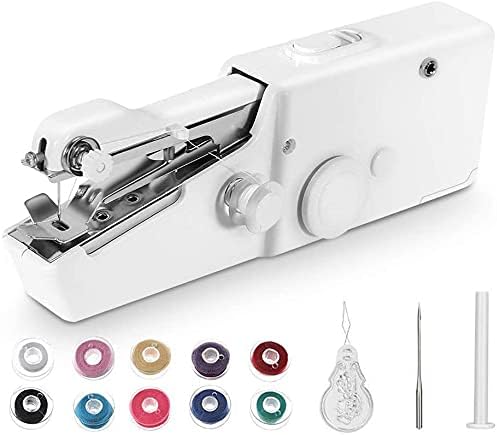
Image 1.1: The GOTOTOP Mini Handheld Sewing Machine shown with various colored bobbins, a needle threader, and spare needles.
2. Safety Instructions
- Keep the sewing machine away from children. This is not a toy.
- Do not immerse the machine in water or other liquids.
- Ensure batteries are inserted correctly according to polarity markings.
- Remove batteries if the machine will not be used for an extended period.
- Always turn off the power switch when not in use or when changing needles/bobbins.
- Exercise caution when handling the needle to prevent injury.
- Use only the recommended type and size of needle for this machine.
3. Package Contents
Please check the package to ensure all items are present:
- GOTOTOP Mini Handheld Sewing Machine
- Bobbins (various colors)
- Needle Threader
- Spare Needle
- Spindle for large thread spools

Image 3.1: The handheld sewing machine displayed with its standard accessories, including bobbins, a needle threader, and a spare needle.
4. Product Components
Familiarize yourself with the different parts of your sewing machine:

Image 4.1: Detailed diagram labeling the key components of the handheld sewing machine for identification and reference.
- Thread pass-through plates: Guides the thread from the bobbin.
- Thread tension controller: Adjusts the tightness of the stitch.
- Mechanized arm: The moving arm that holds the needle.
- Power switch: Turns the machine on and off.
- Safety lock lever: Secures the mechanized arm.
- Wall adapter input: Port for optional power adapter (not included).
- Needle screw: Holds the needle in place.
- Needle: The component that pierces the fabric to create stitches.
- Thread pass through hook: Guides the thread near the needle.
- Thread feeder: Guides the thread to the needle.
- Fastening plate: Holds the fabric in place during sewing.
- Bobbin: Spool holding the thread.
- Mechanized arm's rotatory wheel: Manually moves the needle up and down.
- Batteries compartment: Houses the AA batteries.
5. Setup
5.1 Battery Installation
The machine requires 4 x AA batteries (not included).
- Locate the battery compartment (14) on the side of the machine.
- Slide open the battery compartment cover.
- Insert 4 AA batteries, ensuring correct polarity (+/-) as indicated inside the compartment.
- Close the battery compartment cover securely.

Image 5.1: Visual guide showing the steps for battery installation and initial threading of the sewing machine.
5.2 Threading the Machine
Proper threading is crucial for correct stitching.
- Ensure the power switch (4) is in the OFF position.
- Lift the fastening plate (11) using the safety lock lever (5).
- Place a bobbin onto the bobbin pin. If using a large spool, use the included spindle.
- Guide the thread through the thread pass-through plates (1).
- Pass the thread through the thread tension controller (2).
- Thread the needle (8) from front to back using the needle threader.
- Pull approximately 10-15 cm (4-6 inches) of thread through the needle eye.

Image 5.2: Step-by-step visual instructions for threading the machine and preparing for sewing.
6. Operating Instructions
6.1 Preparing to Sew
- Ensure the machine is threaded correctly (refer to Section 5.2).
- Lift the fastening plate (11) using the safety lock lever (5).
- Place the fabric you wish to sew under the fastening plate.
- Lower the fastening plate onto the fabric.
6.2 Starting to Sew
- Hold the fabric gently with one hand.
- Slide the power switch (4) to the ON position to start sewing. The machine will begin stitching automatically.
- Guide the fabric slowly and steadily as the machine stitches. Do not pull the fabric forcefully.
6.3 Finishing a Stitch
- Once you have completed your seam, slide the power switch (4) to the OFF position.
- Lift the fastening plate (11).
- Carefully pull the fabric away from the machine, leaving a few inches of thread.
- Cut the thread and tie a knot at the end of the seam to secure the stitches.

Image 6.1: A hand demonstrating the operation of the sewing machine, highlighting the movable needle part.
7. Maintenance
Regular maintenance ensures optimal performance and longevity of your sewing machine.
- Cleaning: Use a soft, dry cloth to wipe down the exterior of the machine. Remove any lint or loose threads from the needle area and fastening plate using a small brush or tweezers.
- Needle Replacement: If the needle becomes bent, dull, or breaks, replace it immediately. Loosen the needle screw (7), remove the old needle, insert a new needle with the flat side facing away from you, and tighten the screw securely.
- Storage: Store the machine in a dry place, away from direct sunlight and extreme temperatures. Remove batteries if storing for extended periods.
8. Troubleshooting
If you encounter issues, refer to the following common problems and solutions:
| Problem | Possible Cause | Solution |
|---|---|---|
| Machine does not start | Batteries are dead or incorrectly inserted. Power switch is off. | Replace batteries or check polarity. Ensure power switch is ON. |
| Thread breaks frequently | Incorrect threading. Thread tension too high. Damaged needle. | Re-thread the machine carefully. Adjust thread tension controller (2). Replace needle. |
| Skipped stitches | Incorrect needle insertion. Bent or dull needle. | Ensure needle is inserted correctly with flat side away from you. Replace needle. |
| Stitches are loose | Thread tension too low. | Increase thread tension using the thread tension controller (2). |
9. Specifications
- Brand: GOTOTOP
- Model: Mini Handheld Sewing Machine
- ASIN: B07ZQDCXJL
- UPC: 737983052619
- Power Source: 4 x AA Batteries (not included)
- Product Dimensions: Approximately 8.15" L x 2.87" W x 1.34" H
- Item Weight: Approximately 9.9 ounces

Image 9.1: Diagram illustrating the compact dimensions of the handheld sewing machine.
10. Warranty and Support
For any questions regarding installation, product operation, or warranty information, please contact GOTOTOP customer service. We are committed to providing a satisfactory solution for our customers.
Contact information can typically be found on the retailer's website or through the platform where the product was purchased.