1. Introduction
This manual provides essential information for the proper installation, operation, and maintenance of your Eksahol BRJ-502 Natural Gas Detector. This device is designed to detect various combustible gases, including LPG (Propane), natural gas, coal gas, LNG, and Methane, providing an audible and visual alarm in the event of a leak. Please read this manual thoroughly before use to ensure safe and effective operation.
2. Product Overview and Features
The Eksahol BRJ-502 Gas Detector is a plug-in unit equipped with a semiconductor sensor for reliable gas detection. It features an intelligent MCU system for processing and alerting.
Key Features:
- Comprehensive Gas Detection: Detects LPG (Propane), natural gas, coal gas, LNG, and Methane.
- Visual and Audible Alerts: Triggers an alarm at over 85 dB and provides visual indicators when a gas leak is detected.
- Easy Installation: Designed for simple plug-in setup.
- Self-Test Function: Requires a 150-second warm-up period during which the system performs a self-test.
- Versatile Application: Suitable for residential use, RVs, and can integrate into larger alarm systems for commercial settings.

Figure 1: Front and side view of the Eksahol BRJ-502 Natural Gas Detector. The front features a digital display, a button, and indicator lights for Power, State, and Alarm. The side shows the plug for a standard electrical outlet.
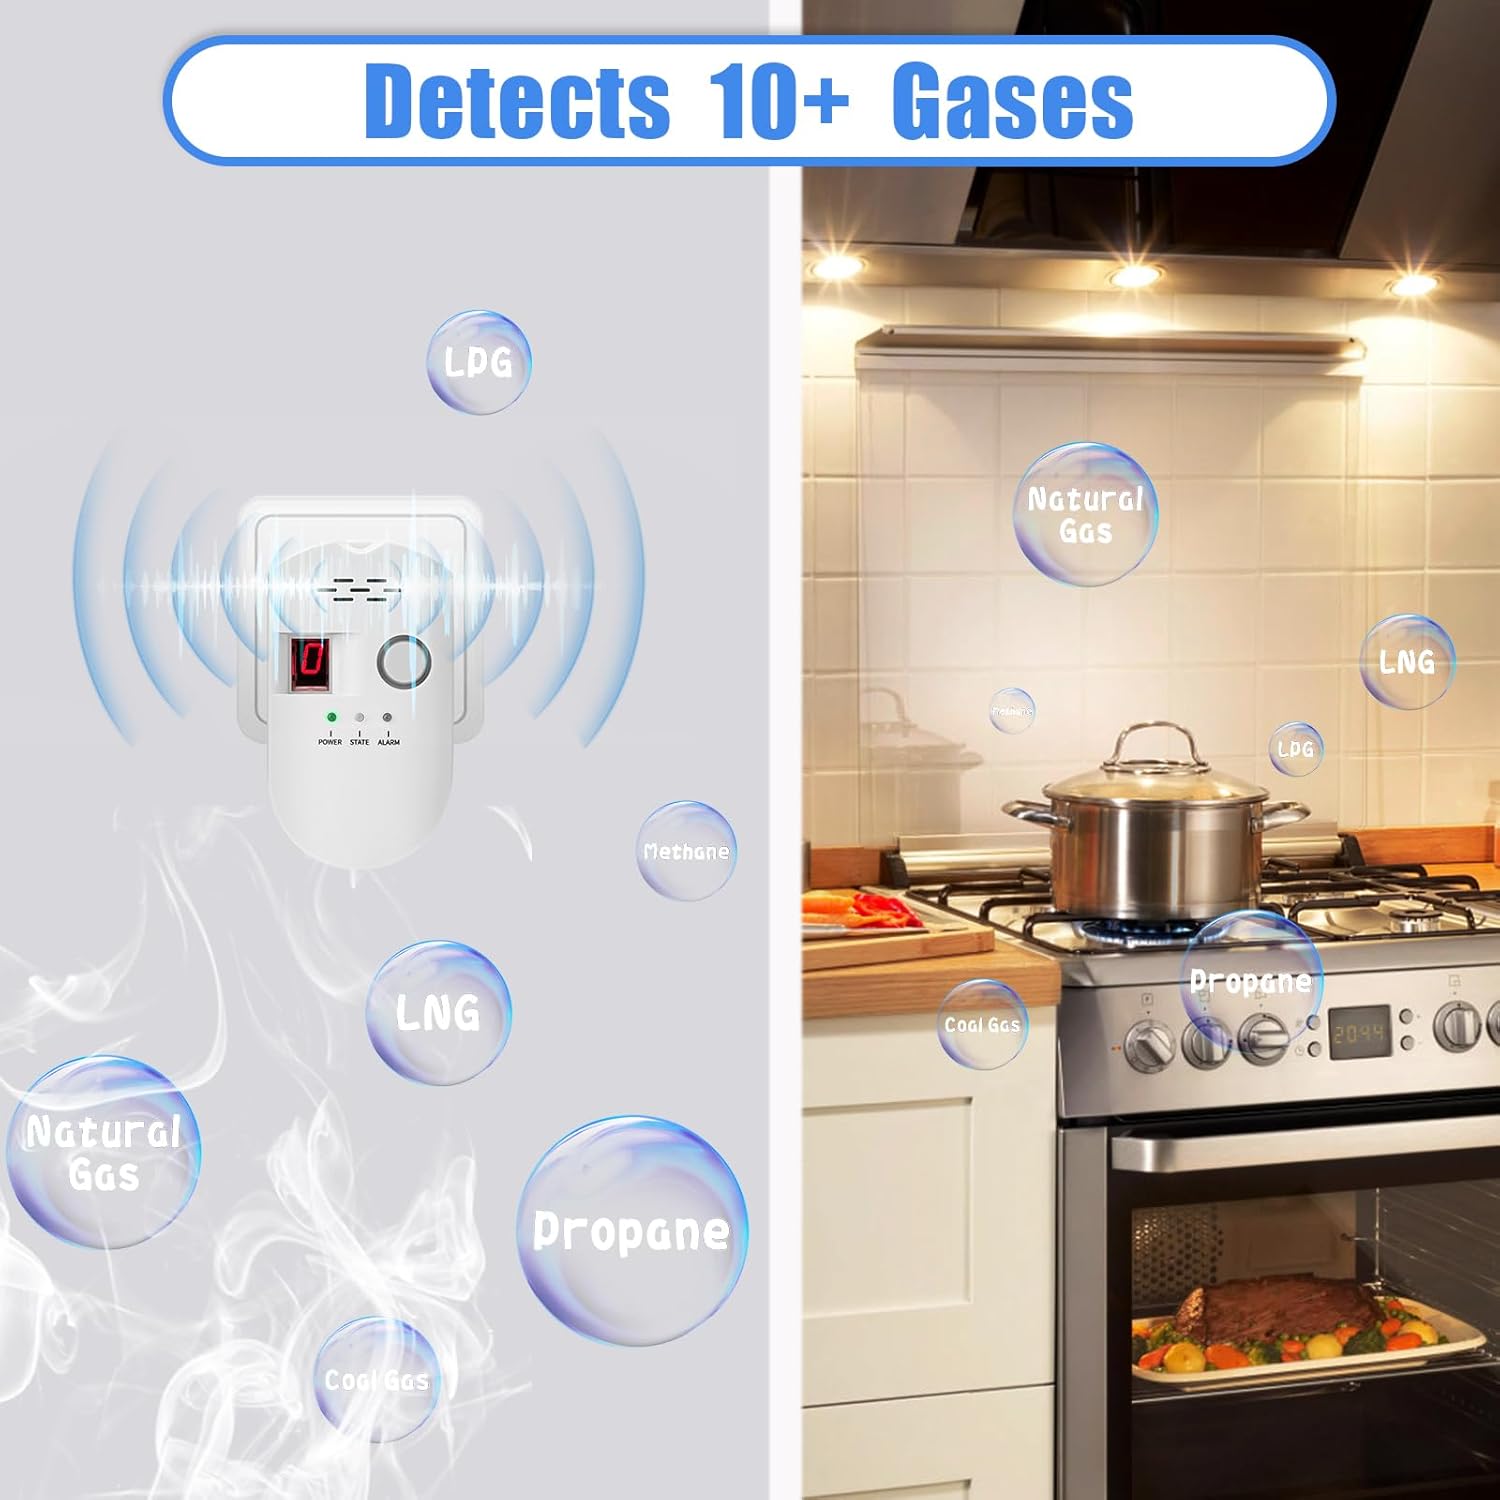
Figure 2: Illustration showing the detector's capability to detect multiple types of combustible gases, including LPG, Natural Gas, LNG, Propane, Methane, and Coal Gas, in a kitchen environment.
3. Setup and Installation
The detector is designed for simple plug-in installation. Proper placement is crucial for effective gas detection.
Installation Steps:
- Identify the type of gas you need to detect (e.g., natural gas, LPG).
- Choose an appropriate location based on the gas type and its density relative to air.
- Plug the detector into a standard power socket.
Placement Guidelines:
- For Natural Gas/Coal Gas (Lighter than air): Install the detector 0.3-1 meter (approximately 1-3 feet) below the ceiling and within 1.8 meters (approximately 6 feet) of the gas source.
- For LPG/Propane (Heavier than air): Install the detector 0.3-1 meter (approximately 1-3 feet) above the floor and within 1.8 meters (approximately 6 feet) of the gas source.
- Avoid placing the detector near ventilation openings, windows, doors, or areas with high humidity or extreme temperatures.
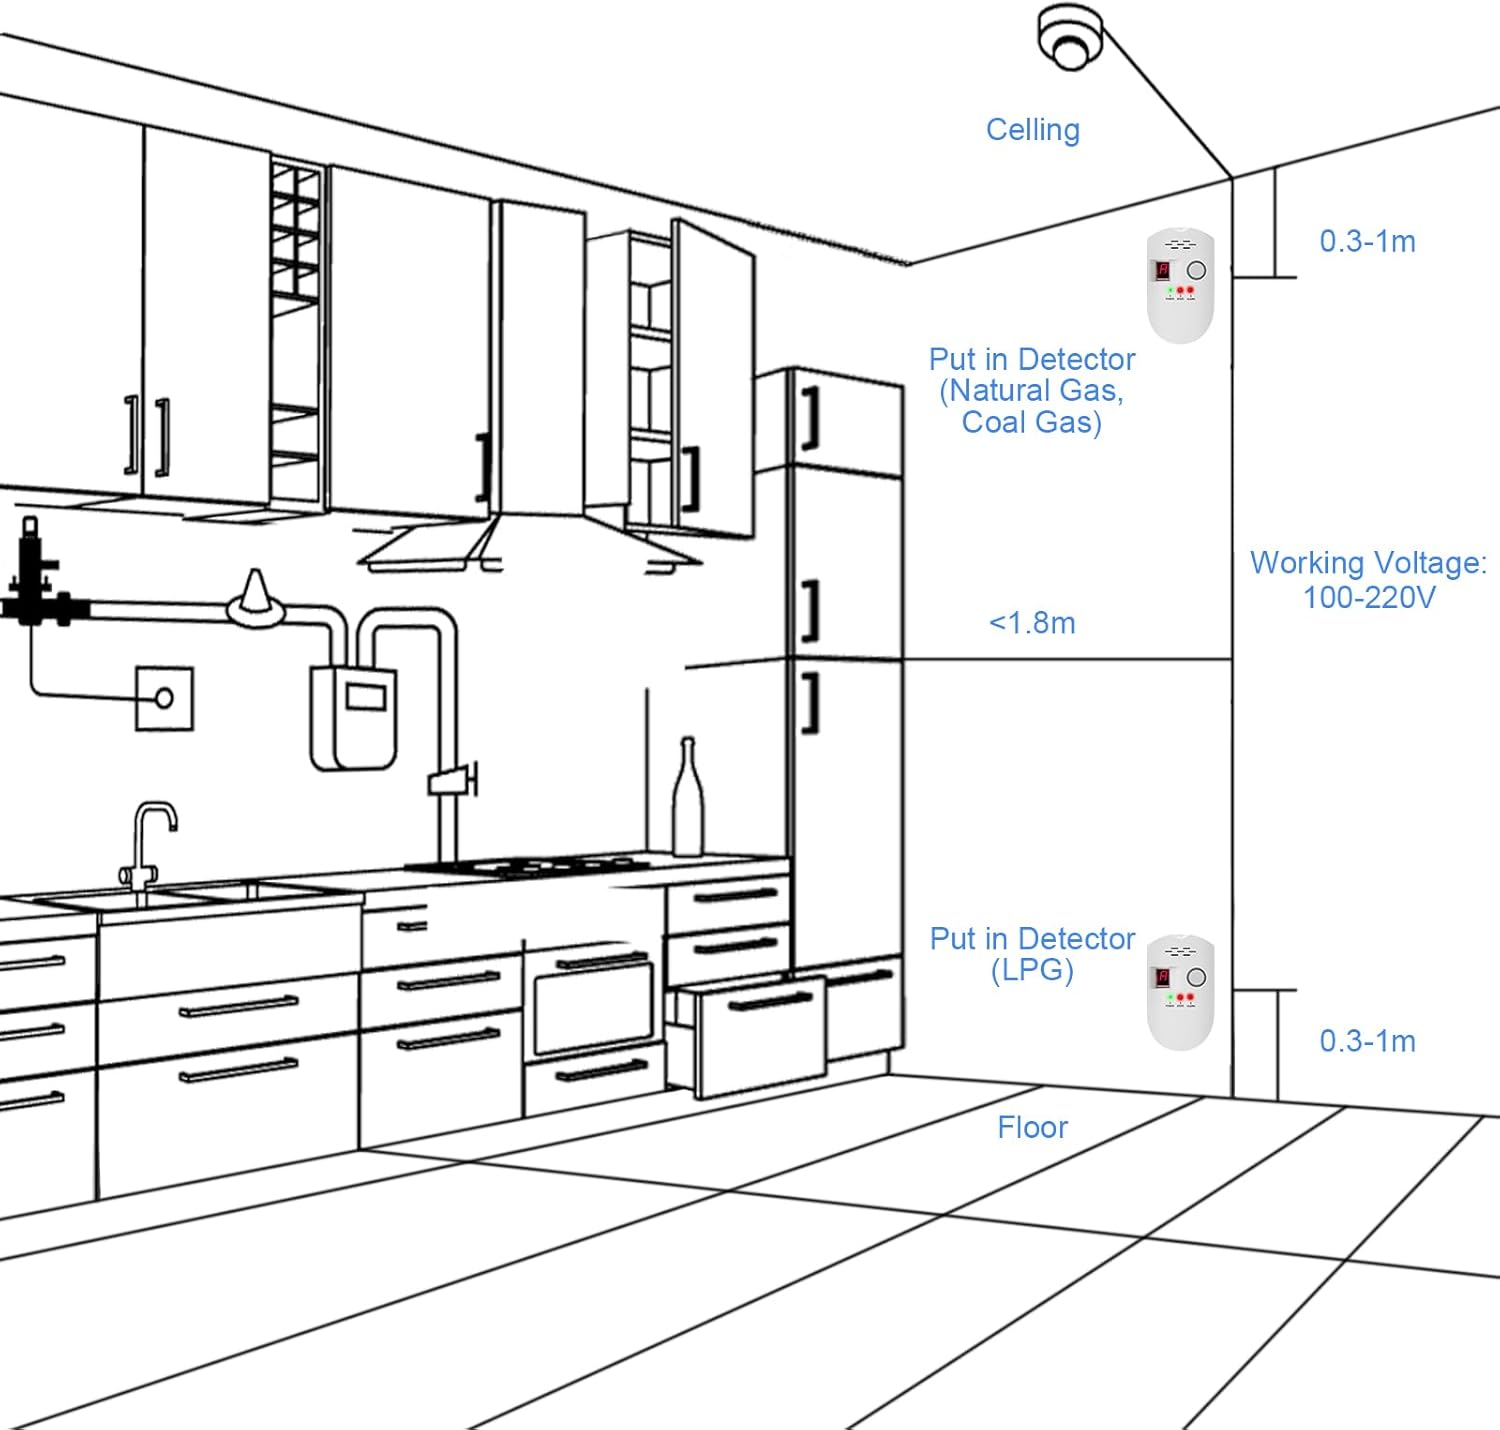
Figure 3: Installation diagram showing recommended placement for the gas detector. For natural gas (lighter than air), place it higher on the wall. For LPG (heavier than air), place it lower on the wall. Both should be within 0.3-1m from the ceiling/floor and less than 1.8m from the gas source.
4. Operating Instructions
Initial Warm-up:
Upon plugging in the detector, it will undergo a 150-second warm-up period. During this time, the gas detection function is not active. The digital display may show a countdown or other indicators. Wait until the display shows "0" before considering the system fully operational.
Normal Operation:
Once the warm-up is complete, the detector will continuously monitor the air for combustible gases. The digital display will typically show "0" under normal, gas-free conditions. The green "POWER" indicator light will be illuminated.
Alarm Conditions:
If a gas leak is detected, the detector will provide both visual and audible alerts:
- The red "ALARM" indicator light will flash.
- An audible alarm exceeding 85 dB will sound.
- The digital display will show the detected gas concentration level (e.g., 0-2% LEL, 3%-5% LEL, 6%-9% LEL, >9% LEL).
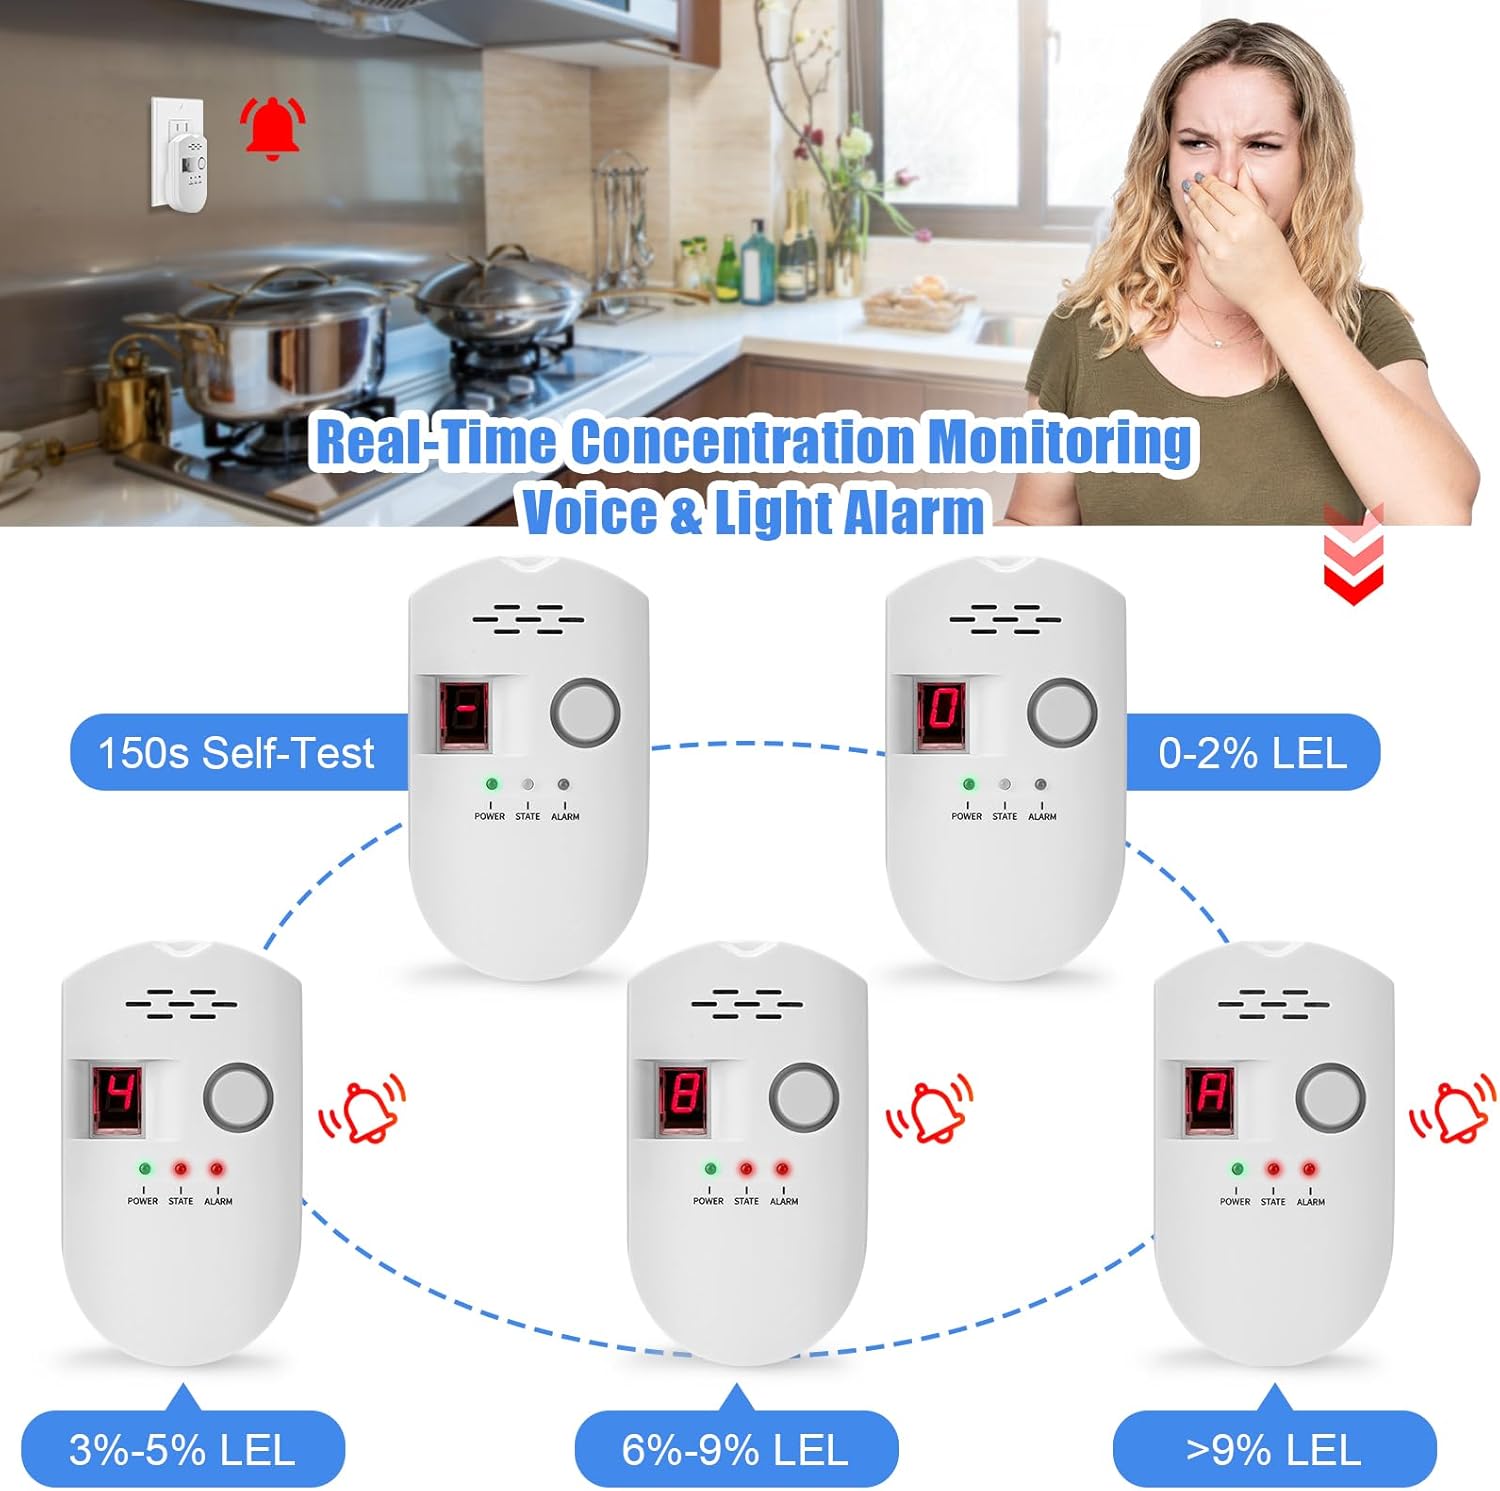
Figure 4: The detector's digital display showing various gas concentration levels (LEL percentages) and corresponding alarm states, from 0% LEL to over 9% LEL, indicating increasing gas presence.
5. Testing the Detector
It is recommended to test the detector periodically to ensure it is functioning correctly. A simple test can be performed using a gas lighter (without igniting a flame).
Testing Procedure:
- Turn on a gas lighter (do not ignite the flame).
- Blow out any flame if accidentally ignited.
- Release gas continuously from the lighter near the detector's sensor for a few seconds.
- The detector should sound an alarm and the red "ALARM" light should illuminate.
- Remove the gas source. The alarm should cease, and the display should return to "0" after the gas dissipates.

Figure 5: Step-by-step guide for testing the gas detector. It shows turning on a lighter, blowing out the flame, releasing gas near the detector, and the detector sounding an alarm.
6. Maintenance
To ensure optimal performance and longevity of your gas detector, follow these maintenance guidelines:
- Regular Cleaning: Gently wipe the exterior of the detector with a soft, dry cloth. Do not use harsh chemicals, solvents, or abrasive cleaners.
- Avoid Obstructions: Ensure that the sensor openings are not blocked by dust, dirt, or other objects.
- Environmental Conditions: Keep the detector within its specified operating temperature and humidity ranges.
- Periodic Testing: Perform the testing procedure described in Section 5 at least once a month.
7. Troubleshooting
If you encounter issues with your gas detector, refer to the following table for common problems and solutions.
| Problem | Possible Cause | Solution |
|---|---|---|
| Detector does not power on. | No power to the outlet; detector malfunction. | Check the power outlet with another device. If the outlet works, contact customer support. |
| Alarm sounds frequently without a detectable gas leak. | False alarm due to strong odors (e.g., cleaning products, aerosols, alcohol, paint fumes); sensor contamination; detector malfunction. | Ventilate the area. Relocate the detector away from sources of strong odors. Clean the detector. If false alarms persist, contact customer support. |
| Detector does not alarm during test with gas lighter. | Insufficient gas concentration; detector malfunction; warm-up period not complete. | Ensure the warm-up period is complete (display shows "0"). Apply gas closer to the sensor. If it still fails, contact customer support. |
| Display shows an error code. | Internal fault. | Unplug the detector for 30 seconds and plug it back in. If the error persists, contact customer support. |
8. Technical Specifications
Detailed specifications for the Eksahol BRJ-502 Natural Gas Detector.
| Specification | Value |
|---|---|
| Brand | Eksahol |
| Model Number | BRJ-502 |
| Power Source | Plug-in |
| Product Dimensions | 1.3"D x 2.7"W x 4.8"H |
| Item Weight | 0.31 Pounds (approx. 5 ounces) |
| Alarm Volume | 85dB |
| Operating Temperature | -13°F to 131°F (-25°C to 55°C) |
| Sensor Type | Semiconductor / Electrochemical |
| Material | ABS |
| UPC | 732376633857 |

Figure 6: Dimensions of the Eksahol BRJ-502 Gas Detector, measuring 1.3 inches in depth, 2.7 inches in width, and 4.8 inches in height.
9. Important Safety Precautions
Please observe the following safety precautions to prevent injury or damage:
- This detector is designed to alert you to the presence of combustible gases. It is not a substitute for proper gas appliance maintenance or regular safety checks.
- Do not paint the detector. Paint can clog the sensor openings and interfere with the detector's ability to sense gas.
- Do not block or cover the detector's vents or alarm openings.
- Do not disassemble or attempt to repair the detector. Refer all servicing to qualified personnel.
- In case of an alarm, immediately ventilate the area, turn off gas appliances, and evacuate if necessary. Contact your gas provider or emergency services.
- The detector requires a 150-second warm-up period during which it is not active. Ensure this period is complete before relying on the detector.
10. Warranty and Support
For warranty information or technical support, please refer to the product packaging or contact the manufacturer directly through their official channels. Keep your purchase receipt as proof of purchase.