1. Introduction
Welcome to the user manual for your KICKER 6x9 CSC Wakeboard Tower Rollbar Speakers. This manual provides essential information for the proper installation, operation, maintenance, and troubleshooting of your new audio system. Please read this manual thoroughly before attempting to install or operate the speakers to ensure optimal performance and longevity.
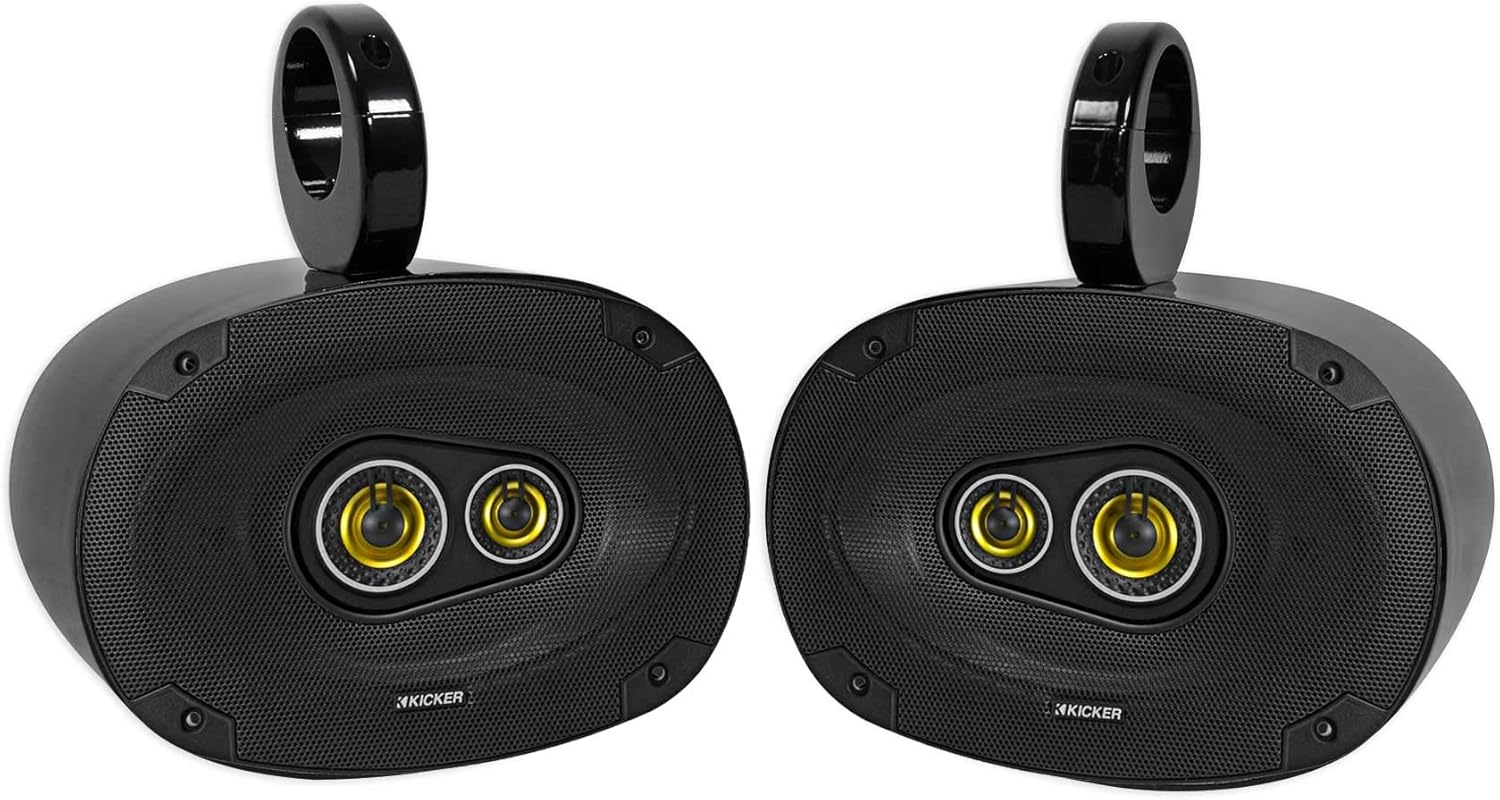
2. Product Overview
The KICKER 6x9 CSC Wakeboard Tower Rollbar Speakers are designed to deliver remarkable audio performance and ultra-clean bass in challenging environments such as boats, ATVs, UTVs, RZRs, carts, and Jeeps. These 3-way speakers feature heavy-duty motor/magnet structures with EVC (Extended Voice Coil) technology, polypropylene cones, and tough, ribbed, UV-treated surrounds for precise linear excursion and reliability. They are engineered to provide clear, powerful sound, making them an ideal upgrade for your vehicle's audio system.
3. Features
- Pair of KICKER 46CSC6934 6x9" 900 Watt 4-Ohm 3-Way Car Audio Speakers CSC693.
- Includes a pair of Rockville MAC69B 6x9 Black Aluminum Wakeboard Tower Speaker Pod Enclosures.
- Zero-protrusion tweeters designed to fit nearly any factory depth.
- Woofer EVC (Extended Voice Coil) technology assists with precise linear excursion.
- UV-treated poly-foam surround resists heat and direct sunlight.
- Large woofer magnet in a heavy-duty motor for ultra-clean bass.
- Integrated 2-inch (50mm) midrange drivers provide detailed attention to mid frequencies.
- PEI-tweeter construction ensures superb clarity.
- Neodymium tweeter magnets allow for increased volume in high frequencies.
- Steel mesh grilles included for speaker protection.
- Enclosures made of high-quality 6061 aircraft grade aluminum with a beautiful black powder-coat finish.
- 100% waterproof and fully marinized against salt and fresh water conditions.
- Internally wired for clean installation with no exposed wires or terminals.
- Rugged universal mounting clamps made of 6061 aluminum.
- Includes precision molded, high impact plastic inserts for tower fitment from 2" diameter to 2.5" diameter.
4. What's in the Box
Your package should contain the following items:
- One (1) Pair of Kicker 46CSC6934 6x9 speakers
- One (1) Pair of Rockville MAC69B enclosures

5. Setup and Installation
Proper installation is crucial for the performance and safety of your speakers. It is recommended that installation be performed by a qualified professional.
5.1 Mounting the Speakers
- Choose a Location: Select a suitable location on your wakeboard tower or rollbar that allows for optimal sound dispersion and does not obstruct visibility or movement. Ensure the mounting surface is strong enough to support the weight of the speakers.
- Attach Clamps: Use the provided rugged universal mounting clamps. These clamps are designed to fit tower diameters from 2" to 2.5" using the included precision molded plastic inserts. Securely attach the clamps to the desired location.
- Mount Enclosures: Attach the speaker enclosures to the mounted clamps. Ensure all bolts and fasteners are tightened securely to prevent vibration and movement during operation.
5.2 Wiring Connections
The Rockville MAC69B enclosures are internally wired for a clean installation, meaning no exposed wires or terminals on the exterior of the pod.
- Identify Wiring: Locate the speaker wire leads extending from the enclosure. These are typically color-coded for positive and negative connections.
- Connect to Amplifier/Source: Connect the speaker wires to your amplifier or head unit's speaker outputs. Ensure correct polarity (positive to positive, negative to negative) to avoid phase issues that can degrade sound quality.
- Secure Connections: Use high-quality connectors (e.g., crimp connectors, solder) and insulate all connections with heat shrink tubing or electrical tape to prevent short circuits and corrosion, especially in marine environments.
- Route Cables: Route all cables safely, away from moving parts, sharp edges, and heat sources. Use cable ties to secure wiring and maintain a tidy installation.

6. Operating Instructions
Once properly installed, operating your KICKER 6x9 CSC speakers is straightforward. These speakers are designed to work with an external amplifier or head unit.
- Power On: Turn on your audio source (head unit, amplifier).
- Adjust Volume: Gradually increase the volume to a comfortable listening level. Avoid excessive volume that causes distortion, as this can damage the speakers.
- Audio Settings: Adjust bass, treble, and balance settings on your audio source to optimize sound quality according to your preference. The speakers have a frequency response of 30 Hz, providing deep bass.
- Power Handling: These speakers have a peak power rating of 300 watts. Ensure your amplifier's output does not exceed the speaker's power handling capabilities to prevent damage.
7. Maintenance
To ensure the longevity and optimal performance of your KICKER 6x9 CSC speakers, follow these maintenance guidelines:
- Cleaning: Regularly clean the speaker grilles and enclosures with a soft, damp cloth. Avoid using harsh chemicals, abrasive cleaners, or solvents, as these can damage the finish and materials.
- Water Exposure: While the speakers and enclosures are 100% waterproof and marinized, it is good practice to rinse them with fresh water after exposure to saltwater to prevent salt buildup and corrosion.
- UV Protection: The poly-foam surrounds are UV-treated, but prolonged exposure to direct sunlight can still cause wear over time. If possible, cover the speakers when not in use for extended periods.
- Inspect Connections: Periodically check all wiring connections for tightness and signs of corrosion. Loose or corroded connections can lead to poor sound quality or speaker failure.
- Environmental Care: Ensure the speakers are not exposed to extreme temperatures outside their operating range.
8. Troubleshooting
If you experience issues with your speakers, refer to the following common troubleshooting steps:
| Problem | Possible Cause | Solution |
|---|---|---|
| No sound from speakers | Loose or incorrect wiring connections Amplifier/head unit not powered on Blown fuse in audio system | Check all speaker wire connections for proper polarity and tightness. Ensure amplifier/head unit is receiving power and is turned on. Inspect and replace any blown fuses in your audio system. |
| Distorted or poor sound quality | Volume too high, causing clipping Incorrect audio settings (bass/treble) Loose speaker mounting Damaged speaker cone/surround | Reduce volume to eliminate distortion. Adjust bass and treble settings on your audio source. Ensure speakers are securely mounted to prevent vibration. Inspect speaker cones and surrounds for visible damage. If damaged, professional repair may be required. |
| One speaker not working | Loose connection to that specific speaker Faulty speaker wire Damaged speaker | Check wiring connections for the non-working speaker. Test the speaker with a known good wire or swap channels on the amplifier to isolate the issue. If the speaker is damaged, it may need replacement. |
If the problem persists after attempting these solutions, please consult a qualified audio technician.
9. Specifications
| Specification | Value |
|---|---|
| Model Name | CSC Wakeboard |
| Item Model Number | 46CSC6934 |
| Speaker Type | 3-Way Coaxial, Surround Sound, Woofer |
| Speaker Size | 6x9 Inches |
| Speaker Maximum Output Power | 300 Watts (Peak) |
| Frequency Response | 30 Hz |
| Connectivity Technology | Coaxial, Wired |
| Mounting Type | Boat Mount, Car Mount (Rollbar/Tower) |
| Compatible Devices | Car, Boat, ATV, UTV, RZR, Cart, Jeep |
| Product Dimensions (Enclosure) | 15.25"D x 10"W x 4.68"H |
| Item Weight | 17.95 pounds (total package) |
| Is Waterproof | True |
| Unit Count | 4.0 Count (speakers + enclosures) |
10. Warranty and Support
Your KICKER 6x9 CSC Wakeboard Tower Rollbar Speakers come with a Limited Warranty. For specific details regarding the warranty period and coverage, please refer to the warranty documentation included with your purchase or contact KICKER customer support directly.
For technical assistance, troubleshooting beyond the scope of this manual, or warranty claims, please contact the manufacturer's customer support. Keep your proof of purchase and model number readily available when contacting support.


