1. Safety Information
Please read these safety instructions carefully before using the device. Failure to follow these instructions may result in laser radiation exposure or electric shock.
1.1 Laser Safety
- CAUTION: This device emits a Class 2 laser. Do not stare directly into the laser beam.
- Do not aim the laser beam at people or animals.
- Do not disassemble or modify the device. Unauthorized repairs can cause laser radiation exposure.
- Keep the device out of reach of children.
1.2 General Precautions
- Avoid using the device in direct sunlight or extremely bright conditions, as this may affect measurement accuracy and visibility of the laser point.
- Protect the device from moisture, dust, and strong impacts. The device has an IP54 rating for splash and dust protection, but it is not waterproof.
- Do not store the device in extreme temperatures.
2. Product Overview
The POPOMAN MTM100A is an advanced laser distance meter designed for accurate and efficient measurements. It features an electronic angle sensor for real-time angle display and multiple measurement modes.

Figure 2.1: POPOMAN MTM100A device dimensions and measurement mode icons. The device measures approximately 112mm in height, 50mm in width, and 25mm in depth. Icons represent various functions including single measurement, area, volume, Pythagorean, continuous measurement, and mute.
2.1 Key Features
- Measurement Range: 0.05m to 50m
- Accuracy: ± 2mm
- Electronic Angle Sensor: Real-time angle display for improved accuracy.
- Multiple Measurement Modes: Distance, Area, Volume, Pythagorean (single/double), Continuous, Addition/Subtraction, Max/Min values, Delay Measurement.
- Units: Switchable between meters (m), inches (in), feet (ft), and feet+inches (ft+in).
- LCD Display: Backlit for visibility in low-light conditions, 5-line data display.
- Data Storage: Stores up to 30 sets of measurements.
- Mute Function: Allows silent operation.
- Auto-Off: Device powers off automatically after 150 seconds of inactivity to conserve battery.
- IP54 Rating: Provides protection against dust and splashing water.
3. Setup
3.1 Package Contents
Verify that all items are present in the package:

Figure 3.1: The complete package includes the MTM100A device, two AAA batteries, a user manual, a protective carrying bag, a wrist strap for secure handling, and a reflective plate for enhanced visibility in challenging conditions.
- POPOMAN MTM100A Laser Distance Meter
- 2 x 1.5V AAA Batteries
- User Manual
- Portable Carrying Bag
- Wrist Strap
- Reflective Plate
3.2 Battery Installation
- Locate the battery compartment cover on the back of the device.
- Slide the cover open.
- Insert two 1.5V AAA alkaline batteries, ensuring correct polarity (+/-).
- Close the battery compartment cover securely.
4. Operating Instructions
4.1 Power On/Off
- Power On: Press the [READ] button once to turn on the device and activate the laser.
- Power Off: Press and hold the [OFF/CLEAR] button for 2 seconds to turn off the device. The device will automatically power off after 150 seconds of inactivity.
4.2 Basic Measurement

Figure 4.1: Proper handling of the device during a measurement, ensuring the laser is directed at the target surface.
- Turn on the device by pressing [READ]. The laser will activate.
- Aim the laser beam at the target point.
- Press [READ] again to take a single measurement. The result will be displayed on the screen.
5. Measurement Functions
The MTM100A offers various measurement modes to suit different needs. Press the [FUNC] button to cycle through the available modes.
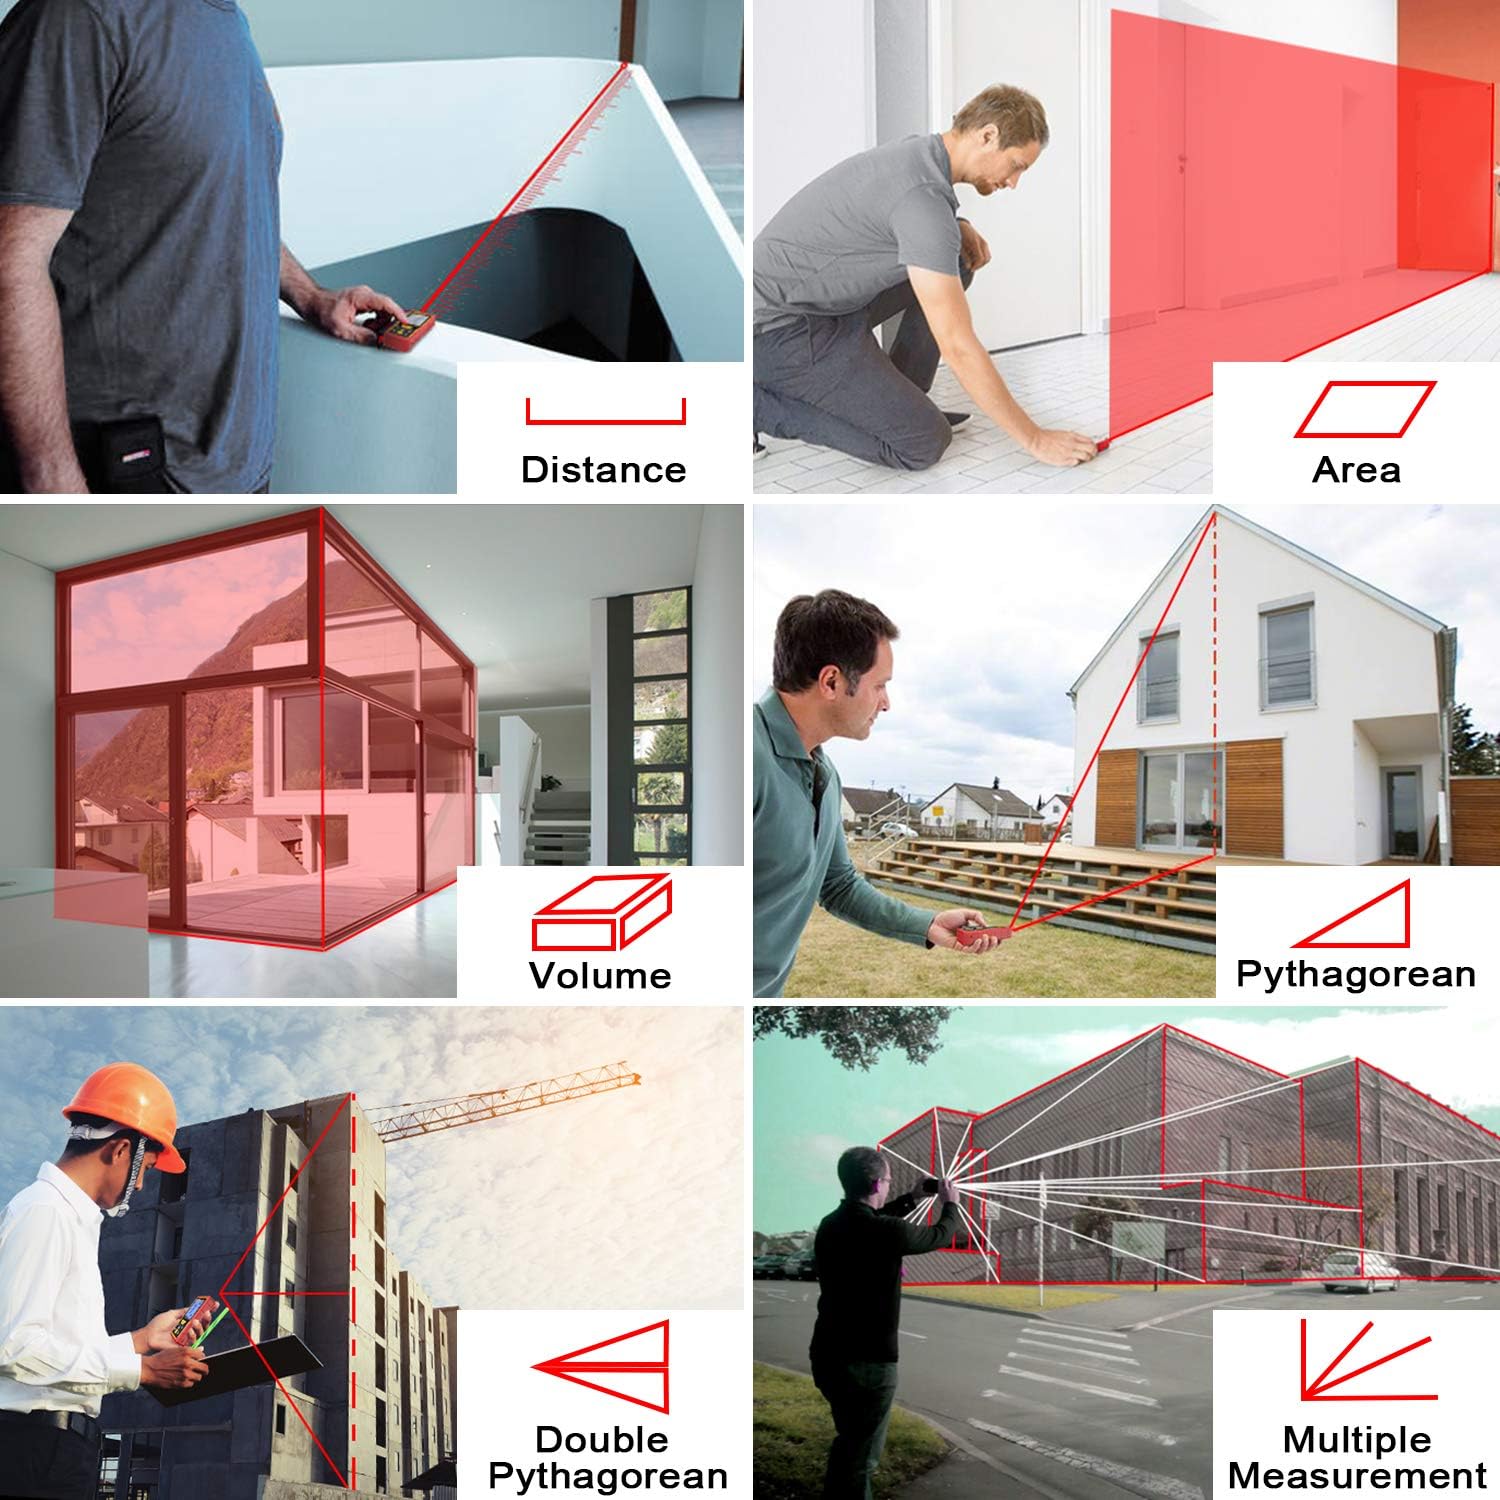
Figure 5.1: Visual guide to various measurement types: Distance, Area, Volume, Pythagorean (single and double), and Multiple Measurements.
5.1 Distance Measurement
This is the default mode for single linear measurements. Refer to Section 4.2 for basic operation.
5.2 Area Measurement
- Press [FUNC] until the area icon (square) appears on the display.
- Press [READ] to measure the first side (length).
- Press [READ] again to measure the second side (width).
- The device will automatically calculate and display the area.
5.3 Volume Measurement
- Press [FUNC] until the volume icon (cube) appears on the display.
- Press [READ] to measure the length.
- Press [READ] to measure the width.
- Press [READ] to measure the height.
- The device will automatically calculate and display the volume.
5.4 Pythagorean Measurement
Used for indirect measurement of height or distance when direct measurement is obstructed.
5.4.1 Single Pythagorean Mode
- Press [FUNC] until the single Pythagorean icon (right triangle with hypotenuse and one leg known) appears.
- Measure the hypotenuse (distance from device to top of object).
- Measure the base (distance from device to bottom of object).
- The device calculates the vertical height.
5.4.2 Double Pythagorean Mode
- Press [FUNC] until the double Pythagorean icon (two right triangles sharing a leg) appears.
- Measure the first hypotenuse (distance from device to top of object).
- Measure the second hypotenuse (distance from device to middle point).
- Measure the base (distance from device to bottom of object).
- The device calculates the total vertical height.
5.5 Continuous Measurement (Max/Min)
This mode allows for dynamic measurement, displaying the current, maximum, and minimum distances as you move the device.
- Press [FUNC] until the continuous measurement icon (arrow with two lines) appears.
- Press [READ] to start continuous measurement.
- Move the device slowly. The display will show current, maximum, and minimum values.
- Press [READ] again to stop continuous measurement.
5.6 Electronic Angle Sensor
The integrated electronic angle sensor provides real-time angle readings, which can be used for more precise measurements or as a digital level.

Figure 5.2: The electronic angle sensor provides real-time angle display, enhancing measurement accuracy by showing the device's tilt.
The angle is displayed on the screen, allowing for more accurate positioning or for use in conjunction with Pythagorean functions.
5.7 Addition and Subtraction
After taking a measurement, you can add or subtract subsequent measurements.
- Take a measurement.
- Press [+] for addition or [-] for subtraction.
- Take the next measurement. The result will be added to or subtracted from the previous total.
5.8 Delay Measurement
This function allows you to set a timer before a measurement is taken, preventing device movement from affecting accuracy.
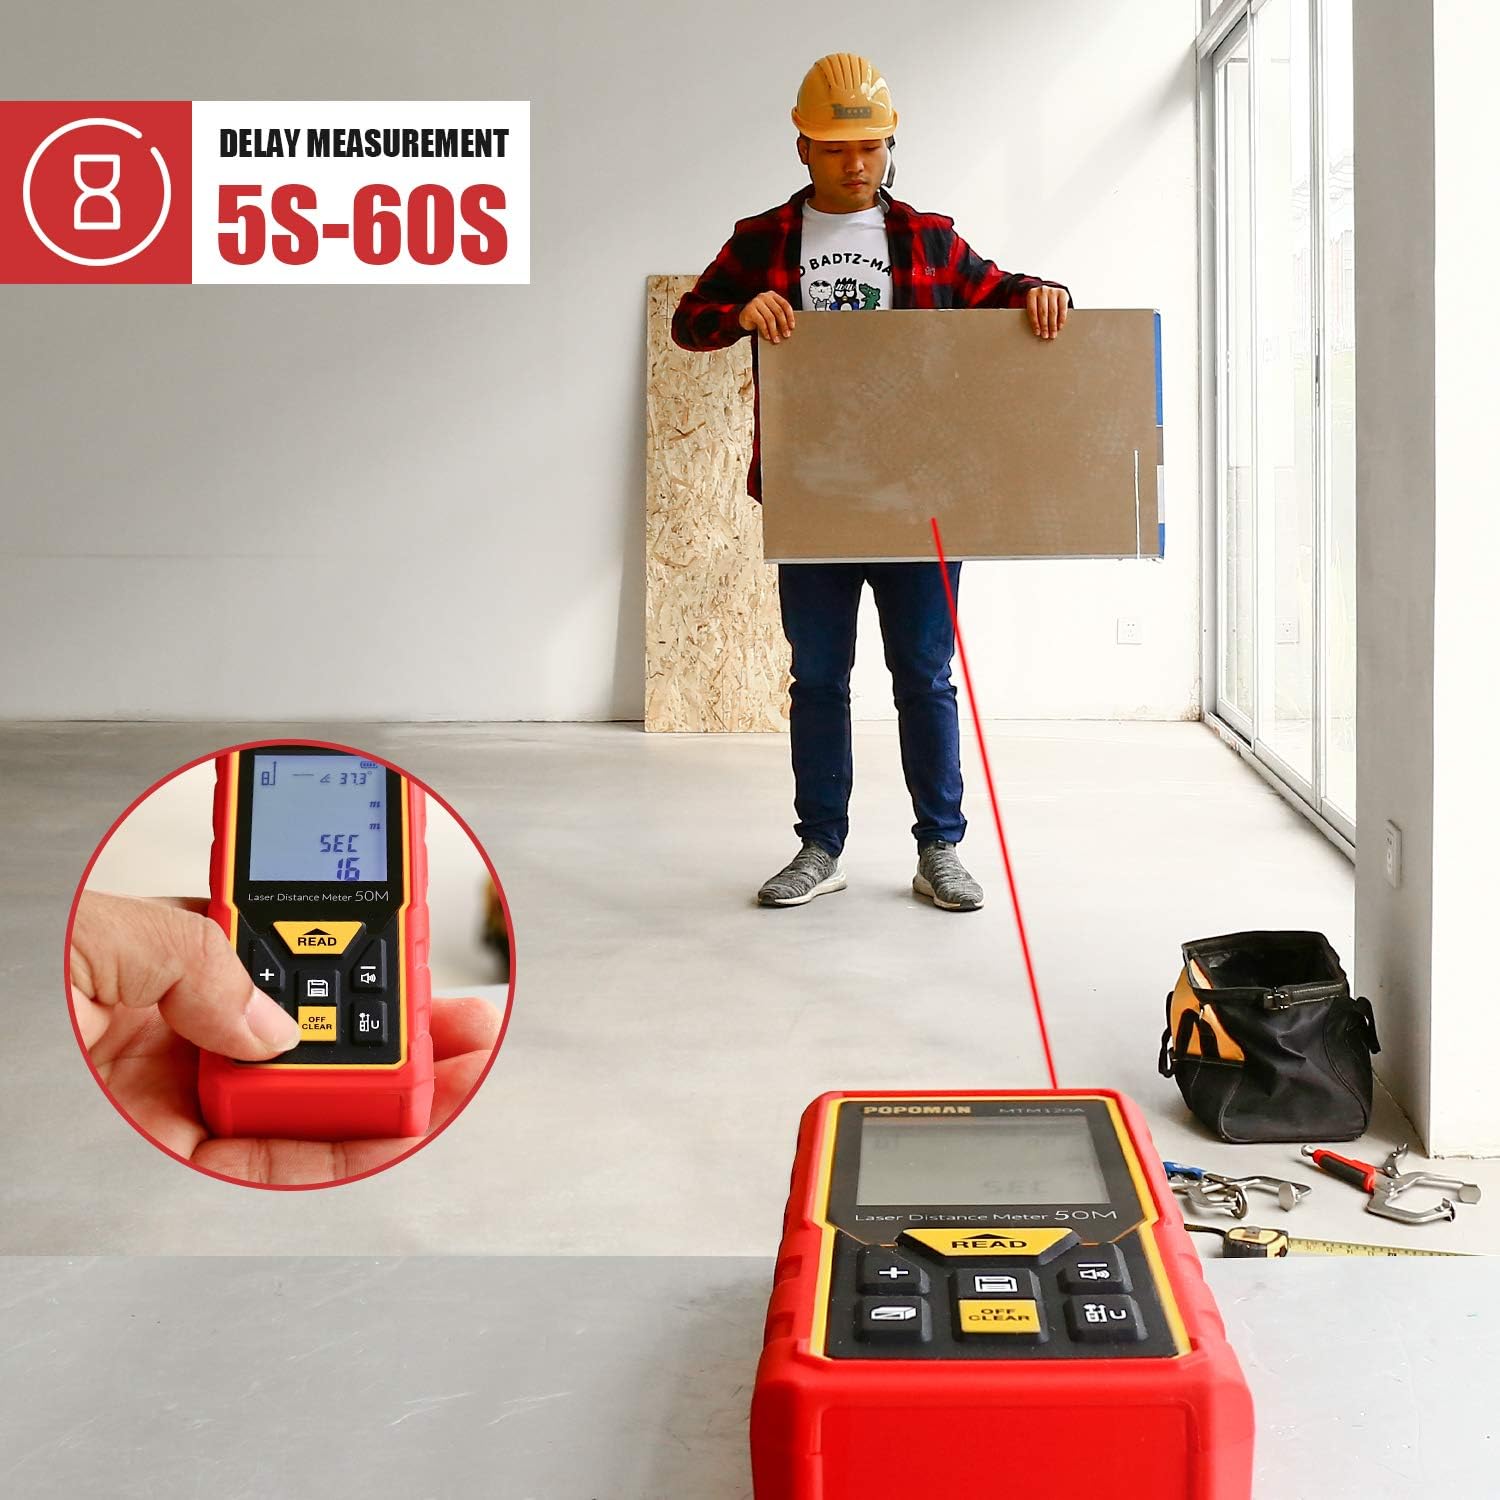
Figure 5.3: The delay measurement function allows setting a timer (5-60 seconds) before the measurement is taken, useful for stable positioning and avoiding hand shake.
- Press and hold the [FUNC] button to enter delay measurement setting.
- Use [+] or [-] to adjust the delay time (5-60 seconds).
- Press [READ] to confirm the delay and start the countdown. The measurement will be taken automatically after the set time.
6. Settings
6.1 Unit Switching
To change the measurement unit:
- Press the [UNIT] button (often labeled with 'U' or 'm/in/ft') to cycle through meters (m), inches (in), feet (ft), and feet+inches (ft+in).
- The selected unit will be displayed on the screen.
6.2 Mute Function
The mute function allows you to disable the measurement beep, useful in quiet environments.
- Press the [MUTE] button (often labeled with a speaker icon) to toggle the sound on or off.
- A speaker icon with a cross will indicate that the sound is muted.
7. Data Storage
The device can store up to 30 sets of measurement data.
7.1 Recalling Data
- Press the [MEM] button (often labeled with 'M' or a memory icon).
- Use the [+] or [-] buttons to scroll through the stored measurements.
- Press [MEM] again to exit the memory view.
7.2 Clearing Data
To clear the current measurement from the display, press the [OFF/CLEAR] button once. To clear all stored data, refer to the troubleshooting section or specific instructions in the full manual if available.
8. Maintenance
8.1 Cleaning
- Wipe the device with a soft, damp cloth. Do not use abrasive cleaners or solvents.
- Clean the laser lens carefully with a soft cloth, similar to cleaning camera lenses.
8.2 Storage
- When not in use for extended periods, remove the batteries to prevent leakage.
- Store the device in its portable bag in a cool, dry place, away from direct sunlight and extreme temperatures.
9. Troubleshooting
If you encounter issues with your POPOMAN MTM100A, refer to the table below for common problems and solutions.
| Problem | Possible Cause | Solution |
|---|---|---|
| Device does not turn on | Low or dead batteries; Incorrect battery installation | Replace batteries with new 1.5V AAA alkaline batteries; Check battery polarity. |
| Laser not visible or weak | Bright ambient light; Dirty laser lens | Use in lower light conditions or use the reflective plate; Clean the laser lens. |
| Inaccurate measurements | Unstable surface; Obstruction in laser path; Extreme temperatures; Target surface not reflective enough | Ensure stable positioning; Clear laser path; Use within operating temperature range; Use reflective plate on non-reflective surfaces. |
| Error message (e.g., 'ERR') | Measurement out of range; Internal error | Ensure target is within 0.05m-50m range; Turn off and restart the device. If error persists, contact support. |
10. Specifications
| Feature | Specification |
|---|---|
| Brand | POPOMAN |
| Model | MTM100A |
| Measurement Range | 0.05 - 50 meters |
| Measurement Accuracy | ± 2.0 mm |
| Measurement Units | m / in / ft / ft+in |
| Laser Class | Class 2, 635nm, <1mW |
| Display Type | LCD with backlight, 5 lines |
| Data Storage | 30 sets |
| Electronic Angle Sensor | Yes |
| Auto-Off Laser | 30 seconds |
| Auto-Off Device | 150 seconds |
| Batteries | 2 x 1.5V AAA Alkaline (included) |
| IP Rating | IP54 (Dust and Splash Protected) |
| Item Weight | 121 Grams |
| Certifications | CE / FDA / FCC / ROHS |
11. Warranty and Support
POPOMAN provides a 24-month quality commitment for this product. For warranty claims or technical support, please refer to the contact information provided with your purchase documentation or visit the official POPOMAN website.
For further assistance, please contact customer service:
- Website: www.popomantools.com
- Email: Refer to your product packaging or website for specific support email.