1. Introduction
This manual provides detailed instructions for the installation, operation, and maintenance of your hykolity 3-Light Vanity Light Fixture and 5-Piece Bathroom Set. This all-in-one set includes a 3-light vanity light, towel bar, towel ring, toilet paper holder, and robe hook, designed to provide a cohesive and functional solution for your bathroom.
Please read this manual thoroughly before beginning installation or use to ensure proper function and safety.
2. Safety Information
- WARNING: Always turn off the power at the main circuit breaker before installing, servicing, or cleaning the light fixture.
- Consult a qualified electrician if you are unsure about the installation process.
- Use only bulbs with an E26 base and a maximum wattage of 60W. Do not exceed the recommended wattage.
- Ensure all electrical connections are secure and comply with local electrical codes.
- Handle glass shades with care to prevent breakage.
- Keep packaging materials away from children.
- This product is designed for indoor use only.
3. Package Contents
The hykolity 5-Piece Bathroom Set includes the following components:
- 3-Light Vanity Light Fixture (1 unit)
- Towel Bar (1 unit)
- Towel Ring (1 unit)
- Toilet Paper Holder (1 unit)
- Robe Hook (1 unit)
- Mounting Hardware (screws, anchors, wire nuts, etc.)
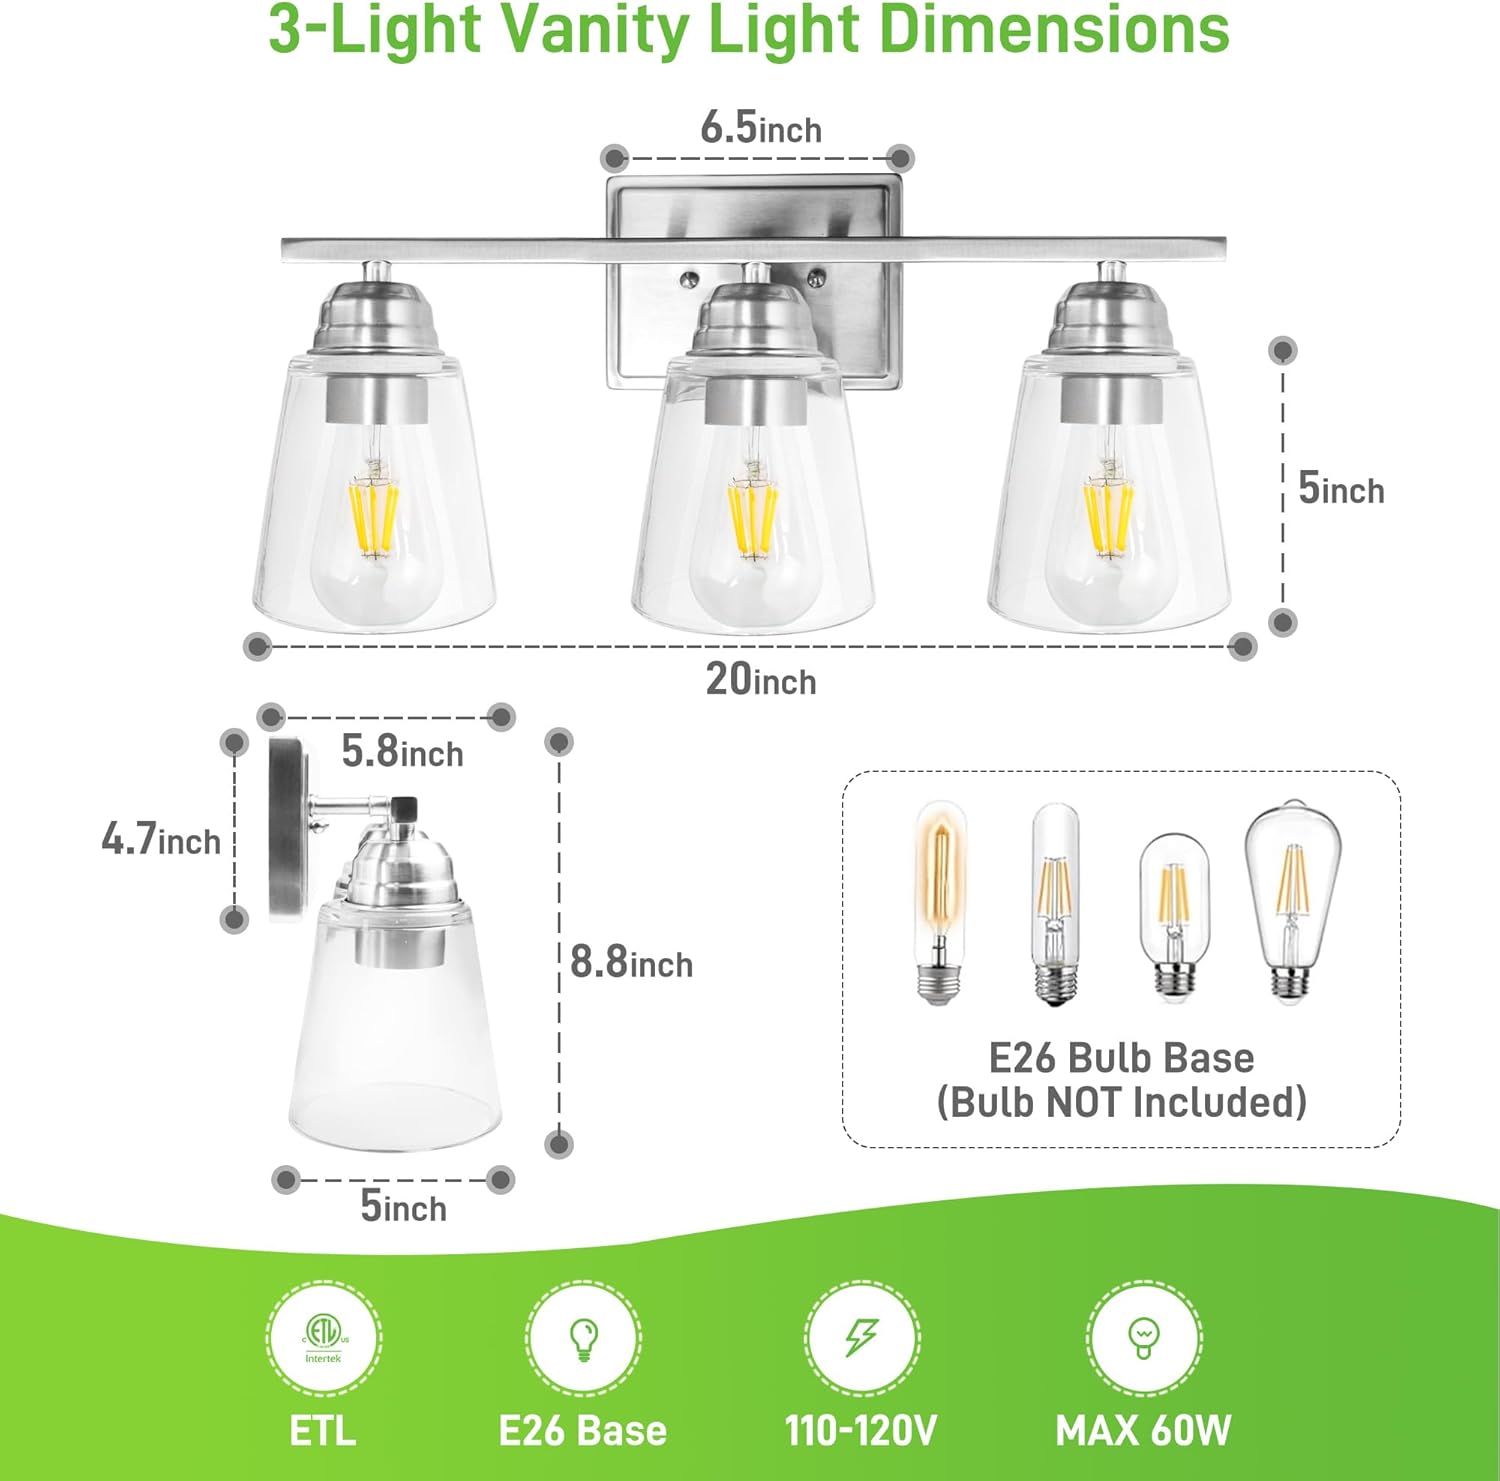
Figure 3.1: Overview of the 5-Piece Bathroom Set components.
4. Specifications
| Feature | Detail |
|---|---|
| Brand | hykolity |
| Model Name | LVA-1061 |
| Color | Brushed Nickel |
| Material | Metal, Glass |
| Style | Modern |
| Light Fixture Form | Wall Mount |
| Product Dimensions (Light) | 20"L x 5.8"W x 8.8"H |
| Power Source | Corded Electric |
| Special Feature | Dimmable (Dimmer Switch Not Included) |
| Light Source Type | LED, CFL, Halogen, Incandescent (Bulbs NOT included) |
| Number of Light Sources | 3 |
| Voltage | 120 Volts |
| Bulb Base | E26 Medium |
| Max Wattage per Bulb | 60 Watts |
| Water Resistance Level | Water Resistant |
| Item Weight | 7.65 pounds (total set) |

Figure 4.1: 3-Light Vanity Light Dimensions and Bulb Compatibility.
Figure 4.2: Bathroom Accessory Dimensions.
5. Installation
Before installation, ensure the power is turned off at the circuit breaker. All mounting hardware is included. For best results, install on a sturdy wall surface.
5.1. 3-Light Vanity Light Fixture Installation
- Prepare Wiring: Turn off power at the circuit breaker. Ensure the existing electrical box is securely mounted.
- Attach Mounting Plate: Secure the universal mounting plate (Figure 5.1) to the electrical box using the provided screws.
- Make Electrical Connections: Connect the fixture's wires to the house wires (black to black, white to white, ground to ground) using wire nuts. Ensure connections are secure.
- Mount Fixture: Carefully align the fixture's backplate with the mounting plate and secure it with the provided screws.
- Install Glass Shades: Gently screw the glass shades onto the fixture sockets.
- Insert Bulbs: Screw E26 base bulbs (not included, max 60W) into the sockets.
- Restore Power: Turn on power at the circuit breaker.
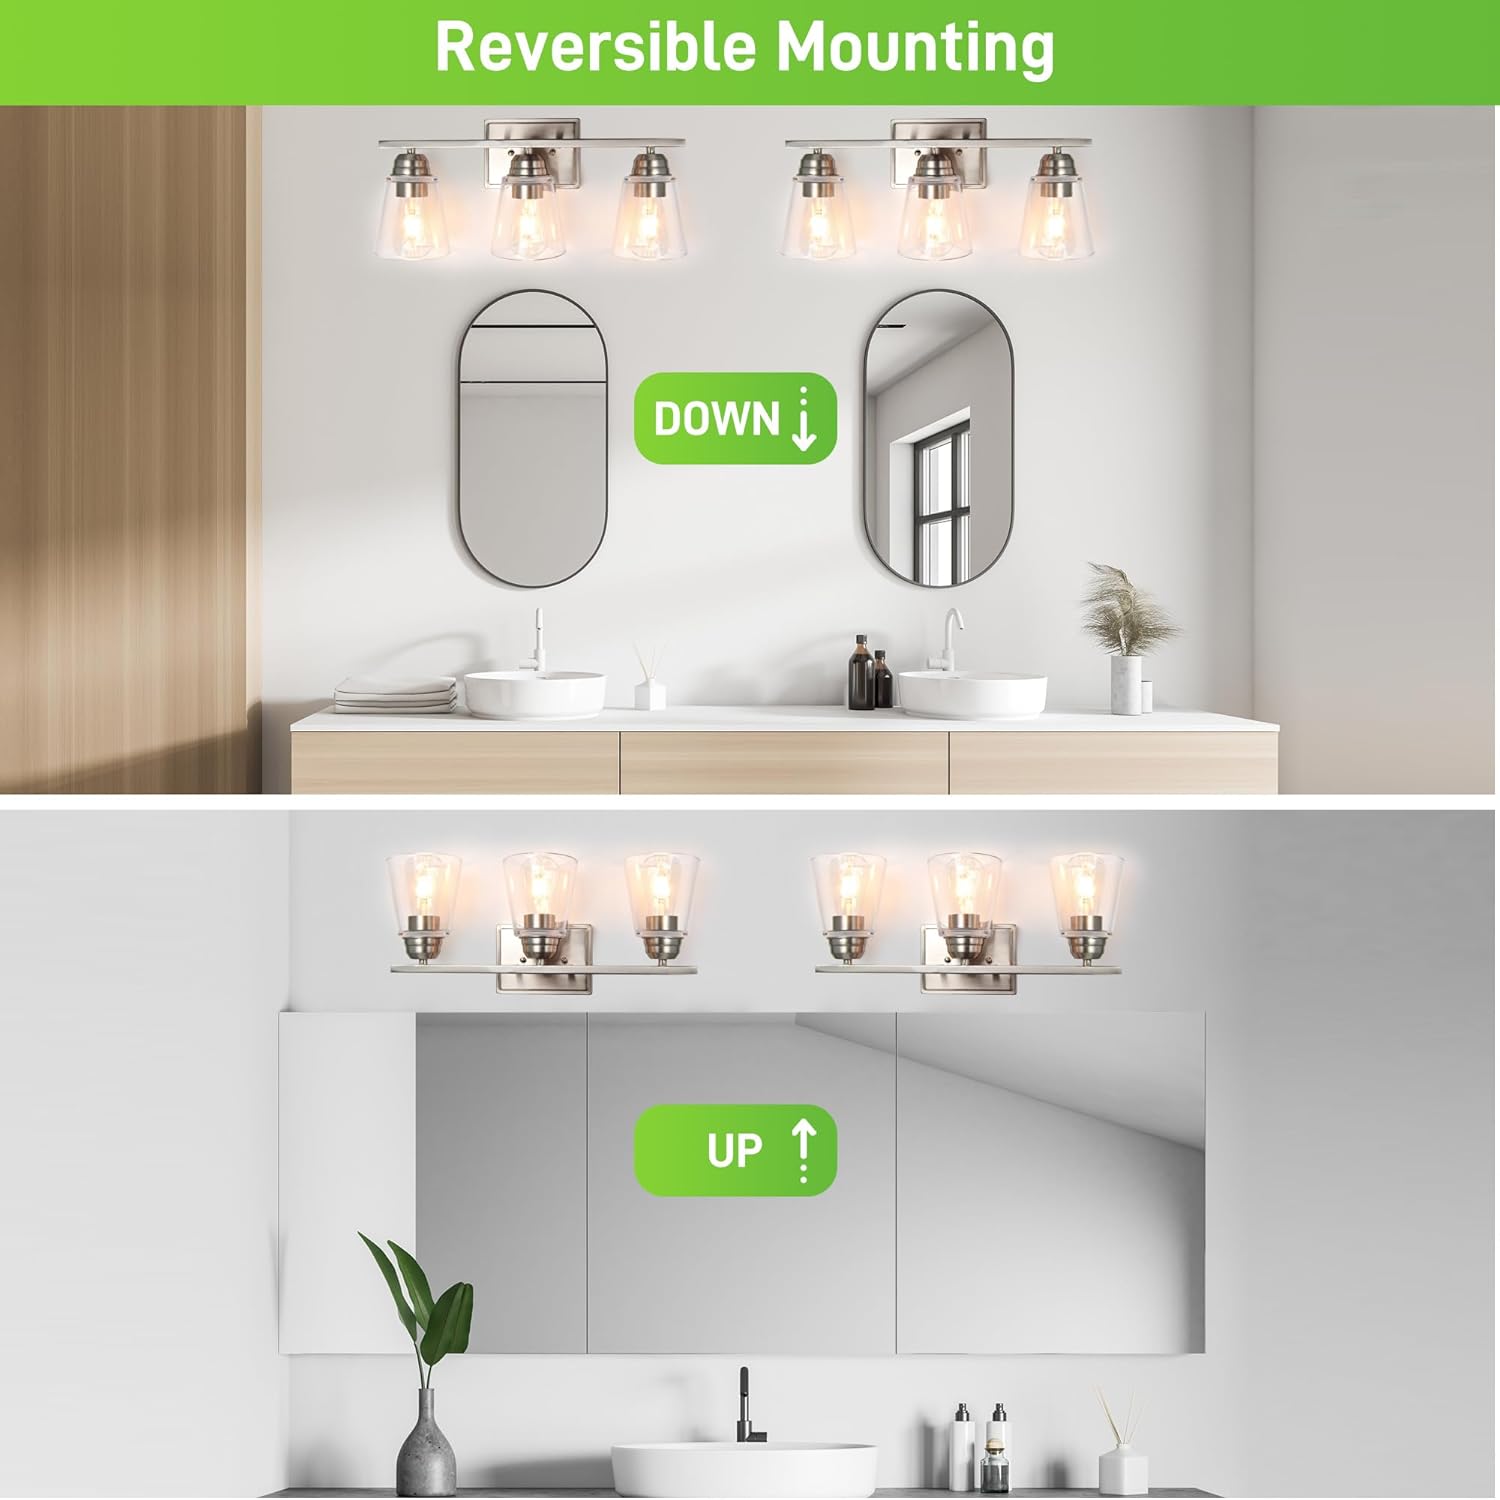
Figure 5.1: Vanity Light Product Details (Backplate, Lampshade, E26 Base, Mounting Plate).
The vanity light fixture can be mounted with the lights facing up or down, depending on your preference and desired lighting direction. Refer to Figure 5.2 for visual guidance.

Figure 5.2: Reversible Mounting Options (Up or Down).
5.2. Accessory Installation (Towel Bar, Towel Ring, Toilet Paper Holder, Robe Hook)
Each accessory comes with its own mounting hardware. The general installation steps are similar for all:
- Choose Location: Select a suitable location on the wall for each accessory.
- Mark Drilling Points: Hold the accessory's mounting bracket against the wall and mark the drilling points with a pencil. Ensure the towel bar marks are level and spaced correctly according to its length.
- Drill Holes: Drill pilot holes at the marked points. If installing into drywall, insert wall anchors.
- Secure Mounting Bracket: Attach the mounting bracket to the wall using the provided screws.
- Attach Accessory: Place the accessory over the mounting bracket and secure it with the small set screw, usually located on the underside of the base.
Note: For the towel bar, ensure the distance between the mounting points matches the bar's length. A common issue is incorrect spacing, as noted in customer feedback. Always measure your specific towel bar before drilling.
6. Operating Instructions
6.1. Light Fixture Operation
Once installed and powered, the vanity light fixture operates via your standard wall switch. If you have installed dimmable bulbs and a compatible dimmer switch (not included), you can adjust the light intensity as desired.

Figure 6.1: E26 Bulb Base Compatibility and Dimmable Functionality.
6.2. Accessory Use
The towel bar is for hanging towels, the towel ring for hand towels, the toilet paper holder for toilet paper rolls, and the robe hook for robes or other garments. Ensure items hung do not exceed the weight capacity of the installed anchors.
7. Maintenance
- Cleaning: To clean the light fixture and accessories, turn off the power to the light fixture. Use a soft, dry cloth. Do not use abrasive cleaners, solvents, or polishes as they may damage the finish.
- Bulb Replacement: Ensure power is off before replacing bulbs. Allow bulbs to cool completely before handling. Use only E26 base bulbs, maximum 60W.
- Inspection: Periodically check all connections and mounting screws to ensure they remain tight and secure.
8. Troubleshooting
| Problem | Possible Cause | Solution |
|---|---|---|
| Light fixture does not turn on. | 1. Power is off. 2. Loose wiring connection. 3. Faulty bulb. | 1. Check circuit breaker and wall switch. 2. Turn off power, check all wire connections. 3. Replace bulb with a new one. |
| Light flickers. | 1. Loose bulb. 2. Incompatible dimmer switch/bulb. 3. Loose wiring. | 1. Tighten bulb. 2. Ensure dimmer and bulbs are compatible (if dimmable). 3. Turn off power, check wiring connections. |
| Accessories feel loose after installation. | 1. Mounting screws not tight. 2. Wall anchors not properly installed or suitable for wall material. | 1. Tighten mounting screws and set screws. 2. Re-install with appropriate anchors for your wall type (e.g., toggle bolts for hollow walls). |
9. Warranty and Support
This hykolity product comes with a limited warranty. For specific warranty details, please refer to the documentation included with your purchase or contact hykolity customer support.
If you encounter any issues or have questions regarding your product, please contact hykolity customer support through their official website or the retailer where the product was purchased. Please have your model number (LVA-1061) and purchase date available.
10. Product Video Guide
Video 10.1: Overview of the hykolity 3-Light Vanity Light and 5-Piece Bathroom Set. This video showcases the various components and design aspects of the product, providing a visual guide to its features and potential applications.


