Radioddity Radioddity GA-510
Radioddity GA-510 Ham Radio Instruction Manual
Model: Radioddity GA-510
Introduction
This manual provides detailed instructions for the operation, maintenance, and troubleshooting of your Radioddity GA-510 10-Watt Ham Radio. The GA-510 is a high-power, dual-band handheld two-way radio designed for long-range communication, featuring a robust build and versatile programming options. Please read this manual thoroughly before using the device to ensure safe and optimal performance.
What's in the Box
Upon opening your Radioddity GA-510 package, you should find the following components:
- 1x Radioddity GA-510 Radio
- 2x 2200mAh Battery
- 1x Dual Band Antenna
- 1x Programming Cable (CH340, compatible with Windows 11 or previous systems)
- 1x Desktop Charger
- 1x Adapter
- 1x Belt Clip
- 1x Wrist Strap
- 1x Earpiece
- 1x User Manual (this document)

Figure 1: All components included in the Radioddity GA-510 package.
Product Features
- Tri-Power & Long Range: Offers 10W, 5W, and 1W power modes for optimized communication range and quality in various environments.
- Easy Programming: Supports both manual keypad programming and PC programming via the included CH340 cable, compatible with Windows 11 and earlier systems.
- Extended Battery Life: Comes with two 2200mAh high-capacity batteries, providing up to 12 hours of continuous operation at 10W, 24 hours at 5W/1W, and 96 hours on standby.
- Dual Band, Dual Watch, Dual Display: Allows monitoring of two frequencies simultaneously with a clear dual-line display.
- Durable Construction: Features a solid and rugged design suitable for business and outdoor use, including construction sites, security work, and survival rescue.
- CHIRP Compatible: Full compatibility with CHIRP programming software, ensuring flexible and easy channel management.

Figure 2: The Radioddity GA-510 includes two 2200mAh batteries for extended use.
Product Layout and Components
Familiarize yourself with the various parts of your Radioddity GA-510 radio:
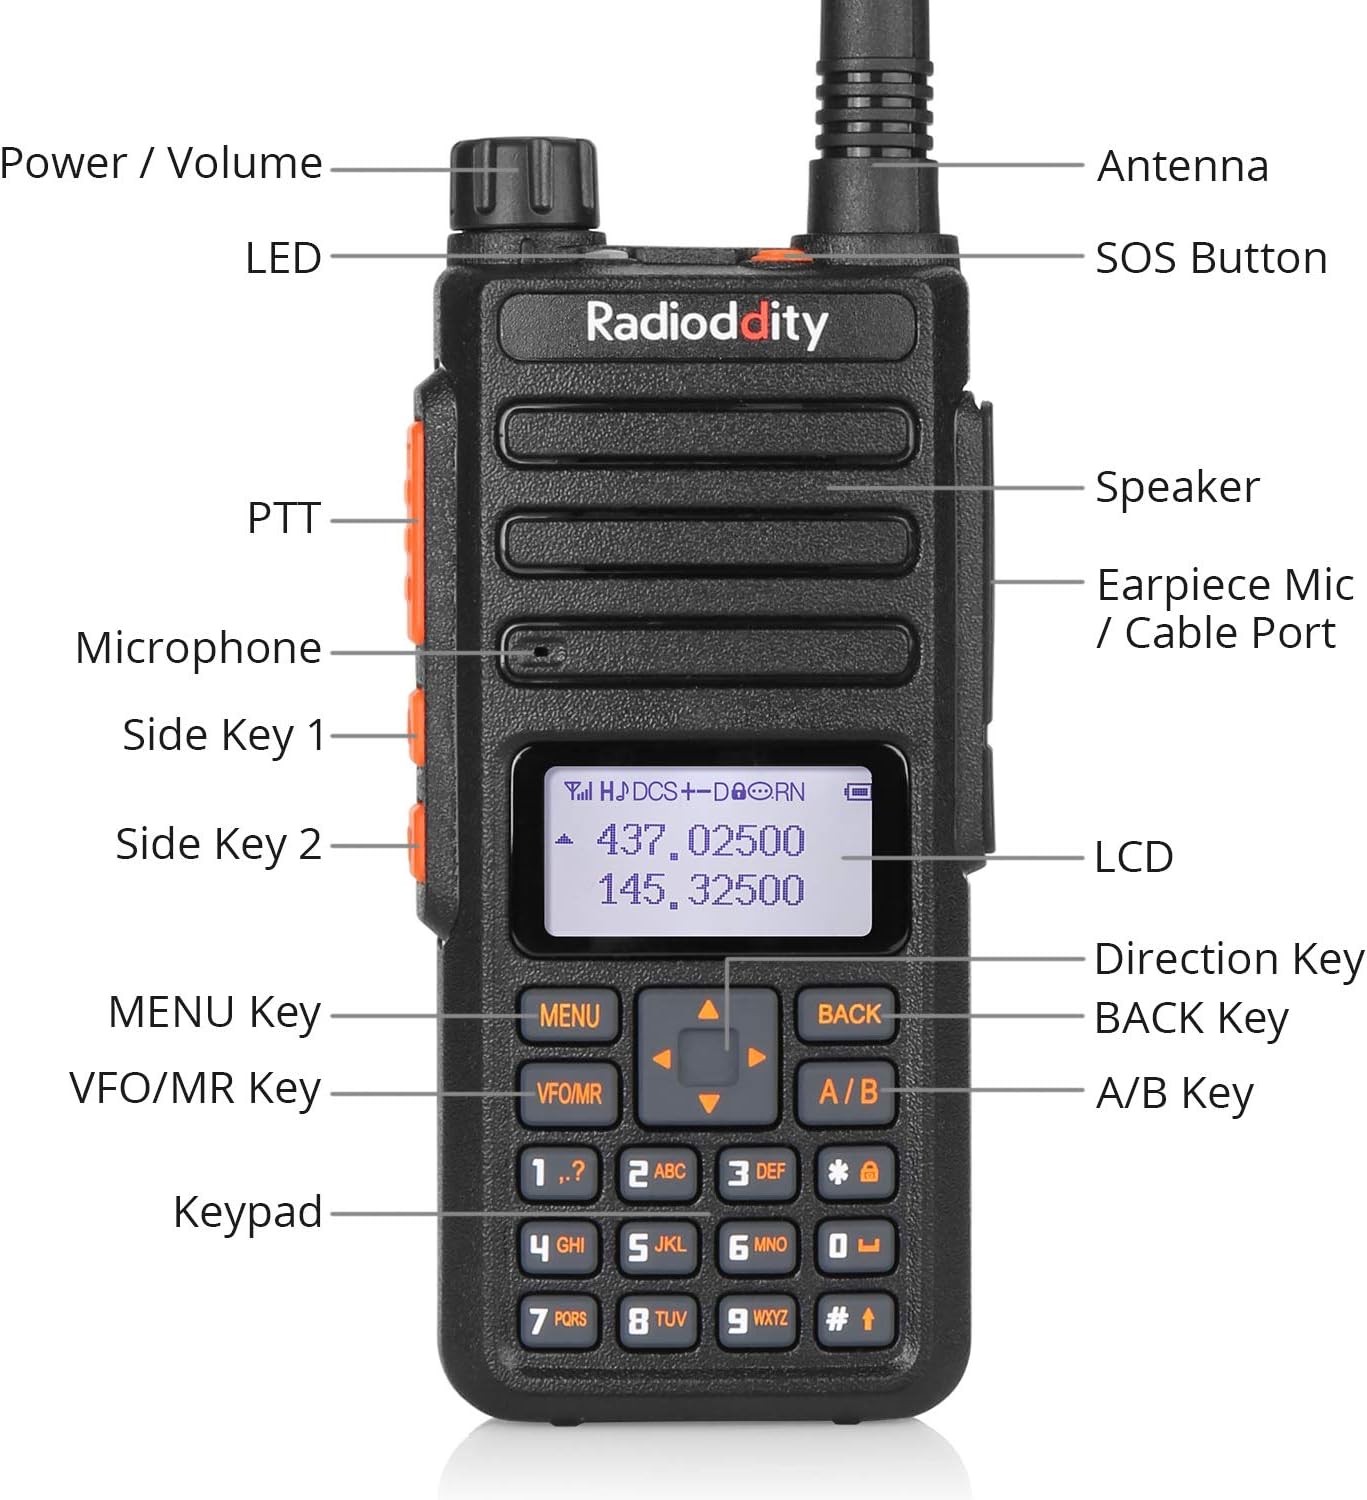
Figure 3: Labeled diagram of the Radioddity GA-510's external components.
- Power / Volume Knob: Rotates to turn the radio on/off and adjust volume.
- LED Indicator: Displays status (e.g., transmitting, receiving, charging).
- SOS Button: Activates the emergency alarm function.
- Antenna: Connects to the radio for signal transmission and reception. The GA-510 uses an SMA-F antenna.
- Speaker: Outputs audio.
- Earpiece Mic / Cable Port: Standard 2-pin Kenwood-style port for accessories like earpieces or programming cables.
- PTT (Push-to-Talk) Button: Press and hold to transmit.
- Microphone: Captures your voice during transmission.
- Side Key 1 & 2: Programmable function keys.
- LCD: Liquid Crystal Display showing frequency, channel, and status information.
- Direction Key: Navigates menus and adjusts frequencies.
- MENU Key: Accesses the radio's menu system.
- VFO/MR Key: Toggles between Frequency Mode (VFO) and Channel Mode (MR).
- BACK Key: Exits menus or cancels operations.
- A/B Key: Switches between the upper and lower display frequencies in dual watch mode.
- Keypad: Used for direct frequency input, channel selection, and menu navigation.

Figure 4: Detailed views of the radio's robust construction and key interfaces.
Setup
- Install the Battery: Align the battery pack with the grooves on the back of the radio and slide it upwards until it clicks into place. To remove, press the release latch and slide the battery downwards.
- Attach the Antenna: Screw the included dual-band antenna clockwise onto the SMA-F connector at the top of the radio until it is finger-tight. Do not overtighten.
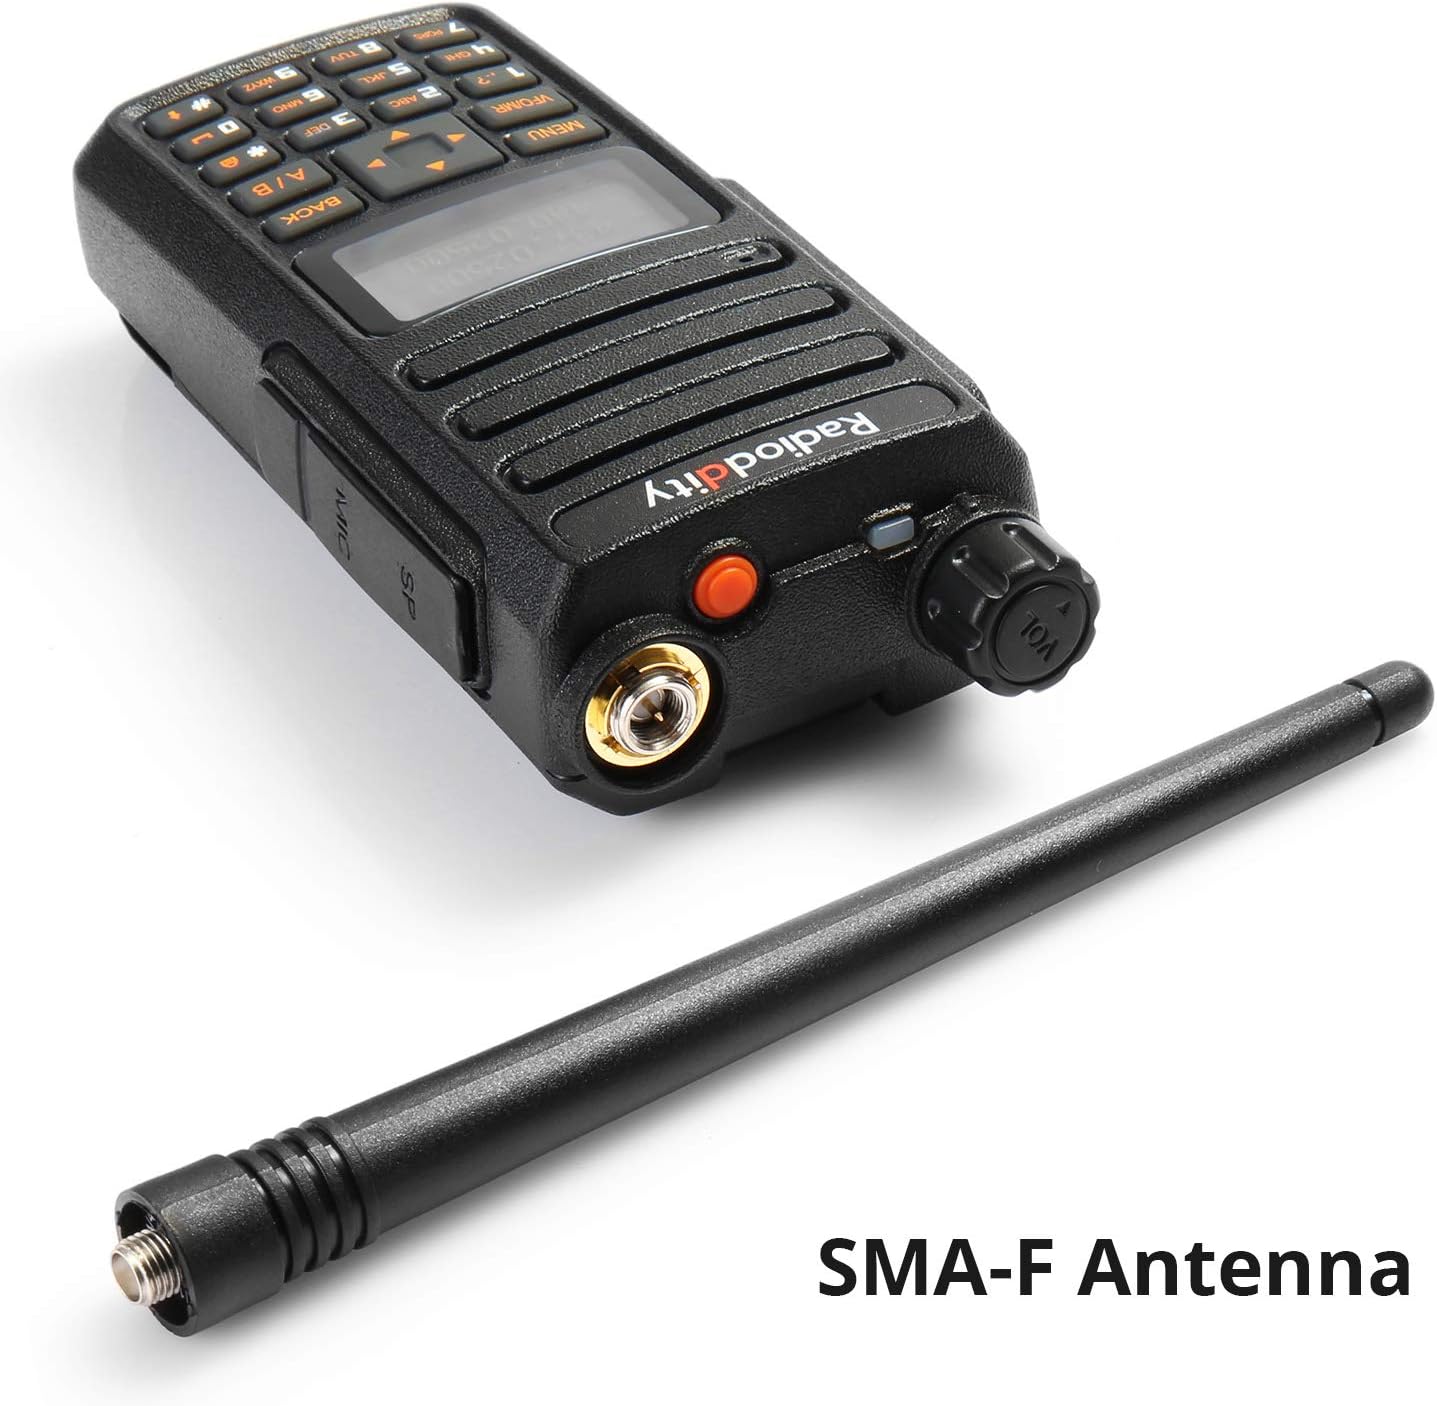
Figure 5: SMA-F Antenna connection point.
- Charge the Battery:
- Connect the AC adapter to the desktop charger base.
- Place the radio with the battery installed (or just the battery) into the charging slot.
- The LED indicator on the charger will show charging status (typically red for charging, green for fully charged).
- A full charge takes approximately 4-5 hours.
- Install Belt Clip and Wrist Strap: Attach the belt clip to the designated slot on the back of the radio using the provided screws. Secure the wrist strap to the loop on the top side of the radio.
- Programming (Optional but Recommended):
While basic settings can be adjusted via the keypad, advanced programming and channel management are best done using a computer and the included CH340 programming cable. The Radioddity GA-510 is fully compatible with CHIRP software.
- Connect the programming cable to the radio's earpiece/mic port and to a USB port on your computer.
- Install the necessary drivers for the CH340 cable if prompted by your operating system.
- Download and install CHIRP software from its official website.
- Follow the instructions within CHIRP to read from and write to your radio, managing frequencies, tones, and other settings.
Video 1: Demonstrates the Radioddity GA-510's features, including its 10W high power output, SOS alarm, solid build, and compatibility with CHIRP programming. This video highlights key operational aspects and durability.
Operating Instructions
- Power On/Off and Volume: Rotate the Power/Volume knob clockwise to turn the radio on and increase volume. Rotate counter-clockwise to decrease volume and turn off.
- Frequency/Channel Selection:
- VFO Mode (Frequency Mode): Press the VFO/MR key to enter VFO mode. Directly input frequencies using the keypad. Use the Direction keys to fine-tune.
- MR Mode (Channel Mode): Press the VFO/MR key to enter MR mode. Use the Direction keys or keypad to select a stored channel.
- Transmitting (PTT): To transmit, press and hold the PTT button on the left side of the radio. Speak clearly into the microphone. Release the PTT button to receive.
- Dual Watch Function: The GA-510 supports dual watch, allowing you to monitor two frequencies simultaneously. Press the A/B key to switch between the upper and lower display frequencies for active transmission.
- SOS Alarm: In an emergency, press and hold the SOS Button (orange button on top) to activate an audible alarm. Release to stop.
- Menu Navigation: Press the MENU key to enter the main menu. Use the Direction keys to scroll through options. Press MENU again to select an option, and BACK to exit.
- Scanning Functions: The radio supports various scanning functions (e.g., frequency scan, channel scan, CTCSS/DCS scan). Refer to the detailed menu options for configuration.

Figure 6: The Radioddity GA-510 in use during outdoor activities and urban communication.
Maintenance
- Cleaning: Use a soft, damp cloth to clean the radio's surface. Do not use harsh chemicals or abrasive cleaners.
- Battery Care:
- Avoid overcharging or completely discharging the battery.
- Store batteries in a cool, dry place when not in use.
- If storing for extended periods, charge the battery to about 50% capacity.
- Antenna: Ensure the antenna is securely attached but not overtightened. Avoid bending or stressing the antenna excessively.
- Storage: When not in use for long periods, store the radio in a dry, dust-free environment away from direct sunlight and extreme temperatures.
Troubleshooting
| Problem | Possible Cause | Solution |
|---|---|---|
| Radio does not power on. | Battery is dead or not properly installed. | Charge the battery or re-install it correctly. |
| Cannot transmit or receive. | Incorrect frequency/channel, antenna not connected, low battery, or squelch too high. | Verify frequency/channel, ensure antenna is connected, charge battery, adjust squelch level. |
| Poor audio quality. | Low signal strength, incorrect CTCSS/DCS settings, or damaged earpiece/mic. | Move closer to the other radio, check CTCSS/DCS settings, try a different earpiece/mic. |
| Programming issues with CHIRP. | Incorrect cable drivers, wrong COM port selected, or radio not in programming mode. | Reinstall CH340 drivers, verify COM port in device manager, ensure radio is on and connected. |
If you encounter issues not listed here or require further assistance, please contact Radioddity customer support.
Specifications
- Item Weight: 10.6 ounces
- Product Dimensions: 1.18 x 2.17 x 10.55 inches (D x W x H)
- Item Model Number: Radioddity GA-510
- Batteries: 2 Lithium Ion batteries required (included), 2200mAh capacity each
- Display Type: LCD
- Color: Black
- Number of Channels: 128
- Frequency Range: 144-148MHz (VHF), 420-450MHz (UHF)
- Talking Range Maximum: 12 Mile (Note: Actual range varies significantly based on terrain and obstructions)
- Tuner Technology: VHF, UHF
- Voltage: 7.4 Volts
- Water Resistance Level: Water Resistant

Figure 7: Physical dimensions and weight of the Radioddity GA-510.
Warranty and Support
The Radioddity GA-510 comes with an 18-month warranty and lifetime support.
For technical assistance, warranty claims, or any other inquiries, please visit the official Radioddity store or contact their customer service directly.
Ask a question about this manual
Ask about setup, troubleshooting, compatibility, parts, safety, or missing instructions. Manuals+ will review the question and use this page’s manual context to help answer it.