
Introduction
This manual provides detailed instructions for the assembly, operation, and maintenance of your PULUZ 30cm Ring Light Photo Studio Light Box. Please read this manual thoroughly before use to ensure proper functionality and longevity of the product.

The PULUZ 30cm Ring Light Photo Studio Light Box, shown assembled and ready for use with a smartphone for product photography.
Package Contents
- PULUZ 30cm Ring Light Photo Studio Light Box
- USB Cable with Dimmer Control
- 6 Color Backdrops (Black, White, Red, Green, Blue, Yellow)
- User Manual (This document)
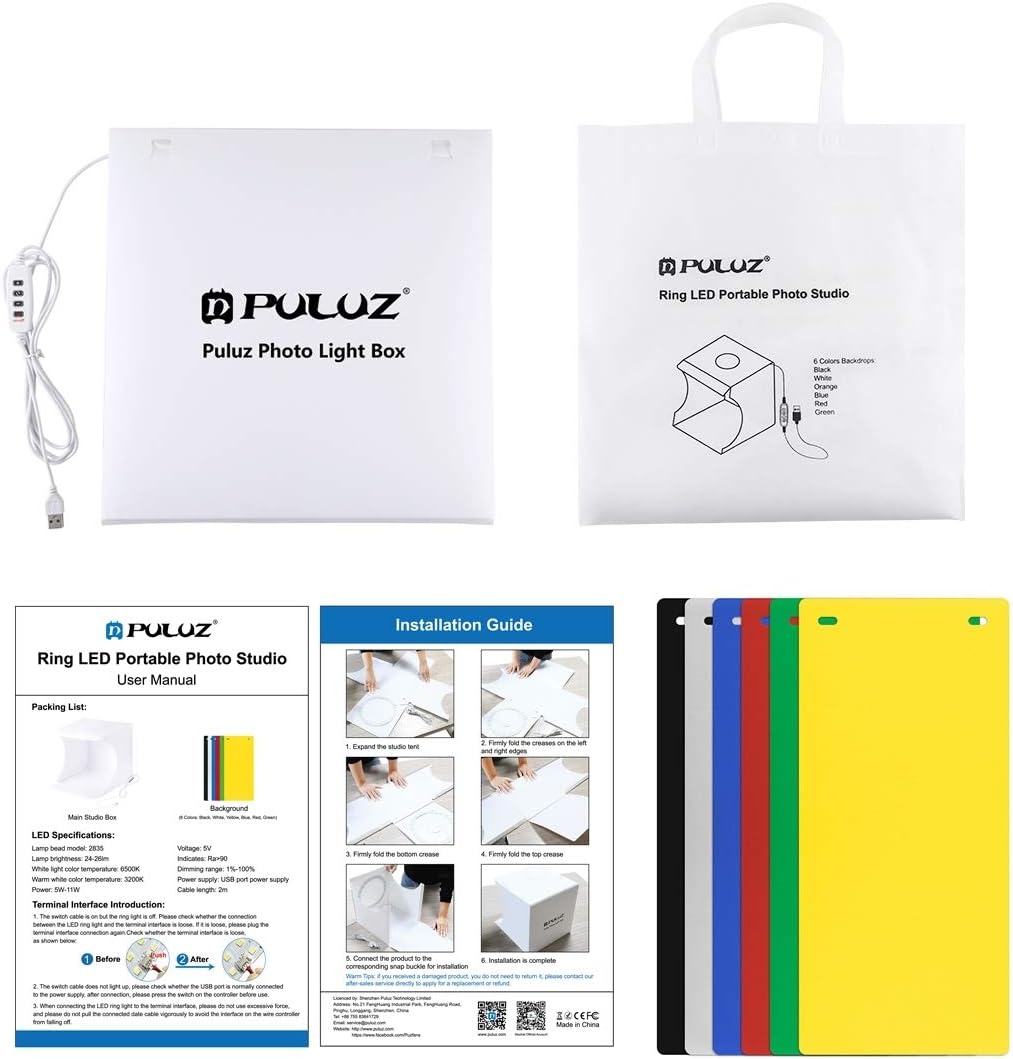
This image displays the complete package contents, including the foldable light box, the USB power cable with integrated dimmer, and the set of six interchangeable backdrops.
Product Features
- High Brightness: Built-in 80pcs high-quality LED light beads provide ample brightness for shooting.
- Multi-angle Shooting: Features one front horizontal shooting window and one vertical window for diverse photographic needs.
- Adjustable Lighting: Offers 6500K white light, 3200K warm light, and soft light modes.
- Brightness Dimmer: Control light intensity from 1% to 100%.
- Wide Application: Ideal for shooting small items such as jewelry, accessories, toys, watches, and gadgets.

This image illustrates the assembled light box with an item inside, demonstrating its use for product photography. It also highlights the included backdrops and the potential for smartphone integration.
Setup Instructions
Assembling the Light Box
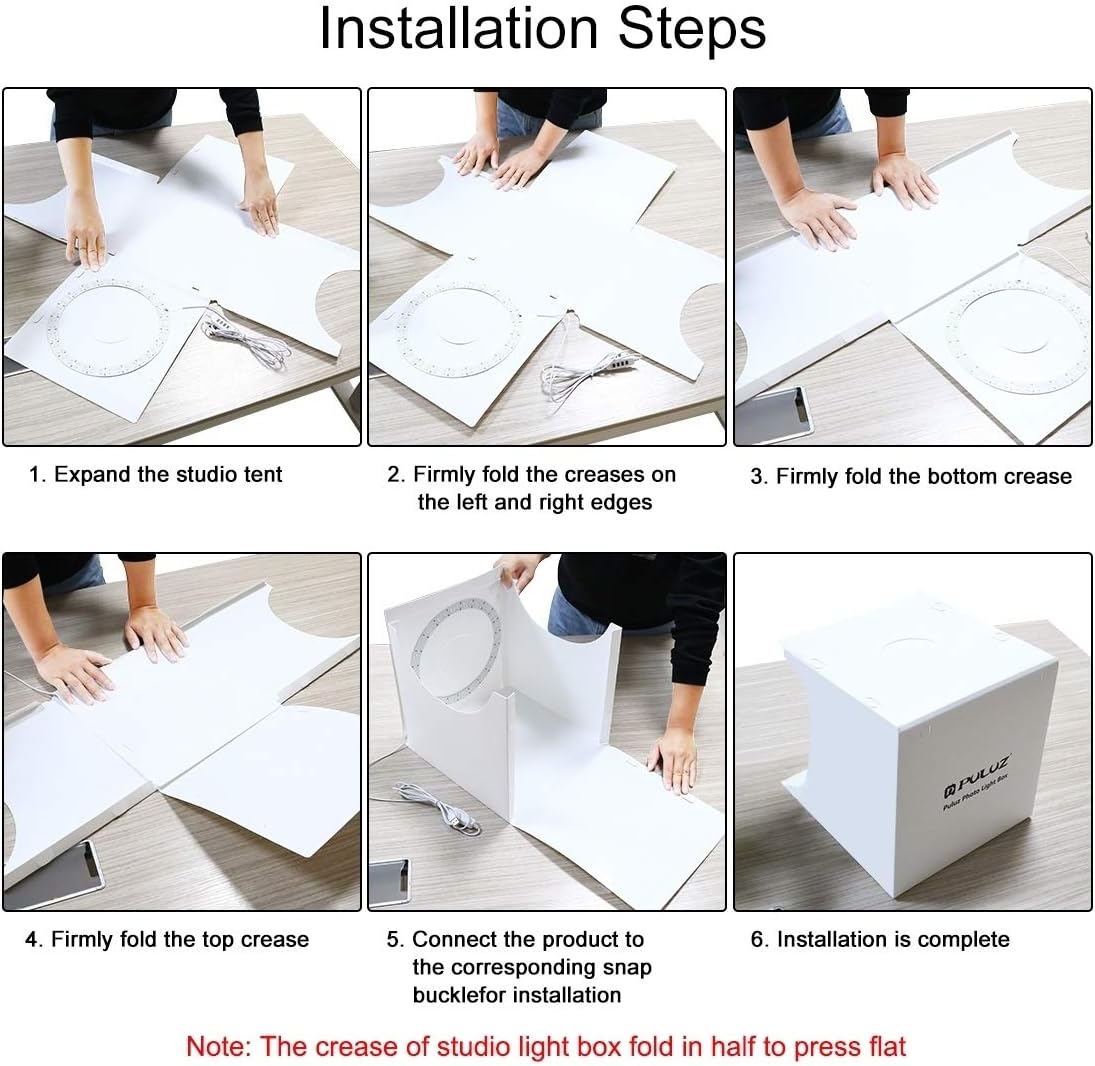
- Expand the Studio Tent: Carefully unfold the light box from its collapsed, flat state.
- Fold Creases: Firmly fold along the designated creases on the left and right edges to form the side walls.
- Secure Bottom Crease: Fold and secure the bottom crease to create the base of the studio.
- Secure Top Crease: Fold and secure the top crease to complete the main structure.
- Connect Buckle: Connect the product to the corresponding snap buckle for secure installation.
- Installation Complete: The studio tent is now assembled.

This series of images demonstrates the step-by-step assembly process, from unfolding the flat-packed light box to securing its structure and connecting the power cable.
Power Connection
Connect the USB cable to a compatible USB power source (e.g., computer, laptop, mobile power bank, or USB charger).

This image illustrates the versatility of the light box's power supply, showing it can be powered by any standard USB interface.
Operating Instructions
Lighting Modes and Brightness Adjustment
The integrated USB cable features a control panel for managing the lighting:
- ON/OFF Button: Press to power the LED lights on or off.
- Mode Button: Cycle through different light modes: White Light (6500K), Warm Light (3200K), and Soft Light (mix of white and warm).
- Brightness Buttons (+/-): Adjust the brightness level from 1% to 100%.

This image visually represents the different color temperatures and brightness levels achievable with the light box, along with examples of product photos taken under various settings.
Multi-Angle Shooting
The light box is designed with multiple openings to facilitate diverse shooting angles:
- Front Horizontal Window: Use for standard eye-level shots.
- Top Vertical Window: Ideal for "overlook" or flat lay photography.
This image illustrates how to utilize the different shooting windows of the light box to capture products from various perspectives, such as from the top or front.
Using Backdrops
Select one of the six provided backdrops (Black, White, Red, Green, Blue, Yellow) to enhance your product photography. Simply insert the desired backdrop into the designated slots inside the light box.
This image showcases the six different colored backdrops included with the light box, demonstrating how each color can be used to create distinct visual effects for product photography.
Maintenance and Care
- Cleaning: Gently wipe the interior and exterior surfaces of the light box with a soft, dry cloth. Avoid abrasive cleaners or solvents.
- Storage: When not in use, fold the light box back into its compact form and store it in the provided carry bag to protect it from dust and damage.
- LED Lights: Do not attempt to replace the integrated LED lights. If lights malfunction, contact customer support.
- Cable Care: Handle the USB cable and dimmer control gently. Avoid sharp bends or excessive pulling.
Troubleshooting
Lights Not Turning On
- Ensure the USB cable is securely connected to both the light box and a powered USB source.
- Verify that the USB power source is functional (e.g., try a different USB port or charger).
- Press the ON/OFF button on the dimmer control.
Uneven Lighting
- Check if the product is positioned centrally within the light box.
- Ensure the LED ring light is properly seated and unobstructed.
- Adjust the brightness levels using the dimmer control.
Backdrops Wrinkled
- Gently flatten backdrops before use. Minor wrinkles typically do not affect photo quality significantly.
- Store backdrops flat or rolled to prevent creasing.
Specifications
| Feature | Detail |
|---|---|
| Product Dimensions (Unfolded) | 12.2 x 12.2 x 12.6 inches |
| Item Weight | 1.21 pounds |
| Model Number | PU5030 |
| LED Light Beads | 80pcs (integrated) |
| Color Temperature | 6500K (White Light), 3200K (Warm Light) |
| Brightness Range | 1% - 100% (Dimmable) |
| Material | Polypropylene |
| Power Interface | USB |
| Cable Length | 78.7 inches (approx. 2 meters) |
Warranty and Support
PULUZ products are designed for quality and reliability. For any issues or inquiries, please refer to the following:
- Warranty Information: Please refer to the warranty card included with your purchase or visit the official PULUZ website for detailed warranty terms.
- Customer Support: For technical assistance or product support, contact PULUZ customer service through their official website or the retailer where the product was purchased.
- Online Resources: Visit the PULUZ Store on Amazon for additional product information and updates.
Safety Information
- Keep the light box away from water and high humidity.
- Do not expose the product to direct sunlight or high temperatures.
- Use only with compatible USB power sources.
- This product is not a toy. Keep out of reach of children.
- Disconnect power before cleaning or moving the unit.


