1. Safety Information
Please read this entire instruction manual before installation and assembly. If you have any questions regarding any of the instructions or warnings, please contact your local distributor for assistance. Failure to understand the instructions and warnings may result in serious personal injury or property damage.
- Check for hidden utilities: Before drilling, verify there are no electrical wires, water pipes, or gas lines behind the wall.
- Wall structure: Ensure the mounting surface can safely support the combined weight of the equipment and all attached hardware.
- Professional installation: If you are unsure about the installation process, consult a qualified professional.
- Weight capacity: Do not exceed the maximum weight capacity of 110 lbs (50 kg).
- Children: Keep children away from the installation area.
2. Package Contents
Verify all components are present and undamaged. If any parts are missing or defective, contact Mount-It! customer service.

Image: Exploded view of the Mount-It! MI-387 TV mount components.
- Wall Plate Assembly
- VESA Arms (2)
- Mounting Hardware Kit (screws, washers, anchors)
- Bubble Level
3. Setup and Pre-Installation
3.1 Tools Required (Not Included)
- Pencil
- Drill
- Phillips Head Screwdriver
- Stud Finder (for wood stud installation)
- Hammer (for concrete anchors)
3.2 Wall Type Verification
This mount is designed for installation on wood studs or solid concrete/brick walls. Do not install on drywall alone.
3.3 VESA Compatibility Check
Ensure your TV's VESA mounting pattern is compatible with the MI-387 mount. Supported VESA patterns include: 200x200, 400x200, 300x300, 400x300, 400x400, 600x400 mm. The mount supports screens from 37 to 80 inches.
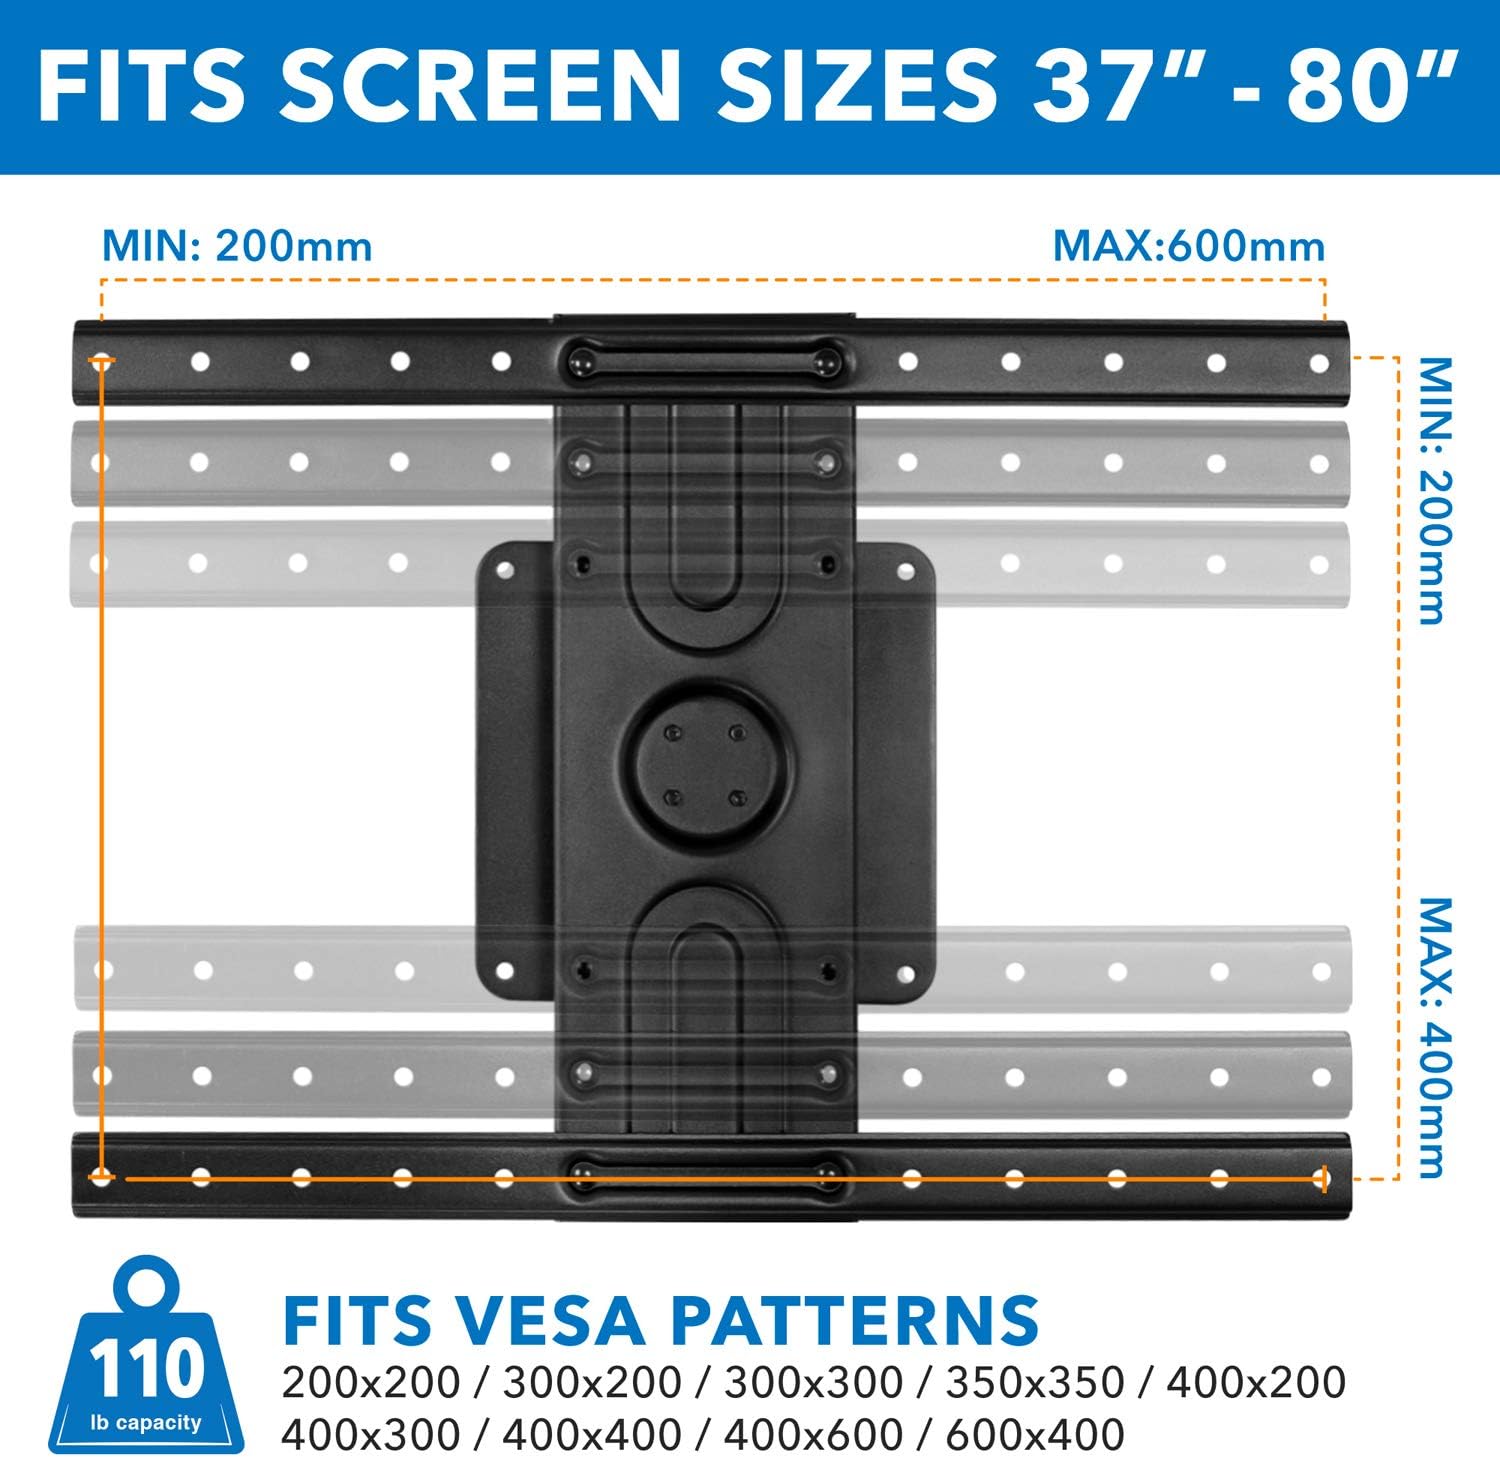
Image: VESA compatibility and screen size guide.
4. Installation
4.1 Separate the Wall Mount
Before mounting, separate the wall plate from the VESA mount. Pull the release cord down, then lift the VESA mount plate up and out of the wall bracket to separate the mount into two parts.
Video: Demonstrates how to separate the wall mount components before installation.
4.2 Wood Stud Mounting Option
- Use a stud finder to locate the center of a wood stud.
- Position the wall plate on the stud at your desired height. Use the included bubble level to ensure it is straight.
- Mark the center of the three mounting holes with a pencil.
- Drill pilot holes at the marked locations using a 3/16 inch (4.5 mm) drill bit to a depth of 2.4 inches (60 mm).
- Secure the wall plate to the wall using the smaller lag screws for the top two holes and the larger lag screw with a washer for the lowest hole. Tighten securely.
4.3 Concrete / Brick Mounting Option
- Position the wall plate on the concrete/brick wall at your desired height. Use the included bubble level to ensure it is straight.
- Mark the center of the three mounting holes with a pencil.
- Drill pilot holes at the marked locations using a 1/2 inch (12 mm) drill bit to a depth of 2.6 inches (65 mm).
- Clear any dust and debris from the holes. Insert the concrete anchors into the drilled holes.
- Secure the wall plate to the wall using the larger lag screws with washers for all three holes. Tighten securely.
4.4 Assemble the VESA Mount to Your TV
- Lay your TV face down on a soft, clean surface.
- Attach the VESA arms to the back of your TV, ensuring the distance between the two arms matches your TV's VESA pattern.
- Select the appropriate size mounting hardware (bolts and washers) from the kit that fits your TV's mounting holes.
- Secure the VESA arms to the TV using the selected bolts. Do not overtighten.
4.5 Hang the TV on the Wall
- Carefully lift the TV with the attached VESA mount.
- Align the VESA mount with the wall plate. Slide the VESA mount into the wall plate until it is fully seated and clicks into the latch.
- Gently pull down on the TV to ensure it is securely locked in place.

Image: Easy slide-in design for quick installation.
5. Operating Instructions
5.1 Rotating the TV (Landscape to Portrait)
The MI-387 mount allows for 360-degree rotation between landscape and portrait orientations. To rotate your TV:
- Locate the pull cord hanging from the bottom of the mount.
- Gently pull down on the cord to release the locking mechanism.
- While holding the cord, carefully rotate the TV to your desired orientation (landscape or portrait).
- Release the cord once the TV is in position. The spring lock will automatically engage to secure the TV.

Image: Using the release cord for 360-degree rotation.
Video: Demonstrates the 360-degree rotation feature of the TV mount.
5.2 Hiding the Pull Cord
The pull cord features a magnetic tip. After rotating the TV, you can attach the magnetic tip to the back of the mount to keep the cord hidden and maintain a clean appearance.

Image: Magnetic strap end for hiding the pull cord.
6. Maintenance
- Periodic Checks: Periodically check that all screws and connections are tight and secure.
- Cleaning: Clean the mount with a soft, dry cloth. Avoid abrasive cleaners or solvents.
- Lubrication: The rotating mechanism is designed for smooth operation and typically does not require lubrication. If movement becomes stiff, contact support.
7. Troubleshooting
7.1 TV is not level after installation.
Solution: Ensure the wall plate was installed perfectly level. If the wall plate is level but the TV appears slightly off, some mounts allow for minor post-installation leveling adjustments. Refer to the installation steps to re-check the wall plate's levelness and adjust if necessary.
7.2 TV does not rotate smoothly.
Solution: Ensure the pull cord is fully engaged when attempting to rotate. Check for any obstructions behind the TV or mount. If the issue persists, contact customer support.
7.3 TV feels loose on the mount.
Solution: Verify that the VESA mount is fully seated and locked into the wall plate. Check all mounting screws on both the TV and the wall plate to ensure they are securely tightened. Do not overtighten.
8. Specifications
| Feature | Specification |
|---|---|
| Model Number | MI-387 |
| Brand | Mount-It! |
| Screen Size Compatibility | 37" - 80" |
| Weight Capacity | 110 lbs (50 kg) |
| VESA Compatibility | 200x200, 400x200, 300x300, 400x300, 400x400, 600x400 mm |
| Rotation | 360 degrees (Landscape to Portrait) |
| Profile from Wall | 1.8 inches (45 mm) |
| Material | Alloy Steel |
| Color | Black |
9. Warranty and Support
Mount-It! products are designed for durability and performance. This product comes with a limited warranty against defects in materials and workmanship. For detailed warranty information, product support, or to purchase replacement parts, please visit the official Mount-It! website or contact customer service.
Contact Information:
- Website: Mount-It! Official Store
- Email: Refer to your product packaging or website for specific contact details.
- Phone: Refer to your product packaging or website for specific contact details.