
1. Product Overview
The Master Lock No. 5423EURD Select Access Key Lock Box provides a secure and convenient solution for key storage. Its durable metal body is designed for wall-mounted installation, offering permanent security. The push-button combination allows for keyless access, and the combination can be reset as needed. A protective shutter door shields the combination buttons from weather, dirt, and grime, ensuring reliable operation.

Figure 1: Master Lock Push-Button Key Safe with protective cover open, revealing the keypad and internal storage compartment.
2. Key Features
- Durable Metal Construction: Ensures long-lasting security and resistance to tampering.
- Push-Button Combination: Offers keyless convenience with up to 10,000 possible combinations.
- Resettable Combination: Allows you to change the code whenever necessary for enhanced security.
- Weather-Resistant Shutter: Protects the combination buttons from environmental elements like weather, dirt, and grime.
- Wall-Mounted Design: Provides permanent and secure installation. Mounting kit included.
- Ample Storage: Accommodates multiple house keys, car keys, and access cards.

Figure 2: Secure design highlights, including push-button combination, metal construction, and the limited lifetime warranty.
3. Setup: Setting Your Combination
The Master Lock Key Safe allows you to set your own combination. Follow these steps to program your desired code:
- Open the Key Safe: Ensure the safe is open and the internal mechanism is visible.
- Locate the Recode Tool: Find the yellow recode tool, typically stored inside the safe.
- Identify Combination Pins: On the back of the keypad, you will see a series of pins corresponding to each number. Each pin has an arrow.
- Set Your Combination: Use the recode tool to turn the arrow on the pins for your desired combination numbers to the "SET ON" position (usually pointing downwards or inwards). For numbers you do not want in your combination, ensure their arrows are in the "SET OFF" position.
- Confirm Buttons: Once set, the buttons corresponding to your chosen combination should remain depressed when pressed, while others spring back.
- Close and Test: Close the safe and test your new combination to ensure it works correctly before securing any keys.
Figure 3: Visual guide for programming your combination. Use the recode tool to set the desired numbers.
4. Operating Instructions
4.1. Opening the Key Safe
- Slide Down the Cover: If the protective shutter door is closed, slide it downwards to reveal the push-button keypad.
- Enter Your Combination: Press the buttons corresponding to your set combination in any order. The buttons should remain depressed.
- Pull Down the Lever: Locate the lever (usually at the top of the keypad) and pull it downwards. This will release the front panel, allowing the safe to open.
- Access Keys: The storage compartment is now accessible. You can retrieve or place keys inside.
4.2. Closing the Key Safe
- Ensure Keys are Clear: Make sure all keys are fully inside the compartment and do not obstruct the closing mechanism.
- Enter Combination (if required): For some models, you may need to re-enter your combination to reset the buttons before closing.
- Close the Front Panel: Push the front panel firmly upwards until it clicks securely into place.
- Slide Up the Cover: Slide the protective shutter door upwards to cover the keypad, protecting it from elements and concealing the combination.

Figure 4: Proper placement of the key safe on a wall for secure and convenient access.
5. Maintenance
To ensure the longevity and smooth operation of your Master Lock Key Safe, regular maintenance is recommended:
- Cleaning: Wipe the exterior and keypad with a dry, soft cloth to remove dust, dirt, and grime. Avoid using abrasive cleaners or solvents.
- Shutter Door: Periodically check that the protective shutter door slides smoothly and fully covers the keypad. Clean any debris that might hinder its movement.
- Button Functionality: Ensure all push-buttons operate freely and do not stick. If a button feels stiff, gently clean around it.
- Installation Check: For wall-mounted units, periodically check that the mounting screws are secure and the safe is firmly attached to the surface.
6. Troubleshooting
If you encounter issues with your Master Lock Key Safe, consider the following common troubleshooting tips:
- Safe Not Opening:
- Ensure you are entering the correct combination.
- Verify that all combination buttons are fully depressed before pulling the lever.
- Press the "C" (Clear) button to reset any previously pressed buttons before re-entering the combination.
- Check for any obstructions preventing the front panel from opening.
- Buttons Sticking:
- Clean the buttons and surrounding areas with a dry cloth to remove dirt or debris.
- Ensure the protective shutter is regularly used to prevent accumulation of grime.
- Combination Reset Issues:
- Ensure the safe is fully open when attempting to reset the combination.
- Verify that the recode tool is properly inserted and used to turn the pins.
- Confirm that pins for desired numbers are set to "ON" and others to "OFF".
7. Specifications
| Brand | Master Lock |
| Model Number | 5423EURD |
| Product Dimensions | 2.05"D x 3.11"W x 4.61"H (79 x 117 x 52 mm) |
| Lock Type | Combination |
| Control Type | Push Button Control |
| Material | Metal |
| Mounting Type | Surface Mount |
| Item Weight | 0.69 Kilograms (1.51 pounds) |
| Special Feature | Hard-wearing |
| Included Components | 1 Key Safe |
| Water Resistance Level | Not Water Resistant |
| Finish Type | Powder Coated |
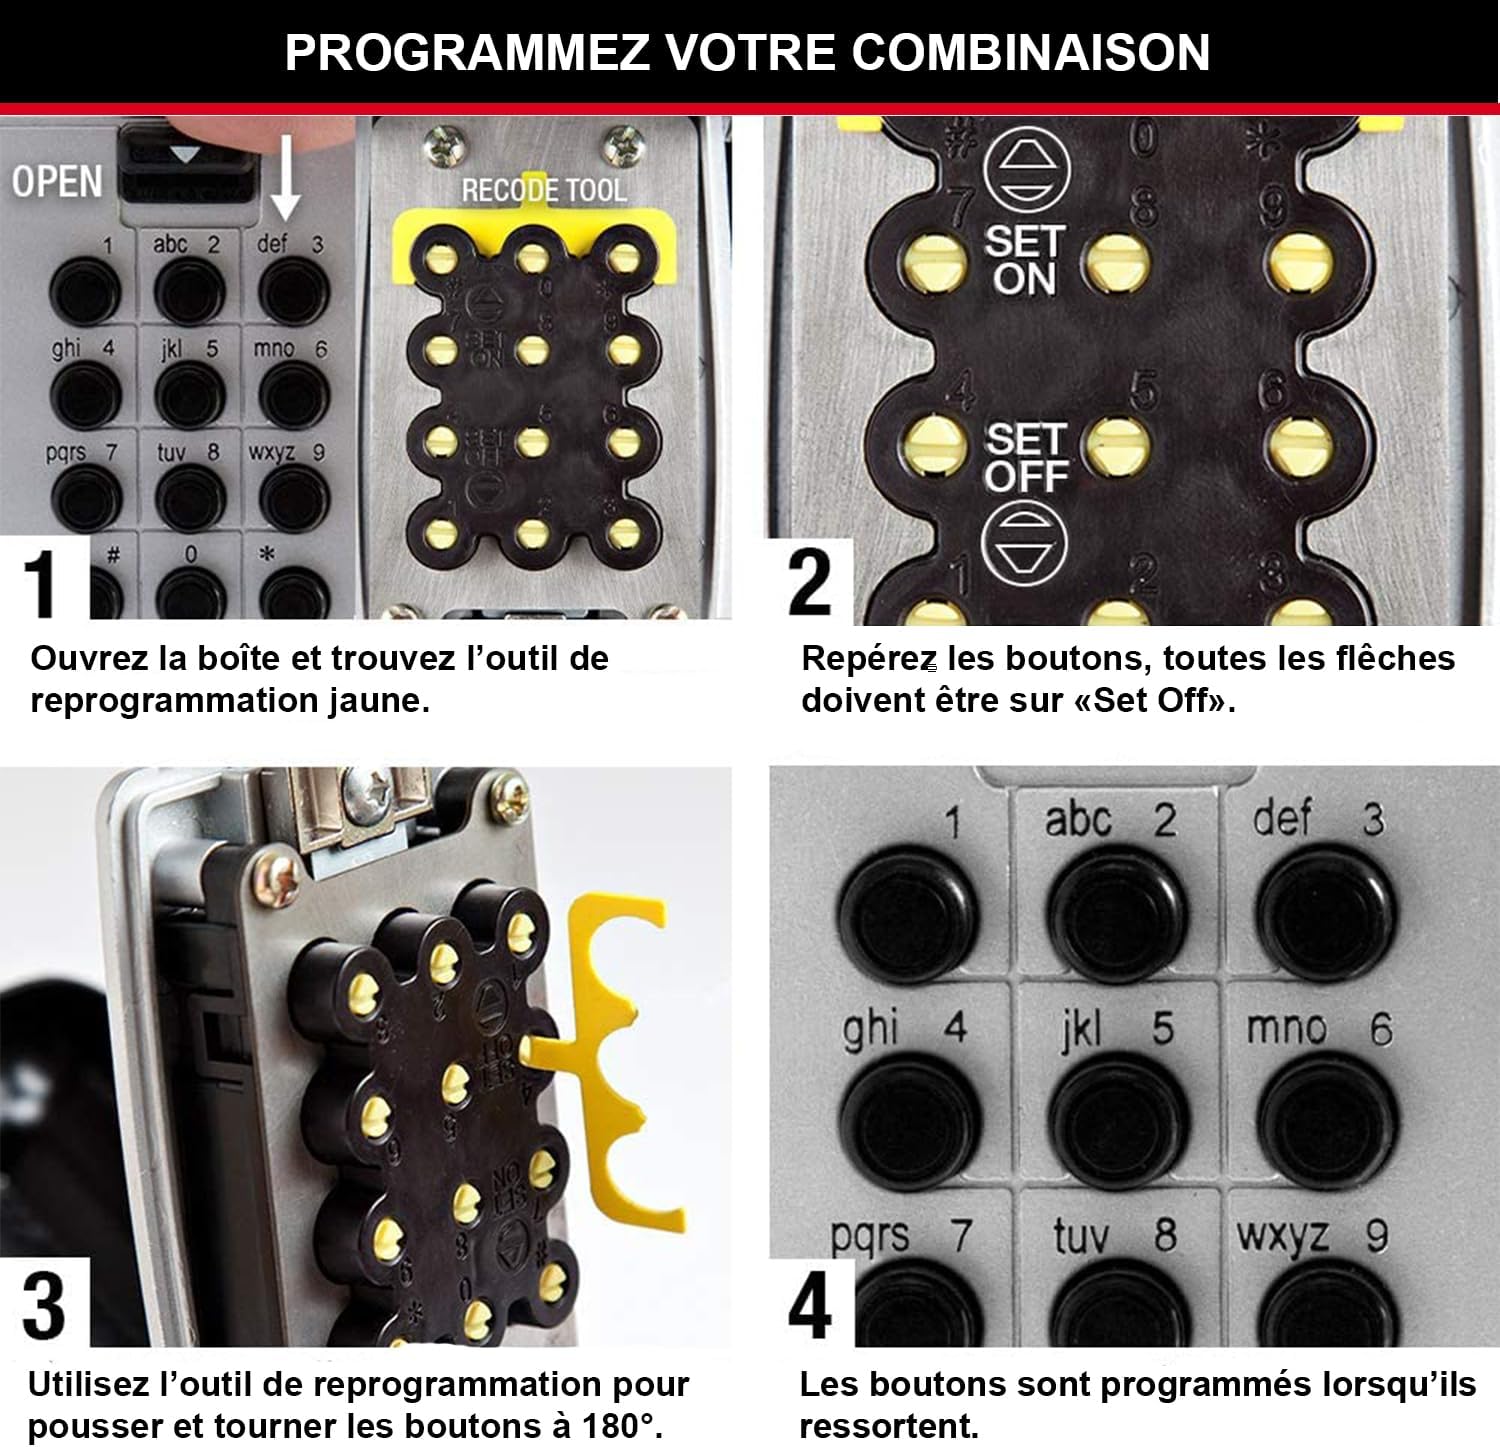
Figure 5: Detailed dimensions of the key safe and its capacity for various key types.
8. Warranty & Support
The Master Lock No. 5423EURD Select Access Key Lock Box is backed by a Limited Lifetime Warranty. This warranty provides peace of mind, ensuring the product's quality and durability under normal use.
For warranty claims, technical support, or any product-related inquiries, please refer to the official Master Lock website or contact their customer service directly. Keep your purchase receipt as proof of purchase for warranty purposes.


