1. Introduction
This manual provides essential information for the safe and efficient use of your inShareplus 24V 18.75A 450W Universal Regulated Switching Power Supply. This device converts alternating current (AC) from a standard wall outlet to a stable 24V direct current (DC) output, suitable for various applications such as LED strip lights, industrial automation, and computer projects. Please read this manual thoroughly before installation and operation.

Figure 1: Overview of the inShareplus 24V 450W Switching Power Supply. This image displays the silver metal enclosure with ventilation slots and the terminal block for wiring connections.
2. Safety Information
WARNING: Improper installation or use can lead to electric shock, fire, or damage to the power supply and connected devices. Always follow these safety guidelines:
- Professional Installation: Installation should be performed by qualified personnel.
- Voltage Selection: Ensure the input voltage switch (110V/220V) is set correctly for your region before connecting to power. Incorrect voltage selection will damage the unit.
- Grounding: A proper earth connection is critical for safety. Ensure the power supply chassis is securely grounded to prevent electric shock hazards.
- Load Capacity: Do not exceed 80% of the power supply's rated wattage (450W) to ensure optimal performance and longevity.
- Ventilation: Ensure adequate airflow around the unit for proper heat dissipation. Do not block ventilation openings.
- Environment: Install in a dry, well-ventilated area, away from flammable materials, moisture, and extreme temperatures.
- Disconnection: Always disconnect power before making any wiring changes or performing maintenance.

Figure 2: This image illustrates the eight protection functions integrated into the power supply, including short-circuit, overvoltage, overload, and overheat protection, designed to enhance safety and stability.
3. Product Overview
The inShareplus 24V 18.75A 450W Switching Power Supply is designed for reliability and efficiency. It features a metal enclosed body for durability and heat dissipation, along with a built-in cooling fan for enhanced thermal management. The unit incorporates multiple protection mechanisms to safeguard against common electrical issues.
Key Features:
- Universal AC Input: 100-240V AC.
- Stable DC Output: 24V DC, 18.75A, 450W.
- Integrated Cooling Fan for efficient heat dissipation.
- Protection Features: Circuit Short Protection, Overload Protection, Over Voltage Protection.
- Dual Input Voltage Switch: Selectable 110V/220V.
Internal Components:

Figure 3: This image highlights key internal components such as imported high-quality capacitors, copper transformer inductance, EMC circuit, and output filter, all contributing to the safety and stability of the power supply.
4. Specifications
| Feature | Specification |
|---|---|
| Input Voltage | 100-240V AC |
| Output Voltage | 24V DC |
| Output Current | 18.75A |
| Output Power | 450W |
| Item Model Number | 744702377595 |
| Package Dimensions | 8.7 x 4.65 x 2.24 inches |
| Item Weight | 1.65 Pounds (0.75 Kilograms) |
| Material | Aluminum |
| Color | Silver |
| Connector Type | Barrel Connector (Internal wiring terminals) |

Figure 4: This image provides the physical dimensions of the power supply, showing a length of 8.5 inches, a width of 4.4 inches, and a height of 1.9 inches.
5. Setup
5.1 Input Voltage Selection
Before connecting the power supply to an AC source, you must select the correct input voltage (110V or 220V) using the switch located inside the unit. For users in the USA, set the switch to 110V.
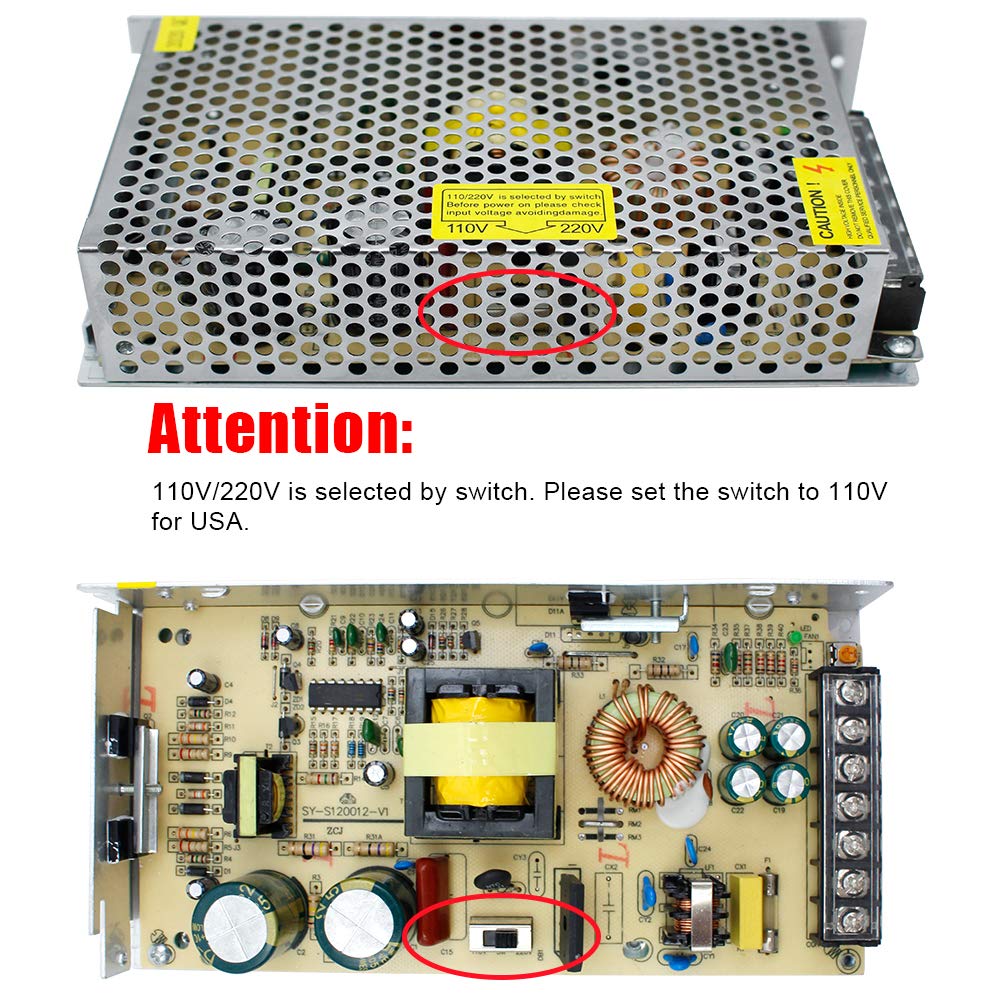
Figure 5: This image shows the internal voltage selector switch. The top panel indicates the switch location, and the bottom panel provides a close-up of the switch, which must be set to 110V for use in the USA.
5.2 Wiring Instructions
The power supply features a terminal block for secure wiring connections. Refer to the diagram below for proper connection of AC input and DC output.
- AC Input: Connect the Live (L) and Neutral (N) wires from your AC power source to the corresponding terminals. Ensure the Earth wire is connected to the ground terminal.
- DC Output: Connect the positive (+V) wire of your device to the +V terminal and the negative (-V) wire to the -V terminal.
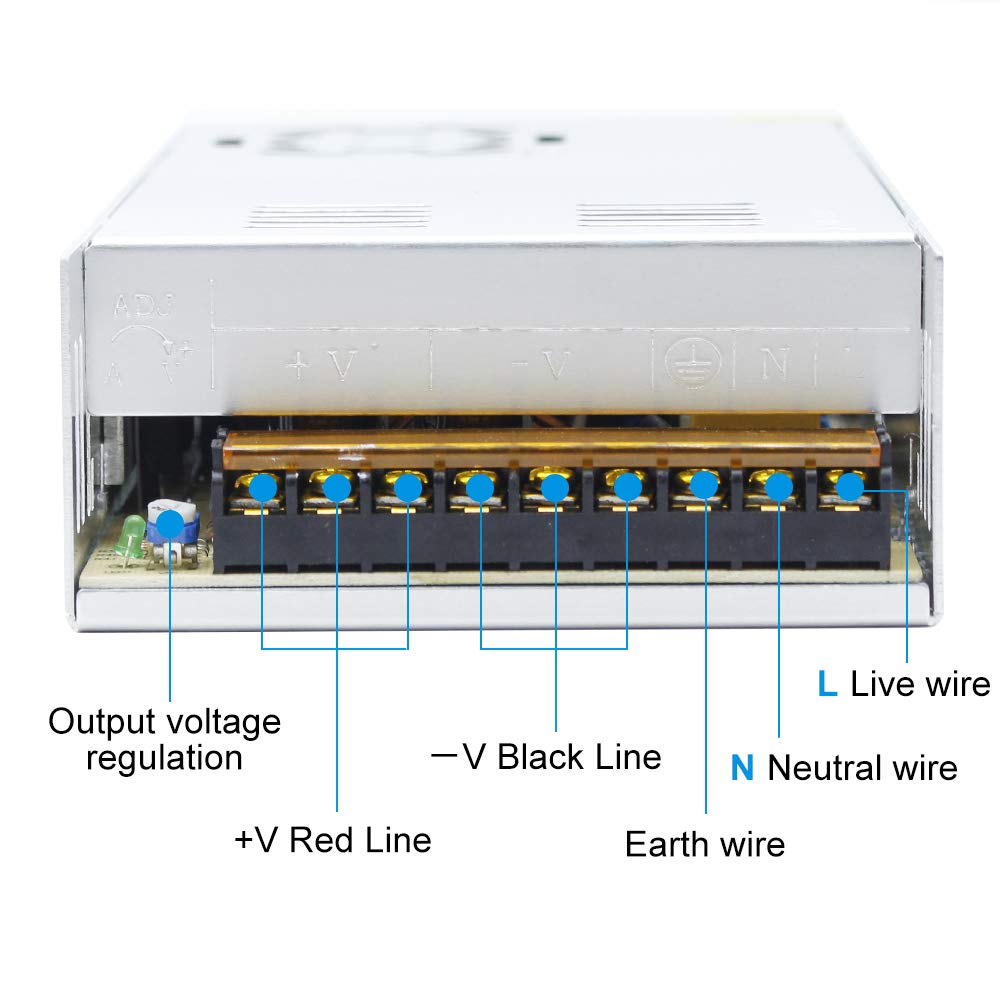
Figure 6: This image provides a detailed view of the terminal block, clearly labeling the connections for Live (L), Neutral (N), Earth wire, -V (Black Line), and +V (Red Line), along with the output voltage regulation potentiometer.
5.3 Mounting
Mount the power supply in a location that allows for adequate ventilation and prevents obstruction of the cooling fan and ventilation slots. Ensure the mounting surface is stable and non-conductive.
6. Operating Instructions
6.1 Initial Power-Up
After ensuring all connections are secure and the voltage switch is correctly set, connect the power supply to the AC mains. The unit should power on, and the cooling fan may activate depending on the load and internal temperature.
6.2 Output Voltage Regulation
The power supply includes a potentiometer for fine-tuning the output voltage. Use a small screwdriver to adjust this control if minor voltage adjustments are required. Always verify the output voltage with a multimeter to ensure it meets your application's requirements.
7. Maintenance
The inShareplus power supply is designed for minimal maintenance. However, periodic checks can help ensure its longevity and reliable operation.
- Cleaning: Periodically clean the exterior of the unit and ensure ventilation slots are free from dust and debris. Use a soft, dry cloth. Do not use liquid cleaners.
- Fan Operation: The built-in cooling fan operates to maintain optimal temperature. Ensure it is not obstructed and is functioning correctly. A noisy fan might indicate dust buildup or wear.
- Connection Integrity: Occasionally check all wiring connections to ensure they remain tight and secure.
8. Troubleshooting
If you encounter issues with your power supply, refer to the following common problems and solutions:
| Problem | Possible Cause | Solution |
|---|---|---|
| No power output | 1. Incorrect input voltage selection. 2. Loose wiring connections. 3. Overload protection activated. 4. Internal fault. | 1. Verify the 110V/220V switch setting. 2. Check all input and output wiring. 3. Reduce the connected load. Disconnect power, wait, then reconnect. 4. Contact support if other solutions fail. |
| Output voltage is incorrect | 1. Output voltage potentiometer misadjusted. 2. Connected load is too high. | 1. Adjust the output voltage potentiometer with a multimeter. 2. Ensure the load does not exceed 80% of the rated power. |
| Unit is overheating | 1. Insufficient ventilation. 2. Excessive load. 3. Fan malfunction. | 1. Ensure clear airflow around the unit. 2. Reduce the connected load. 3. Check if the fan is spinning freely. Clean if necessary. |
| Loud fan noise | 1. Dust buildup in fan. 2. Fan bearing wear. | 1. Disconnect power and carefully clean the fan blades. 2. If noise persists, contact support. |
Important: If troubleshooting steps do not resolve the issue, discontinue use and contact customer support.
9. Warranty and Support
For warranty information or technical assistance, please contact inShareplus customer support through your purchase platform or the official inShareplus website. Please have your product model and purchase date available when contacting support.


