1. Introduction
The Happybuy MD-3010H Metal Detector is designed for precise detection of various metal objects. Its user-friendly design, adjustable features, and waterproof search coil make it suitable for a wide range of environments, from dry land to shallow water. This manual provides essential information for proper assembly, operation, and maintenance of your metal detector.
2. Package Contents
Verify that all items listed below are included in your package:
- 1 x MD-3010H Metal Detector Unit (Control Box, Stem, Search Coil)
- 1 x Headphone
- 1 x Folding Shovel with Pouch
- 1 x User Manual
- Necessary assembly hardware (screws, washers)

Figure 2.1: Complete Package Contents
3. Assembly
Follow these steps to assemble your MD-3010H Metal Detector. No special tools are required.
- Install Batteries: Open the battery compartment on the control box. Insert two 9V (6F22, S006P) batteries, ensuring correct polarity. Close the compartment securely.
- Attach Control Box to Upper Stem: Slide the control box onto the upper stem. Secure it by tightening the knob on the side of the control box.
- Connect Search Coil to Lower Stem: Attach the search coil to the lower stem using the provided screw and washers. Ensure it is firmly secured but allows for angle adjustment.
- Assemble Stem Sections: Connect the middle stem to the lower stem, and then connect the upper stem (with the control box) to the middle stem. The sections should snap or screw together.
- Route Cable: Wrap the search coil cable neatly around the stem, ensuring it is not taut or loose. Plug the cable connector into the corresponding port on the control box.
- Adjust Length: Adjust the stem length to a comfortable position for your height (adjustable from 102cm/3.3ft to 130cm/4.2ft). Secure the adjustment.
- Attach Armrest: Ensure the armrest is correctly positioned for comfortable use.

Figure 3.1: Ergonomic Design and Adjustable Length
Video 3.1: Assembly and Basic Operation of the Metal Detector
4. Controls and Display
The MD-3010H features an intuitive LCD control panel with several buttons and a volume knob:
- Power/Volume Knob: Turns the detector ON/OFF and adjusts the audio volume.
- MENU Button: Accesses various settings such as Sensitivity (SENS), Discrimination (DISC), and Notch.
- PP (Pinpoint) Button: Used to pinpoint the exact location of a detected target.
- NOTCH Button: Allows you to eliminate specific types of metals from detection.
- Light Button: Activates the backlight for the LCD display, useful in low-light conditions.
- +/- Buttons: Adjusts values for settings like sensitivity, discrimination, and light intensity.
- LCD Display: Shows target identification, depth, battery status, sensitivity level, and discrimination settings.
- PHONE Jack: Connects the included headphones for private listening and improved audio clarity.

Figure 4.1: LCD Control Panel Overview
5. Operation
Before operating, ensure the detector is fully assembled and batteries are installed.
5.1 Power On/Off and Volume
Rotate the Power/Volume knob clockwise to turn the detector ON. Continue rotating to increase volume. Rotate counter-clockwise to decrease volume and turn OFF.
5.2 Sensitivity Adjustment (SENS)
Press the MENU button until 'SENS' appears on the display. Use the +/- buttons to adjust sensitivity. Higher sensitivity increases detection depth but may also increase false signals in mineralized ground.
5.3 Discrimination (DISC) and Notch
The detector can discriminate between different metal types. Use the DISC setting to ignore unwanted metals (e.g., iron). The NOTCH function allows you to selectively eliminate specific target categories. The LCD display will show the type of metal detected (e.g., IRON, 5¢, P-TAB, 10¢, 25¢, 50¢, 1$).
5.4 Pinpointing (PP)
Once a target is detected, press and hold the PP button to activate pinpoint mode. Move the search coil slowly over the target area. The detector will emit a continuous tone and the signal strength indicator will increase as you get closer to the exact center of the target.
5.5 Waterproof Search Coil
The search coil is waterproof, allowing for detection in shallow water. Ensure the control box and connections remain dry as they are not waterproof.

Figure 5.1: High Sensitive & Waterproof Search Coil in Use
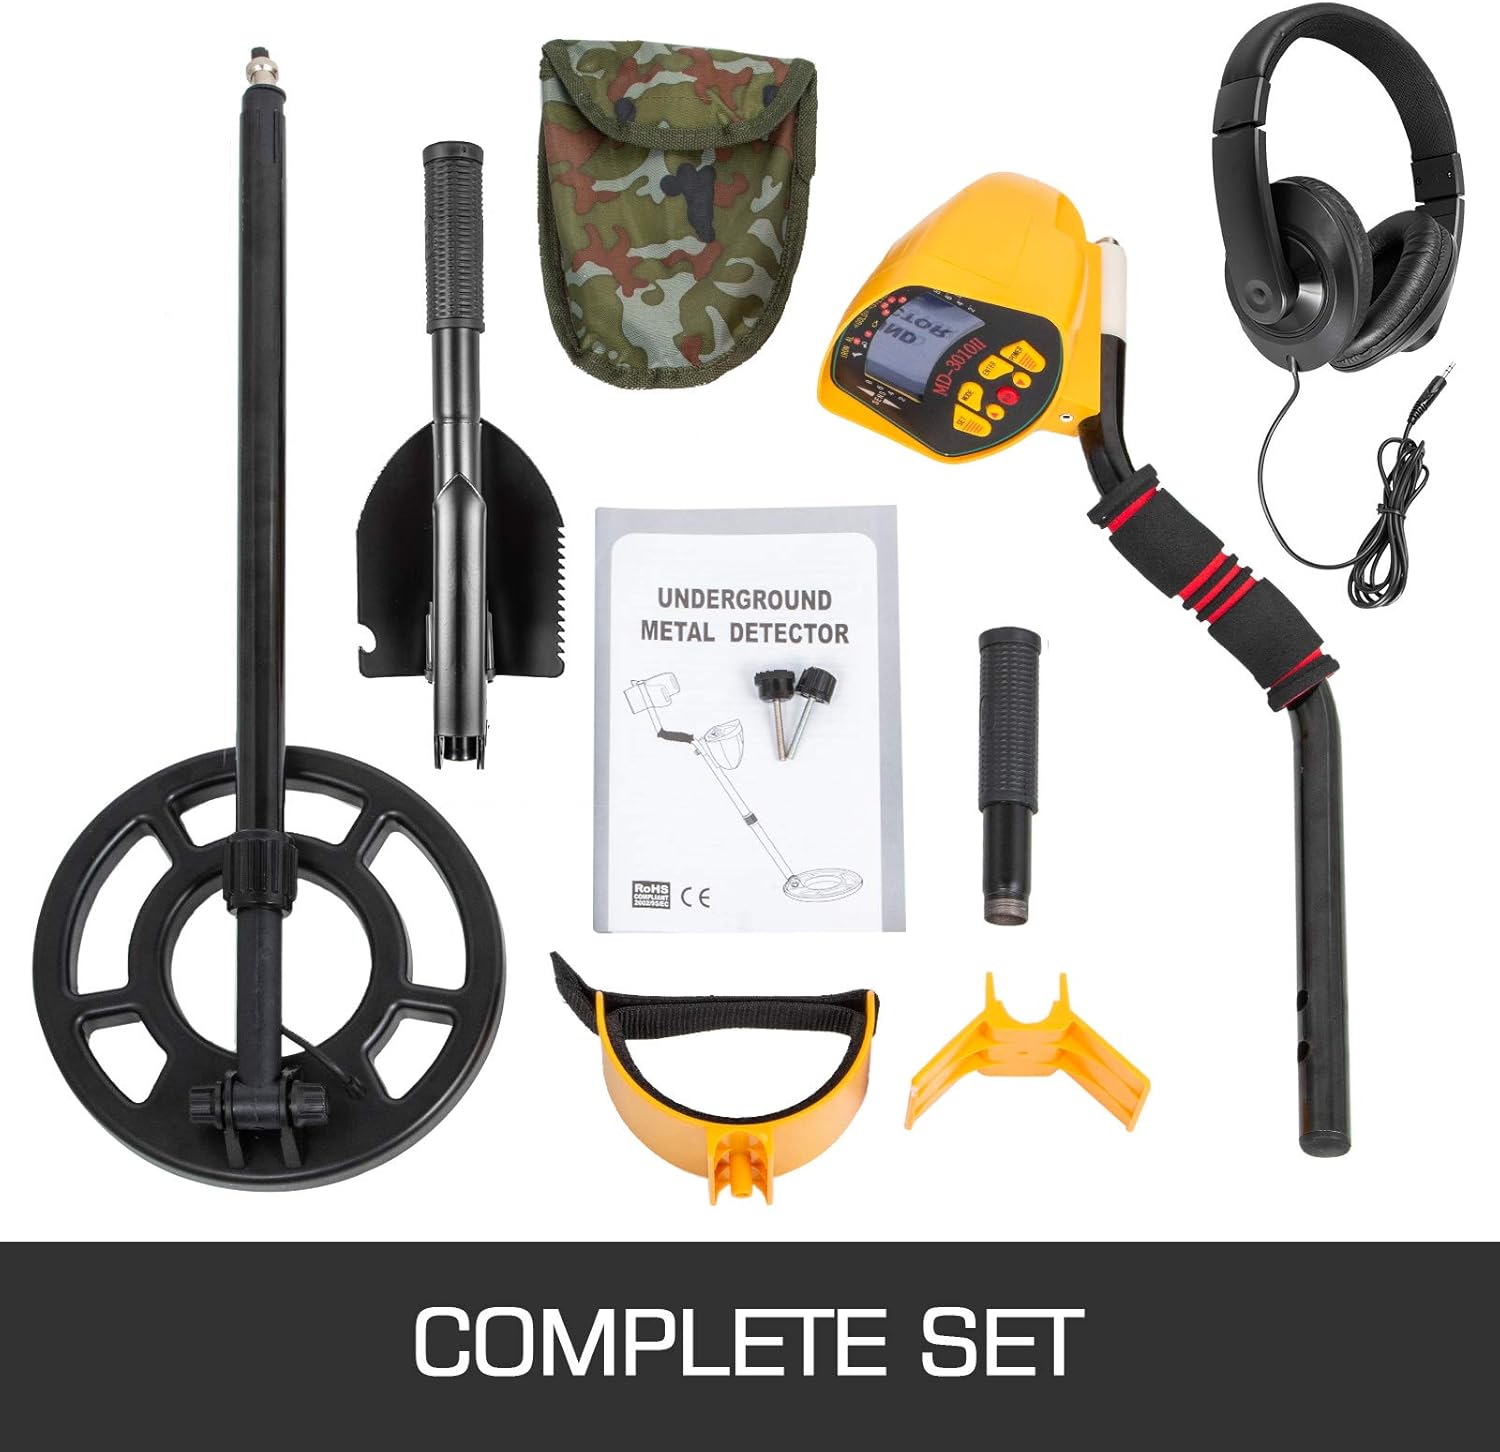
Figure 5.2: Wide Application of the Metal Detector
6. Maintenance
- Keep the detector clean and dry. Wipe down the search coil and stem after use, especially after detecting in wet or sandy conditions.
- Avoid exposing the control box to extreme temperatures or direct sunlight for prolonged periods.
- Remove batteries if the detector will not be used for an extended period to prevent leakage.
- Store the detector in a safe place, preferably in its carrying case, to prevent damage.
7. Troubleshooting
- No Power: Check battery installation and ensure batteries are fresh.
- Erratic Signals: Reduce sensitivity. Ensure the search coil cable is tightly wrapped and connected. Avoid detecting near power lines or other electronic devices.
- No Target Indication: Increase sensitivity. Ensure the search coil is parallel to the ground and moving at a consistent speed.
- Headphones Not Working: Check headphone connection to the PHONE jack. Ensure volume is adjusted.
8. Specifications
| Feature | Specification |
|---|---|
| Material | ABS, Copper, Aluminium Tube |
| Adjustable Length | 102-130 cm (3.3-4.2 ft) |
| Power Source | 2 x 9V (6F22, S006P) batteries |
| Signal Frequency | 7.5 KHz +/- 1 KHz |
| Sensitivity | At least 13 cm (5.1 in) |
| Product Dimensions | 550 x 355 x 153 mm (21 x 14 x 6 in) |
| Net Weight | 3 kg (6.6 lbs) |

Figure 8.1: Product Dimensions
9. Warranty and Support
For warranty information or technical support, please refer to the contact details provided with your purchase or visit the official Happybuy website. Keep your purchase receipt as proof of purchase.


