1. Introduction
Thank you for choosing the Magnusson Auto-Leveling Laser Level. This manual provides essential information for the safe and effective operation, setup, and maintenance of your device. Please read this manual thoroughly before use and retain it for future reference.
2. Safety Information
WARNING: Read all safety warnings and instructions before operating this product.
- This device emits a laser beam. Do not stare directly into the laser beam or direct it at other people or reflective surfaces.
- Laser radiation can cause eye injury. Always wear appropriate safety glasses when operating the laser level.
- Do not attempt to modify or disassemble the laser level. Repairs should only be performed by qualified personnel.
- Keep the device out of reach of children.
- Ensure the work area is clear of obstructions and potential hazards.
- Use only the specified battery type and dispose of batteries responsibly.
3. Product Overview
The Magnusson Auto-Leveling Laser Level is designed for precise horizontal, vertical, and angular alignment tasks. It features an auto-leveling mechanism for quick and accurate setup, integrated bubble vials for initial alignment, and a versatile mounting accessory.
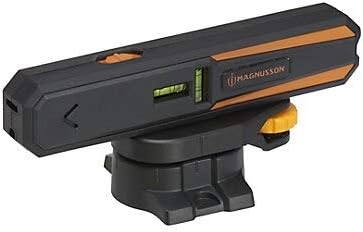
Figure 1: Front view of the Magnusson Auto-Leveling Laser Level, showing the laser aperture and control button.
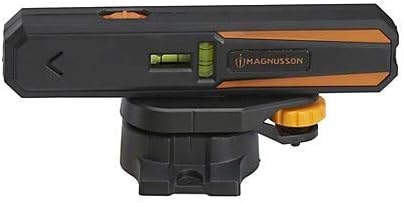
Figure 2: Side view of the laser level, highlighting the integrated bubble vials for manual leveling assistance.

Figure 3: The laser level projecting a horizontal line onto a wall, demonstrating its application for alignment tasks.
4. Setup
- Battery Installation: Open the battery compartment (location not specified, assume standard placement) and insert the required batteries, ensuring correct polarity.
- Mounting:
- Wall Mounting: Attach the versatile mounting accessory to a wall using appropriate fasteners (not included). Ensure it is securely fixed.
- Tripod Mounting: The device can be mounted onto a compact tripod (not included) using the integrated mounting thread on the accessory.
- Magnetic Base: The mounting accessory features a magnetic base for attachment to metallic surfaces.
- Initial Leveling: Use the two integrated bubble vials on the device to achieve a rough level position before activating the laser. This assists the auto-leveling function.
5. Operating Instructions
- Power On: Locate the power switch/button (typically on the top or side) and slide or press it to turn on the device. The laser will activate.
- Auto-Leveling: Once powered on, the device will automatically level itself. Ensure the device is placed on a relatively stable surface or mounted securely. If the device is outside its self-leveling range, the laser line may flash or an indicator light may activate. Adjust the device's position until it self-levels.
- Mode Selection (if applicable): Some models allow switching between horizontal line, vertical line, or cross-line modes. Refer to the device's controls for this functionality.
- Marking: Once the laser line is stable and projected onto your desired surface, you can use it as a reference for marking, drilling, or alignment tasks.
- Power Off: When finished, turn off the device using the power switch/button to conserve battery life.
Operating Range: The laser line has an operating range of 3 meters. For point laser applications, the range extends to 20 meters.
6. Maintenance
- Cleaning: Clean the device with a soft, damp cloth. Do not use abrasive cleaners or solvents. Ensure the laser aperture is free from dust and debris.
- Storage: Store the laser level in a dry, cool place, away from direct sunlight and extreme temperatures. If storing for extended periods, remove the batteries.
- Calibration: While the device is auto-leveling, periodic checks against a known level reference are recommended to ensure continued accuracy. If significant discrepancies are observed, professional calibration may be required.
7. Troubleshooting
| Problem | Possible Cause | Solution |
|---|---|---|
| Laser does not turn on. | Batteries are dead or incorrectly installed. | Check battery polarity and replace batteries if necessary. |
| Laser line is flashing or not stable. | Device is outside its auto-leveling range. | Adjust the device's position until it is within its self-leveling range. Ensure it is on a stable surface. |
| Laser line is dim or unclear. | Low battery power; dirty laser aperture; excessive ambient light. | Replace batteries; clean laser aperture; use in a less brightly lit environment if possible. |
8. Specifications
| Feature | Detail |
|---|---|
| Product Type | Auto-Leveling Laser Level |
| Laser Axis | Horizontal and Vertical Line |
| Operating Range (Line Laser) | 3 meters |
| Operating Range (Point Laser) | 20 meters |
| Integrated Features | Two bubble vials for quick and precise leveling |
| Mounting | Versatile mounting accessory (wall, tripod, magnetic base) |
| Product Height | 165 mm |
| Product Width | 23 mm |
| Product Weight | 172 grams |
| IP Rating | No IP classification |
| Manufacturer | MADE by B&Q |
9. Warranty Information
Specific warranty details for the Magnusson Auto-Leveling Laser Level are not provided within the product information. Please refer to your purchase receipt or contact the retailer for warranty terms and conditions.
10. Customer Support
For technical assistance or inquiries regarding your Magnusson Auto-Leveling Laser Level, please contact the retailer or the manufacturer, MADE by B&Q. Contact information was not provided in the product details.