
ZCGIOBN B07YS6Q99W
Ultra Mini Portable WiFi Projector Instruction Manual
Model: B07YS6Q99W
1. Introduction
Thank you for purchasing the ZCGIOBN Ultra Mini Portable WiFi Projector. This compact and versatile projector is designed to provide a high-quality viewing experience for various applications, from home entertainment to outdoor movie nights. Featuring DLP technology, wireless screen mirroring, and automatic keystone correction, it offers convenience and superior image clarity. This manual provides detailed instructions on how to set up, operate, and maintain your projector to ensure optimal performance and longevity.

Image: The ZCGIOBN Ultra Mini Portable WiFi Projector, a compact black device, shown projecting a vibrant 3D image of a whale. Icons indicate its 3D, WiFi, and projection capabilities.
2. Package Contents
Please check the box for the following items. If any items are missing or damaged, please contact customer support.

Image: A visual representation of the package contents, including the projector unit, its power adapter, a printed instruction manual, and the remote control.
- Ultra Mini Portable WiFi Projector
- Power Adapter
- Remote Control
- Instruction Manual
3. Product Features
3.1. Mini Size, Large Screen
The projector is designed for ultimate portability, measuring approximately 6.69 x 4.13 x 1.1 inches and weighing only 0.83 lbs. Despite its compact size, it can project a screen size of up to 120 inches (from 5.47 ft to 13.35 ft throw distance). For optimal viewing, an ideal projection distance of 6.56 ft is recommended.

Image: A side-by-side comparison illustrating the compact size of the projector relative to a typical smartphone, highlighting its portability.

Image: The projector positioned to display a large, clear image of a mountain lake on a screen, with annotations showing projection sizes from 50 to 120 inches and throw distances from 5.47 to 13.35 feet.
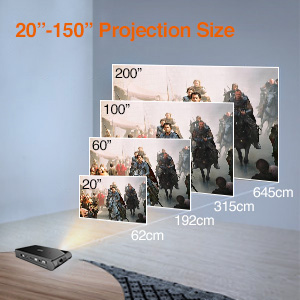
Image: A visual guide demonstrating various projection sizes, ranging from 20 inches to 150 inches, illustrating how the image scales depending on the distance from the projection surface.
3.2. Powerful DLP Technology
The micro projector utilizes DLP (Digital Light Processing) reflective projection technology, which provides superior image quality compared to traditional LCD projectors. DLP technology ensures uniform images with high contrast and accurate color reproduction due to its integrated color correction circuit. The robust box structure minimizes external light interference, resulting in clear and deep visuals for a realistic viewing experience.
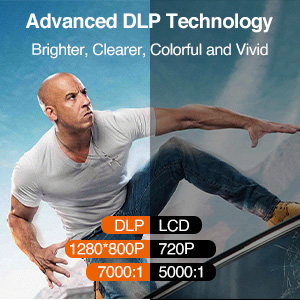
Image: A comparison graphic showcasing the superior image quality of DLP technology over LCD, emphasizing brighter, clearer, and more vivid colors, along with higher resolution and contrast ratio.

Image: A two-part image. The top part compares contrast ratios, showing 'Others' at 3000:1 and 'Ours' (DLP) at 7000:1. The bottom part illustrates the automatic keystone correction function, showing how a distorted image is corrected to a perfect rectangle.
3.3. Wireless Screen Sharing
The projector features built-in 2.4G dual WiFi, enabling seamless wireless mirroring from your iPhone, iPad, Mac, and Android devices via Airplay and Miracast. This eliminates the need for adapters or dongles, allowing you to easily share photos, videos, and presentations on the big screen.

Image: A visual demonstrating the projector's wireless screen mirroring capability, showing content from an iPhone, iPad, Mac, and Android phone being displayed on the projection screen via Airplay and Miracast.

Image: A diagram illustrating the wireless connection setup, showing a laptop, smartphone, and tablet wirelessly transmitting content to the projector, which then displays it on a large screen.
3.4. Auto Keystone Correction
Equipped with an automatic keystone correction function, the projector detects keystone distortion using an internal gravity sensor and corrects it automatically. This allows for clear image projection even when the projector is placed at a tilted horizontal position. Additionally, manual ±50° four-point keystone correction is available for fine-tuning as needed.

Image: A visual representation of the automatic keystone correction feature, demonstrating how a trapezoidal image, resulting from an angled projection, is automatically adjusted into a perfectly rectangular display.
3.5. Wide Range of Interchangeability & Battery
The projector offers extensive connectivity options, including HDMI, USB, DV, and headphone terminals, making it compatible with various devices such as PCs, game consoles, and headsets. It also features a built-in 8400mAh rechargeable battery, providing 1.5-2.5 hours of movie playback on a single charge, allowing for flexible use anywhere without constant charging.

Image: A detailed diagram illustrating the projector's various multimedia connection ports, including Power In, Power Button, USB, HDMI, Audio Jack, and Master Switch, along with examples of compatible devices for each port like USB sticks, laptops, gamepads, and earphones.

Image: A comprehensive diagram illustrating the HDMI, USB, and Audio ports of the projector and a wide array of devices that can be connected, including Blu-ray/DVD players, TV sticks, smartphones, tablets, speakers, laptops, computers, gamepads, and USB sticks.

Image: A hand demonstrating the ease of connecting a USB stick to the projector's USB port, with a clear indication that it supports up to 128GB for plug-and-play functionality.

Image: The projector in an outdoor night setting, demonstrating its portability and long battery life (8400mAh), as people enjoy a movie projected onto a screen from a camper van.
3.6. Additional Features
- 3D Support: Supports active 3D SBS / 3D TNB / Blu-Ray 3D formats for an immersive viewing experience. (3D glasses not included).

Image: The projector projecting a 3D image of a whale in a living room setting, with people observing. A graphic below illustrates the components needed for 3D viewing: 3D video, 3D projector, and 3D glasses.

Image: A diagram illustrating the combination of a 3D source, a 3D projector, and 3D glasses (not included) to create an immersive 3D world experience.
- Built-in Dual Stereo Speakers: Provides clear and powerful sound for an enhanced audio experience.

Image: The projector emitting musical notes, symbolizing its built-in dual stereo speakers, set against a background of a lively concert crowd, emphasizing its audio capabilities.
- Eye-Protective Lamp: Designed with eye-protective technology to reduce strain during prolonged viewing.

Image: A diagram illustrating the path of light from the projector to the screen and then to the viewer's eye, highlighting the eye-protective lamp feature designed to reduce visual strain.

Image: A collage of four images depicting various usage scenarios for the projector: a person doing yoga with a projected image, a family enjoying a home theater experience, friends at an outdoor movie night, and a child playing video games.
4. Setup
4.1. Initial Charging
- Before first use, fully charge the projector using the provided power adapter. The charging indicator light will show the charging status.
- A full charge typically takes approximately [X] hours (refer to specifications for exact time).
4.2. Placement and Projection Distance
- Place the projector on a stable, flat surface.
- Ensure there is adequate ventilation around the projector to prevent overheating.
- Position the projector at the desired distance from the projection surface (wall or screen). Refer to the specifications for recommended throw distances for various screen sizes.
4.3. Powering On/Off
- To Power On: Press and hold the power button on the projector or remote control until the indicator light turns on and the projection starts.
- To Power Off: Press and hold the power button again until the projector shuts down. Always allow the projector to cool down before unplugging or moving.
4.4. Focus Adjustment
Rotate the focus ring located near the lens until the projected image appears sharp and clear.
4.5. Keystone Correction
- Automatic Keystone Correction: The projector will automatically correct vertical keystone distortion. Ensure the projector is on a stable surface for best results.
- Manual Keystone Correction: If further adjustment is needed, navigate to the keystone correction settings in the projector's menu to manually adjust the ±50° four-point correction.
5. Operating Instructions
5.1. Connecting Devices
The projector supports various input sources:
- HDMI: Connect your laptop, game console, TV stick, or Blu-ray player using an HDMI cable. Select the HDMI input source from the projector's menu.
- USB: Insert a USB flash drive (up to 128GB) into the USB port to play media files directly. Navigate to the USB media player option in the menu.
- Audio Jack: Connect external speakers or headphones using a 3.5mm audio cable.
5.2. Wireless Screen Mirroring
To mirror your smartphone or tablet screen:
- Ensure both your device and the projector are connected to the same Wi-Fi network.
- On the projector, select the 'Wireless Mirroring' or 'Screen Share' option from the main menu.
- For iOS devices (Airplay): Open Control Center on your iPhone/iPad and tap 'Screen Mirroring' or 'AirPlay Mirroring'. Select the projector from the list.
- For Android devices (Miracast): Go to your device's settings and find 'Wireless Display', 'Cast', 'Screen Mirroring', or similar. Select the projector from the detected devices.
5.3. Navigating the Menu
Use the remote control or the buttons on the projector to navigate through the on-screen menu. The main menu typically includes options for input source selection, media playback, network settings, and system settings.
5.4. Audio Settings
Adjust volume using the remote control. You can also select audio output preferences (internal speakers or external audio devices) in the system settings.
5.5. 3D Playback
To enjoy 3D content:
- Ensure your 3D content is in a supported format (SBS, TNB, Blu-Ray 3D).
- Connect your 3D source (e.g., Blu-ray player) via HDMI.
- Wear compatible active 3D glasses (not included). The projector will automatically detect and display 3D content.
6. Connectivity
The ZCGIOBN projector offers a comprehensive set of ports and wireless capabilities to connect to a wide range of devices:
- HDMI Port: For high-definition video and audio input from laptops, gaming consoles, streaming devices (e.g., TV sticks), and Blu-ray players.
- USB Port: Supports USB flash drives for direct media playback (photos, videos, music) up to 128GB.
- Audio Jack (3.5mm): For connecting external headphones or speakers.
- DV Port: For power input.
- 2.4G Dual WiFi: Enables wireless screen mirroring via Airplay (iOS) and Miracast (Android/Windows).
7. Maintenance
7.1. Cleaning the Lens
Use a soft, lint-free cloth specifically designed for optical lenses to gently wipe the projector lens. Do not use abrasive cleaners or excessive force, as this can scratch the lens.
7.2. Ventilation
Ensure the projector's ventilation vents are clear and unobstructed. Do not place the projector on soft surfaces that might block airflow. Proper ventilation is crucial to prevent overheating and extend the projector's lifespan.
7.3. Storage
When not in use, store the projector in a cool, dry place, away from direct sunlight and extreme temperatures. Use the original packaging or a protective case to prevent dust accumulation and physical damage.
7.4. Battery Care
To maximize battery life:
- Avoid fully discharging the battery frequently.
- If storing for an extended period, charge the battery to about 50% before storage.
- Recharge the battery every few months if not in use to prevent deep discharge.
8. Troubleshooting
| Problem | Possible Cause | Solution |
|---|---|---|
| No image projected | Power cable not connected; Projector not powered on; Incorrect input source selected; Lens cap on; Device not connected properly. | Check power connection and power on; Select correct input source (HDMI, USB, Wireless); Remove lens cap; Reconnect device cables securely. |
| Image is blurry | Focus not adjusted; Projector too close/far from screen. | Adjust the focus ring; Adjust projection distance. |
| Image is trapezoidal/distorted | Projector not perpendicular to screen; Keystone correction needed. | Ensure projector is placed straight; Use auto or manual keystone correction. |
| No sound | Volume too low; Muted; External speakers not connected; Incorrect audio output selected. | Increase volume; Unmute; Connect external speakers if desired; Check audio output settings. |
| Wireless mirroring not working | Not on same Wi-Fi network; Device not compatible; Firewall issues. | Ensure both devices are on the same Wi-Fi; Check device compatibility (Airplay/Miracast); Temporarily disable firewall on device if necessary. |
| Projector overheating | Vents blocked; Prolonged use in hot environment. | Ensure vents are clear; Place in a well-ventilated area; Allow to cool down. |
9. Specifications
| Feature | Detail |
|---|---|
| Brand | ZCGIOBN |
| Model | B07YS6Q99W |
| Display Technology | DLP |
| Native Resolution | 1280 x 720 (HD) |
| Max Supported Resolution | 1920 x 1080 (Full HD) |
| Brightness | 3600 Lumen (Marketing Value) |
| Contrast Ratio | 7000:1 (DLP) |
| Projection Size | 50-120 inches (Recommended) |
| Throw Distance | 5.47 ft to 13.35 ft (Ideal: 6.56 ft) |
| Keystone Correction | Automatic Vertical, Manual ±50° Four-Point |
| Connectivity | HDMI, USB, DV, 3.5mm Audio Jack, 2.4G WiFi |
| Wireless Mirroring | Airplay, Miracast |
| Battery Capacity | 8400mAh |
| Battery Life | 1.5-2.5 hours (movie playback) |
| Dimensions | 6.69 x 4.13 x 1.1 inches (approx.) |
| Item Weight | 0.83 lbs (approx.) |
| Manufacturer | CAIWEI |
| Date First Available | October 6, 2019 |
10. Warranty and Support
For information regarding warranty coverage, technical support, and service, please refer to the warranty card included with your product or visit the official ZCGIOBN website. You may also contact the retailer where you purchased the product for assistance.
Please retain your proof of purchase for warranty claims.
Ask a question about this manual
Ask about setup, troubleshooting, compatibility, parts, safety, or missing instructions. Manuals+ will review the question and use this page’s manual context to help answer it.