DONSU DZ-260C
DONSU DZ-260C Automatic Vacuum Packaging Machine User Manual
Model: DZ-260C | Brand: DONSU
1. Introduction
This manual provides comprehensive instructions for the safe and efficient operation, maintenance, and troubleshooting of your DONSU DZ-260C Automatic Vacuum Packaging Machine. This desktop vacuum sealer is designed for packaging various products, including ripe foods, salted items, and fruits, to extend their freshness and storage life. It utilizes advanced seal technology to prevent spoilage.
Please read this manual thoroughly before operating the machine to ensure proper usage and to prevent damage or injury.
2. Safety Instructions
Observe the following safety precautions to prevent electric shock, fire, or injury:
- Ensure the power supply matches the machine's requirements (AC110V).
- Do not operate the machine with wet hands.
- Keep the machine away from water or other liquids.
- Unplug the machine before cleaning or maintenance.
- Do not attempt to repair the machine yourself. Contact qualified personnel for service.
- Keep children and pets away from the machine during operation.
- Ensure proper ventilation around the machine during use.
3. Product Overview
Familiarize yourself with the components of your vacuum packaging machine:

Figure 3.1: Labeled components of the DONSU DZ-260C Vacuum Packaging Machine.
This image displays the key parts of the vacuum sealer, including the control panel for operation, the vacuum table where items are placed, the heating wire for sealing, the vacuum chamber, the upper strip, the vacuum seal, the transparent plexiglass cover, and the durable stainless steel body.
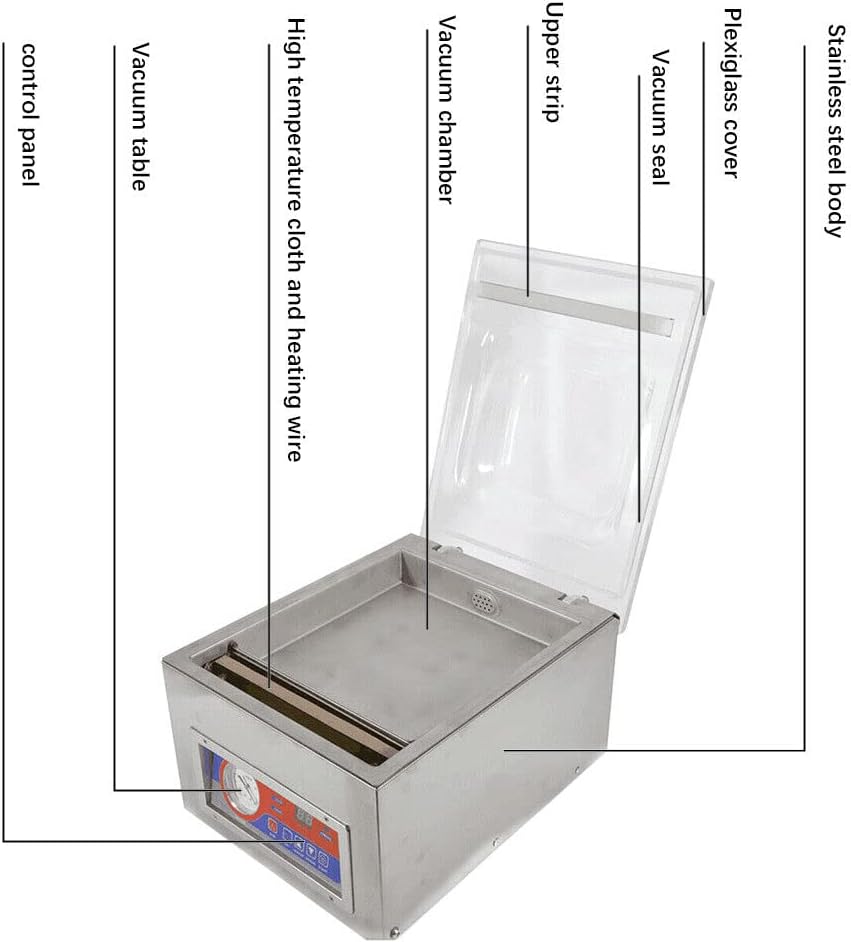
Figure 3.2: Machine Dimensions.
The diagram illustrates the overall dimensions of the machine and the internal dimensions of the vacuum chamber, providing essential information for placement and capacity planning.
4. Setup
4.1 Initial Oil Filling (Before First Use)
Before using the machine for the first time, it is essential to add vacuum pump oil to the vacuum pump. This step is crucial for the machine's proper function and longevity.
- Open the Rear Panel: Carefully unscrew and remove the screws on the rear panel of the machine to access the internal components, including the vacuum pump.
- Locate the Vacuum Pump: Identify the vacuum pump unit inside the machine. It typically has a cap for oil filling and a sight glass or oil window to check the oil level.
- Add Vacuum Oil: Unscrew the oil cap. Slowly inject vacuum pump oil into the pump until the oil level reaches approximately half of the display on the oil window. Any standard type of vacuum oil is suitable.
- Secure Panel: Replace the oil cap and reattach the rear panel securely.
Video 4.1: Initial Setup and Oil Filling Guide.
This video demonstrates the process of opening the machine's rear panel, locating the vacuum pump, and correctly adding vacuum oil to the appropriate level before the first use of the machine.
4.2 Power Connection
Connect the power cord to the machine's power inlet and then to a suitable AC110V power outlet. Ensure the power switch on the rear of the machine is in the OFF position before connecting.

Figure 4.1: Rear Panel and Power Connection.
This image highlights the power input and switch located on the rear of the machine, along with the ventilation area for heat dissipation.
5. Operating Instructions
5.1 Control Panel Overview

Figure 5.1: Control Panel.
The control panel features a vacuum meter, a digital display for setting and monitoring time, and buttons for controlling the vacuum, sealing, and cooling processes.
5.2 Setting Parameters
The machine allows you to adjust vacuuming time, sealing time, and cooling time. These settings should be adjusted based on the specific bag material and contents.
- Set Vacuuming Time: Press the "Setting" button to cycle through the parameters. Use the "Raise" and "Lower" buttons to adjust the vacuuming time. A typical initial setting is 30 seconds.
- Set Sealing Time: Press "Setting" again to select sealing time. Adjust using "Raise" and "Lower". A common initial setting is 2 seconds. For thicker vacuum bags, increase this time.
- Set Cooling Time: Press "Setting" once more to select cooling time. Adjust using "Raise" and "Lower". A typical initial setting is 2 seconds.
- Confirm Settings: Press the "Setting" button until the display returns to the operational state (often indicated by "ED" or similar).

Figure 5.2: Parameter Setting Steps.
This diagram illustrates the sequence for adjusting the vacuum, sealing, and cooling times using the control panel buttons. It also emphasizes the manual pressing of the cover during operation.
5.3 Vacuum Sealing Process
- Prepare Items: Place the items to be vacuum-sealed inside a suitable vacuum bag. Ensure the open end of the bag is clean and flat.
- Position Bag: Place the open end of the vacuum bag over the sealing bar within the vacuum chamber. Ensure the bag is flat and free of wrinkles.
- Close and Press Cover: Close the plexiglass cover. Manually press down firmly on the vacuum cover to initiate the vacuum process. Continue pressing until the vacuum table is running.
- Start Operation: Press the "Start" button. The machine will begin the vacuuming cycle.
- Monitor Vacuum: Observe the vacuum meter. When the needle reaches the green area (typically 0.06-0.08Mpa), the vacuum process is complete.
- Automatic Release: After the sealing and cooling cycles are finished, the lid will automatically pop open, indicating the completion of the operation.
5.4 Important Considerations

Figure 5.3: Operational Cautions.
This image highlights critical operational notes, specifically the necessity of firmly pressing the vacuum cover and the potential issues arising from incorrect sealing time settings, such as sparks on the heating wire.
- Pressing and holding the vacuum cover is critical for a good vacuum seal. Insufficient pressure can affect the vacuum quality and may cause sparks on the heating wire.
- Do not confuse the time settings for vacuuming and sealing. Setting the sealing time too long can also lead to sparks on both sides of the heating wire.
6. Maintenance
6.1 Cleaning
- Always unplug the machine before cleaning.
- Wipe the exterior of the machine with a damp cloth. Do not use abrasive cleaners or immerse the machine in water.
- Clean the vacuum chamber and sealing bar regularly to ensure optimal performance and hygiene.
6.2 Vacuum Pump Oil Check and Replacement
- Regularly check the vacuum pump oil level through the oil window.
- If the oil level is low or the oil appears discolored, replace it with appropriate vacuum pump oil. Refer to section 4.1 for oil filling instructions.
6.3 Heating Wire Replacement
The machine features a nickel complex alloy heating wire designed for a long working life. If the sealing performance degrades, the heating wire may need replacement. This process is designed to be easy and quick.

Figure 6.1: Sealing Bar and Heating Wire.
This image shows the robust sealing bar and heating wire, which are crucial for creating strong, airtight seals.
Consult the manufacturer's guidelines or a qualified technician for detailed instructions on replacing the heating wire.
7. Troubleshooting
| Problem | Possible Cause | Solution |
|---|---|---|
| Machine does not power on. | Power cord not connected; Power switch off; No power from outlet. | Check power cord connection; Ensure power switch is ON; Test outlet with another device. |
| Poor vacuum seal or no vacuum. | Vacuum cover not pressed firmly; Bag not positioned correctly; Bag material unsuitable; Vacuum pump oil low. | Ensure cover is pressed firmly during vacuuming; Reposition bag; Use appropriate vacuum bags; Check and refill vacuum pump oil. |
| Sparks on heating wire. | Sealing time set too long; Insufficient pressure on cover. | Reduce sealing time; Ensure firm pressure on vacuum cover. |
| Seal is incomplete or weak. | Sealing time too short; Heating wire dirty or damaged; Bag material issues. | Increase sealing time; Clean or replace heating wire; Ensure bag is clean and dry at sealing area. |
8. Specifications
- Brand: DONSU
- Model: DZ-260C
- Material: Stainless Steel
- Power Source: Corded Electric
- Operation Mode: Automatic
- Wattage: 120W
- UPC: 760385685680
- ASIN: B07YKG2H36
- Date First Available: September 30, 2019
9. Warranty and Support
For warranty information or technical support, please refer to the documentation included with your purchase or contact DONSU customer service. Keep your purchase receipt for warranty claims.
You can visit the official DONSU store for more information: DONSU Store
Ask a question about this manual
Ask about setup, troubleshooting, compatibility, parts, safety, or missing instructions. Manuals+ will review the question and use this page’s manual context to help answer it.