1. Introduction
The Godox E250 is a lightweight, compact, and durable studio flash designed for various photography needs, including studio portraits, e-commerce product photography, headshots, waist shots, and certificate photography. It can also serve as a high light, background light, or hair light in larger studio environments. This flash unit offers complete functionality and precise control for professional lighting setups.
Key Features:
- Precise output displayed on LED panel, with 20 steps from 1.0 to 3.0 in 0.1 increments.
- Optional FT-16 trigger for wireless control of flash power ratio, modeling lamp, and buzzer, as well as flash triggering.
- 75W modeling lamp adjustable in 9 power levels (L1 to L9).
- Outstanding output stability, with no more than 2% shifts under the same output settings.
- Anti-preflash function for synchronization with cameras featuring a one-preflash firing system.
- Automatic memory and recovery of adjusted panel settings.
2. What's in the Box
Upon opening the package, please verify that all the following components are included:
- 1x Godox E250 Flash Unit
- 1x Power Cord
- 1x Modeling Lamp (75W)
- 1x Instruction Manual (this document)
- 1x TUYUNG Cleaning Cloth
3. Setup Guide
Follow these steps to set up your Godox E250 flash unit:
3.1 Unpacking and Initial Inspection
Carefully remove all components from the packaging. Inspect the flash unit and accessories for any signs of damage during transit. If any damage is found, do not proceed with setup and contact customer support.
3.2 Attaching the Modeling Lamp
Gently insert the 75W modeling lamp into its socket on the front of the flash unit. Ensure it is securely seated but do not overtighten.

Image: Front view of the Godox E250 flash unit, showing the modeling lamp securely installed within the reflector.
3.3 Mounting the Flash Unit
The E250 features a standard mounting bracket for attachment to light stands. Loosen the adjustment knob on the bracket, slide the flash onto your light stand's spigot, and then tighten the knob to secure it. Adjust the angle as needed.

Image: Close-up view of the Godox E250's mounting bracket, illustrating the attachment point for a light stand.
3.4 Power Connection
Connect the provided power cord to the power input port on the rear panel of the flash unit. Ensure the power switch is in the 'OFF' position before plugging the other end into a suitable AC 110V-120V 60Hz power outlet.
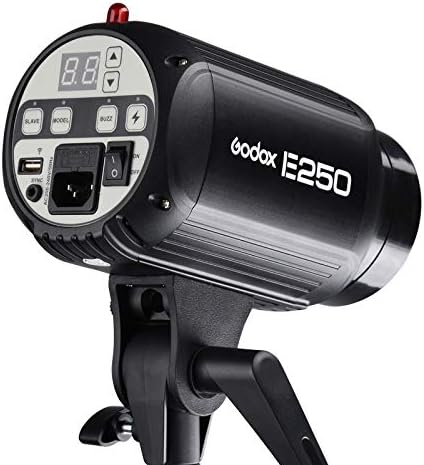
Image: Rear control panel of the Godox E250, highlighting the power input socket and the main power switch.
4. Operating Instructions
This section details the operation of your Godox E250 flash unit.
4.1 Powering On/Off
Locate the main power switch on the rear control panel. Flip the switch to the 'ON' position to power on the unit. The LED display will illuminate. To power off, flip the switch back to 'OFF'.
4.2 Adjusting Flash Output
The flash output can be adjusted from 1.0 to 3.0 (equivalent to 1/8 to 1/1 power) in 0.1 increments. Use the UP and DOWN arrow buttons on the control panel to increase or decrease the power level. The current setting is displayed on the LED panel.
4.3 Modeling Lamp Control
Press the MODEL button on the control panel to cycle through modeling lamp modes: ON, OFF, and Proportional. The modeling lamp level can be adjusted in 9 levels (L1 to L9) using the arrow buttons when the modeling lamp is active.
4.4 Triggering Methods
The Godox E250 supports multiple triggering methods:
- Sync Cord: Connect a PC sync cord from your camera's PC sync port to the SYNC port on the flash unit.
- Test Button: Press the TEST button on the control panel to manually fire the flash.
- Slave Triggering: The flash has an optical slave sensor. Press the SLAVE button to activate slave mode. The flash will fire when it detects another flash. The anti-preflash function helps synchronize with cameras that use a pre-flash.
- Wireless Control Port: For advanced wireless control, an optional Godox FT-16 trigger (sold separately) can be connected to the wireless control port. This allows remote adjustment of flash power, modeling lamp, and buzzer.
4.5 Buzzer Function
Press the BUZZ button to toggle the audible ready beep on or off. When enabled, the unit will beep to indicate it has recycled and is ready to fire again.
5. Maintenance
Proper maintenance ensures the longevity and optimal performance of your Godox E250 flash unit.
- Cleaning: Use a soft, dry cloth to clean the exterior of the flash unit. For the modeling lamp and flash tube, use a clean, lint-free cloth. Avoid using abrasive cleaners or solvents.
- Storage: When not in use, store the flash unit in a cool, dry place, away from direct sunlight and excessive humidity. It is recommended to use the original packaging or a padded case for protection.
- Modeling Lamp Replacement: If the modeling lamp burns out, ensure the unit is powered off and unplugged. Allow the lamp to cool completely before carefully unscrewing the old lamp and replacing it with a new 75W modeling lamp of the correct type.
- Flash Tube Replacement: Flash tube replacement should ideally be performed by qualified service personnel. If replacement is necessary, ensure the unit is powered off and unplugged, and allow ample time for the tube to cool.
6. Troubleshooting
If you encounter issues with your Godox E250, refer to the following common problems and solutions:
| Problem | Possible Cause | Solution |
|---|---|---|
| Flash does not fire. |
|
|
| Modeling lamp not working. |
|
|
| Inconsistent flash output. |
|
|
7. Specifications
| Feature | Specification |
|---|---|
| Model | E250 |
| Max Power | 250Ws |
| Guide Number (m ISO 100) | 53 |
| Color Temperature | 5000±200K |
| Operating Voltage | AC110V-120V-60Hz |
| Power Output Control | OFF, 1.0-3.0 (1/8-1/1) |
| Modeling Lamp | 75W |
| Modeling Lamp Level | 9 levels (L1 to L9) |
| Recycle Time | 0.4~2.5s |
| Triggering Method | Sync cord, Test button, Slave triggering, Wireless control port |
| Flash Duration | 1/2000 to 1/800s |
| Fuse | 5A |
| Net Weight | Approx. 1.19kg |
8. Warranty and Support
8.1 Warranty Information
Specific warranty terms and conditions for the Godox E250 flash unit are typically provided with your purchase documentation or can be found on the official GODOX website. Please retain your proof of purchase for warranty claims.
8.2 Customer Support
For technical assistance, troubleshooting beyond this manual, or warranty inquiries, please contact GODOX customer support or the retailer from whom you purchased the product. Refer to the contact information provided on the GODOX official website or your purchase receipt.