1. Introduction
This manual provides detailed instructions for the setup, operation, and maintenance of your WENWEN Frequency A 8-Channel UHF Wireless Microphone System. This professional audio system is designed for clear and reliable vocal performance in various settings, including karaoke, church services, conferences, weddings, and KTV environments. It features an 8-channel receiver with a combination of handheld microphones and bodypack transmitters, offering flexibility with headset and lavalier microphone options.
2. Safety Information
- Power Source: Use only the provided AC 16V, 2000mA power adapter. Ensure the voltage matches your local power supply.
- Battery Usage: Use 2x 1.5V AA batteries for each wireless microphone. Do not mix old and new batteries, or different types of batteries. Remove batteries if the device will not be used for an extended period to prevent leakage.
- Moisture and Heat: Keep the system away from water, high humidity, and direct heat sources. Do not expose to rain or moisture.
- Ventilation: Ensure adequate ventilation around the receiver to prevent overheating. Do not block ventilation openings.
- Servicing: Do not attempt to open or service the unit yourself. Refer all servicing to qualified personnel. Opening the casing may void the warranty.
- Placement: Place the receiver on a stable, flat surface. Avoid placing it near strong electromagnetic fields or other wireless devices that may cause interference.
- FCC Compliance: This microphone system complies with new FCC frequency rules.
3. Package Contents
Verify that all items listed below are included in your package:
- 1x 8-Channel UHF Wireless Receiver
- 4x Handheld Microphones
- 4x Bodypack Transmitters
- 4x Headset Microphones
- 4x Lavalier (Lapel) Microphones
- 4x Receiver Antennas
- 1x Audio Cable (6.35mm)
- 1x US 110-240V Power Adapter
- Batteries (for initial use)
- Warranty Card
- User Manual

Image: Included accessories, including the user manual, power adapter, and audio cable.
4. System Overview
4.1. Receiver Unit
The central receiver unit manages all 8 wireless channels. It features individual volume controls for each channel, allowing precise audio mixing. The front panel includes clear displays for frequency and RF/AF levels, while the rear panel provides both mixed 6.35mm and individual XLR outputs for versatile connectivity.

Image: Front view of the receiver unit, showing channel displays and controls.

Image: Rear panel of the receiver unit with various audio outputs and antenna ports.
4.2. Handheld Microphones
The system includes four durable metal handheld microphones. These microphones are designed for vocal clarity and feature a built-in antenna and a display for frequency and battery status. They operate on 2x 1.5V AA batteries.
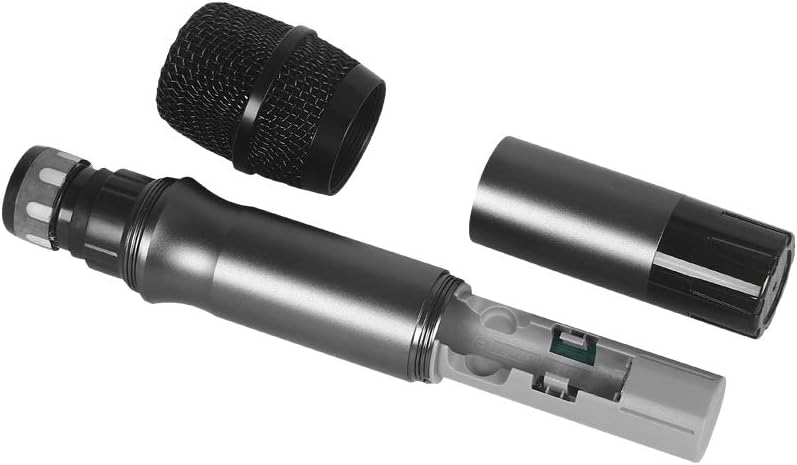
Image: Handheld microphone with its components separated, illustrating battery access.
4.3. Bodypack Transmitters with Headset and Lavalier Microphones
Four bodypack transmitters are provided, each compatible with either a headset microphone or a lavalier (lapel) microphone. These offer hands-free operation, ideal for presentations, performances, or interviews. The bodypacks also operate on 2x 1.5V AA batteries and feature an on/off switch and an antenna.

Image: Bodypack transmitter with its battery compartment open.

Image: Lavalier (lapel) microphone and headset microphone.
5. Setup Instructions
- Unpack and Inspect: Carefully remove all components from the packaging and inspect for any damage. Refer to the "Package Contents" section to ensure all items are present.
- Receiver Placement: Place the receiver unit on a stable, flat surface, ensuring it is within optimal range of where the microphones will be used. Avoid obstructions and other electronic devices that may cause interference.
- Attach Antennas: Screw the four provided antennas securely into the antenna ports on the rear of the receiver. Position them vertically for best reception.
- Connect Power: Connect the power adapter to the receiver's power input and then plug it into a suitable power outlet (110-240V AC).
- Audio Output Connection:
- Mixed Output: For a single audio output, connect the 6.35mm audio cable from the receiver's "MIXED OUTPUT" port to your mixer, amplifier, or sound system's input.
- Individual Outputs: For separate control of each microphone channel, use XLR cables to connect the receiver's "MIC A OUTPUT" through "MIC H OUTPUT" to individual input channels on your mixer.
- Install Batteries in Microphones:
- Handheld Microphones: Unscrew the bottom part of the microphone to access the battery compartment. Insert 2x 1.5V AA batteries, observing polarity (+/-). Screw the bottom back on.
- Bodypack Transmitters: Open the battery cover on the bodypack. Insert 2x 1.5V AA batteries, observing polarity (+/-). Close the cover.
- Connect Headset/Lavalier Mics to Bodypacks: Plug the connector of the headset or lavalier microphone into the input jack on the bodypack transmitter.
- Power On: Turn on the receiver unit using the power button. Then, turn on each microphone/bodypack transmitter. The receiver display should show active channels and signal strength.
- Frequency Synchronization: The system is typically pre-synchronized. If a microphone does not connect, refer to the troubleshooting section for manual frequency pairing instructions (if applicable, not detailed in product description).
6. Operation
- Volume Adjustment: Use the individual volume control knobs on the receiver for each channel (A-H) to adjust the output level of each microphone. Start with a low volume and gradually increase to avoid feedback.
- RF/AF Level Monitoring: The receiver's display shows RF (Radio Frequency) and AF (Audio Frequency) levels. A stable RF signal indicates good wireless connection, while AF indicates audio input.
- Microphone Usage:
- Handheld: Hold the microphone approximately 2-6 inches from your mouth for optimal sound.
- Lavalier: Clip the lavalier microphone to your clothing, about 6-8 inches below your chin, ensuring it is not covered by fabric.
- Headset: Position the headset microphone boom approximately 1-2 inches from the corner of your mouth.
- Range: Maintain a clear line of sight between the microphones and the receiver for optimal performance. Obstacles and distance can affect signal quality.
- Power Off: After use, turn off all microphones/bodypacks first, then power off the receiver unit.
7. Maintenance
- Cleaning: Use a soft, dry cloth to clean the exterior of the receiver and microphones. Do not use liquid cleaners or abrasive materials.
- Battery Replacement: Replace batteries in microphones when the low battery indicator appears or when audio quality degrades. Always replace all batteries in a unit at the same time.
- Storage: Store the system in a cool, dry place away from direct sunlight and extreme temperatures. Remove batteries from microphones if storing for extended periods.
- Antenna Care: Handle antennas carefully to avoid bending or breaking. Ensure they are securely attached during use.
8. Troubleshooting
| Problem | Possible Cause | Solution |
|---|---|---|
| No sound from microphone |
|
|
| Intermittent audio or signal dropouts |
|
|
| Poor sound quality / Distortion |
|
|
9. Specifications
9.1. Overall System
- Number of Channels: 8 channels
- Carrier Frequency Range: 520MHz-580MHz
- Stability: ±0.006%
- Normal Deviation: ±22kHz
- S/N Ratio: <120dB
- T.H.D: <0.6%
- Frequency Response: 50Hz-15kHz
- Receiver Sensitivity: >80dB
- Audio Output: Balanced (XLR) and Unbalanced (6.35mm)
- Power Requirement: AC 16V, 2000mA
- Dimensions: 610×400×190mm
- Weight: Approx. 8 kg
9.2. Wireless Microphones (Handheld & Bodypack)
- Cartridge Type: Dynamic (Handheld)
- Antenna: Built-in
- RF Output: <10mW
- Normal Deviation: ±22kHz
- Maximum Deviation: ±80kHz
- Battery: 2x 1.5V AA battery
- Battery Life: >8 hours
10. Warranty and Support
Your WENWEN Wireless Microphone System comes with a 3-year free warranty. For warranty claims, technical support, or any questions regarding your product, please contact WENWEN customer service. Refer to the warranty card included in your package for specific contact details and terms.
Note: Keep your purchase receipt and warranty card for future reference.