Introduction
This manual provides detailed instructions for the installation, operation, and maintenance of your NOLYTH 10-inch Full Touch Rearview Dash Camera. Please read this manual thoroughly before using the device to ensure proper functionality and safety.
Package Contents
Verify that all items listed below are included in your package:
- NOLYTH 10-inch Full Touch Rearview Dash Camera
- Rear Camera
- 32GB Class 10 SD Card (pre-inserted)
- Power Cable (for cigarette lighter)
- Rear Camera Cable (10m)
- Mounting Straps/Bands
- User Manual (this document)

Image: Main product components including the dash camera, rear camera, SD card, and cables.
Product Overview
The NOLYTH 10-inch Full Touch Rearview Dash Camera is designed to provide comprehensive vehicle monitoring with its dual lens system and advanced features.
- 10-inch Full HD IPS Touch Screen: Provides a clear, responsive interface for all operations.
- 1080P Dual Lens & 170° Wide Angle: Records both front and rear views simultaneously with a wide field of vision.
- Super Night Vision: Enhances visibility and recording clarity in low-light conditions.
- Smart Reversing Assistance: Displays backup camera view with guidelines for safe parking.
- Loop Recording: Automatically overwrites older footage when the memory card is full, ensuring continuous recording.
- G-Sensor: Detects sudden impacts or collisions and automatically locks the current video segment to prevent overwriting.
- Adjustable Display: Allows users to adjust the view angle by sliding a finger on the touch screen.

Image: Overview of the NOLYTH 10-inch Mirror Dash Cam, showcasing its full touch screen and main functionalities.

Image: Visual representation of the wide-angle coverage provided by the front (170°) and rear (140°) cameras.
Setup & Installation
Follow these steps to install your dash camera system:
- Mount the Front Camera: Secure the main dash camera unit over your existing rearview mirror using the provided rubber straps. Ensure it is centered and does not obstruct your view.
- Connect Power: Plug the power cable into the dash camera and then into your vehicle's cigarette lighter socket. Route the cable neatly along the windshield trim to avoid interference.
- Install Rear Camera:
- Mount the rear camera at the back of your vehicle, typically above the license plate or on the rear window.
- Connect the rear camera cable to the rear camera and route it to the main dash camera unit.
- For reversing assistance, connect the red wire from the rear camera cable to your vehicle's reverse light power wire. This allows the camera to display parking guidelines when reversing.
- Insert SD Card: The 32GB SD card is typically pre-inserted. If not, insert it into the designated slot on the main unit. The device supports up to 128GB SD cards (not included).
- Initial Power On: Start your vehicle. The dash camera should power on automatically and display the front and rear camera views.
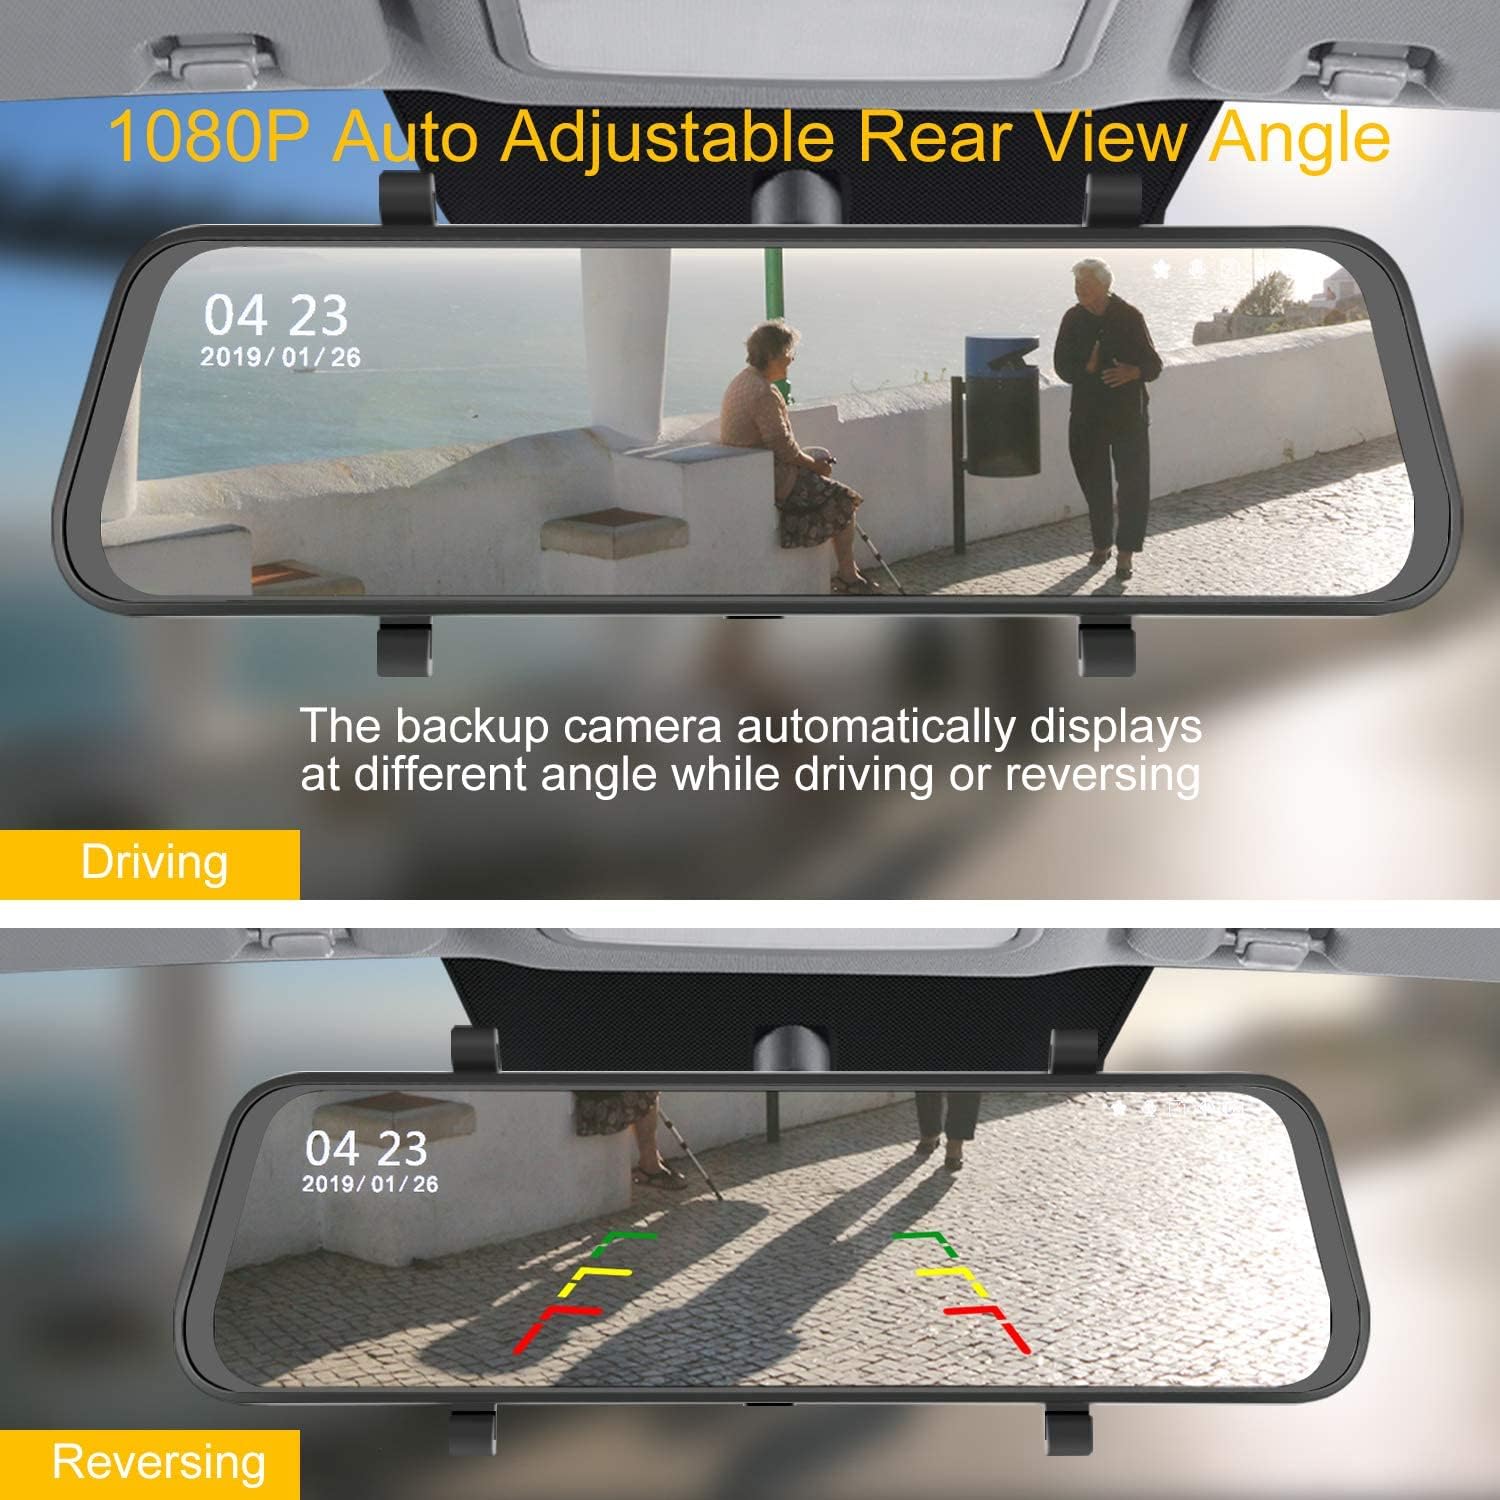
Image: Illustration of the dash camera displaying both driving and reversing views with parking guidelines.
Operating Instructions
Basic Operation
- Power On/Off: The device powers on automatically with vehicle ignition and powers off when the vehicle is turned off. You can manually power it on/off by pressing and holding the power button.
- Touch Screen Control: All functions and settings are accessed via the 10-inch touch screen. Swipe left/right to switch between front, rear, or split-screen views.
- Adjusting View Angle: Swipe up or down on the screen to adjust the vertical viewing angle of the displayed camera feed.

Image: Demonstrates how to adjust the display range on the touch screen for optimal field of view.
Recording Functions
- Continuous Recording: Once powered on, the camera automatically begins continuous loop recording. Video segments are saved to the SD card.
- Loop Recording: When the SD card is full, the oldest unlocked video files will be overwritten by new recordings.
- G-Sensor (Emergency Recording): In the event of a sudden impact or collision, the built-in G-sensor will detect the event and automatically lock the current video file, preventing it from being overwritten by loop recording.

Image: Visual explanation of how Loop Recording overwrites old files and how the G-sensor locks emergency video in case of a collision.
Night Vision
The camera features Super Night Vision technology to provide clear video recordings even in low-light conditions. This function activates automatically.

Image: Demonstrates the enhanced clarity of the Super Night Vision feature in low-light environments.
Parking Assistance
When the vehicle is shifted into reverse (and the rear camera is correctly wired to the reverse light), the dash camera will automatically display the rear view with parking guidelines on the screen, assisting with safe parking maneuvers.

Image: Shows the Smart Reversing Assistance feature with colored parking guidelines on the screen.
Settings
Access the settings menu by tapping the gear icon on the touch screen. Common settings include:
- Video Resolution: Adjust recording quality (e.g., 1080P).
- Loop Recording Duration: Set the length of each video segment (e.g., 1, 3, 5 minutes).
- G-Sensor Sensitivity: Adjust the sensitivity of the G-sensor to prevent accidental locking of files.
- Screen Saver: Configure the screen to turn off after a set period to avoid distraction while driving.
- Date/Time: Set the correct date and time for accurate timestamps on recordings.
- Language: Select your preferred language.
Maintenance
- Clean the Lenses: Regularly clean the front and rear camera lenses with a soft, lint-free cloth to ensure clear video quality.
- Clean the Screen: Use a soft cloth to wipe the touch screen. Avoid abrasive cleaners.
- SD Card Maintenance: Format the SD card periodically (e.g., once a month) within the camera's settings to maintain optimal performance and prevent data corruption. Back up any important files before formatting.
- Temperature: Avoid exposing the device to extreme temperatures for extended periods, as this can affect battery life and performance.
Troubleshooting
- Camera does not power on:
- Ensure the power cable is securely connected to both the camera and the vehicle's cigarette lighter socket.
- Check if the vehicle's cigarette lighter socket is functioning.
- Verify the power cable is not damaged.
- "SD Card Full" error or recording stops:
- Format the SD card through the camera's settings menu.
- Ensure Loop Recording is enabled in the settings.
- Reduce G-sensor sensitivity if too many emergency files are being locked unnecessarily.
- Consider upgrading to a larger capacity SD card (up to 128GB, Class 10 or higher recommended).
- Poor video quality:
- Clean the camera lenses.
- Ensure the protective film has been removed from the lenses.
- Check video resolution settings; ensure it is set to 1080P.
- Rear camera not displaying or showing incorrectly:
- Check the connection of the rear camera cable to both the rear camera and the main unit.
- Ensure the rear camera is installed correctly and not obstructed.
- If parking guidelines are not appearing, verify the red wire from the rear camera cable is correctly connected to the reverse light power.
Specifications
| Model | B07YHKB8W1 |
| Brand | NOLYTH |
| Screen Size | 10 Inches |
| Video Capture Resolution | 1080p (Front & Rear) |
| Wide Angle Lens | 170° |
| Control Method | Touch Screen |
| Storage | Supports up to 128GB SD card (32GB included) |
| Connectivity Technology | USB |
| Product Dimensions | 10.04 x 2.64 x 0.39 inches |
| Item Weight | 1.32 pounds (0.6 Kilograms) |
| Color | Black |
Warranty & Support
For warranty information, technical support, or customer service inquiries, please refer to the contact information provided on the product packaging or the official NOLYTH website. Keep your purchase receipt for warranty claims.