AMOCAM 70M401
AMOCAM 7-Inch Wired Video Intercom System User Manual
Model: 70M401
1. Introduction
This manual provides comprehensive instructions for the installation, operation, and maintenance of your AMOCAM 7-Inch Wired Video Intercom System. This system is designed to enhance home security and convenience by allowing you to see, speak with, and unlock doors for visitors from the comfort of your indoor monitor.
Key features include:
- 7-inch color monitor for clear video display.
- Outdoor HD camera with wide viewing angle.
- Infrared (IR) LED lights for clear night vision.
- Two-way audio intercom for communication with visitors.
- Electric unlocking function for compatible door/gate locks.
- Easy 4-wire connection for stable and reliable operation.
- Rainproof and anti-vandal design for the outdoor unit.
2. What's in the Box
Please verify that all components are present before proceeding with installation:
- 1 x Indoor Monitor
- 1 x Outdoor Doorbell Camera
- 1 x Power Supply
- 1 x Connection Cable (4-wire)
- Mounting Accessories (screws, wall anchors)
- User Manual

Image: All components included in the AMOCAM Video Intercom System package, including the indoor monitor, outdoor doorbell, power adapter, connection cable, and mounting hardware.
3. Setup and Installation
Before installation, ensure the power is disconnected from the installation area. It is recommended to test the system components together on a flat surface before permanent mounting.
3.1 Component Overview
Outdoor Doorbell Unit

Image: Detailed view of the outdoor doorbell unit, highlighting its components such as the rain cover, microphone, camera, infrared night light, call button, and loudspeaker, along with its dimensions (4.9 inches height, 2.0 inches width, 1.8 inches depth).
- Rain Cover: Protects the unit from weather elements.
- MIC: Microphone for two-way audio.
- Camera: Captures video of visitors.
- Night Light (Infrared): Provides illumination for night vision.
- Call Button: Pressed by visitors to alert the indoor monitor.
- Loudspeaker: Outputs audio from the indoor monitor.
Indoor Monitor Unit
Image: Front and back views of the indoor monitor, indicating control buttons (Ring cancel, Monitor, Intercom, Unlock) and connection ports (Power light, Volume/ring adjustment, Microphone, Intercom volume adjustment, Power port, Connect outdoor camera, Connect next monitor).
- Power Light: Indicates power status.
- Ring Cancel: Silences the doorbell ring.
- Monitor: Activates the camera view.
- Volume/Ring Adjustment: Adjusts audio levels and ringtone.
- Intercom: Initiates two-way communication.
- Unlock: Activates the electric lock.
- Microphone: For speaking to visitors.
- Power Port: Connects to the power supply.
- Connect Outdoor Camera: Port for the doorbell unit.
- Connect Next Monitor: For multi-monitor setups.
3.2 Wiring Diagram

Image: A simplified wiring diagram illustrating how the outdoor doorbell unit connects to the indoor monitor using a 4-core cable. It also shows optional connections for an electric lock and additional indoor monitors using 4 or 6 core cables.
The system uses a 4-wire connection between the outdoor doorbell and the indoor monitor. For multiple indoor monitors or electric lock integration, additional wiring may be required. Refer to the detailed wiring instructions provided in the physical user manual for specific color-coded connections.
3.3 Installation Steps
- Mount the Outdoor Unit: Choose a suitable location near your door, ensuring it is protected from direct heavy rain (though it is rainproof, additional shelter is recommended). Use the provided mounting bracket and screws to secure the unit at an appropriate height (typically 1.4-1.7 meters from the ground).
- Mount the Indoor Monitor: Select a convenient indoor location, such as a wall in your living room or kitchen. Secure the monitor's mounting bracket to the wall using screws and anchors.
- Connect Wiring:
- Connect the 4-wire cable from the outdoor unit to the designated port on the back of the indoor monitor. Ensure correct polarity and secure connections.
- If installing multiple monitors, connect them in series using appropriate wiring.
- If integrating an electric lock, connect the lock to the outdoor unit or indoor monitor as per the specific lock's instructions and the system's wiring diagram.
- Connect Power: Plug the power supply into a standard electrical outlet and connect it to the power port on the indoor monitor.
- Test the System: Once all connections are secure, power on the system and perform a full test of all functions: doorbell ring, video display, two-way intercom, and door unlocking.
Video: An unboxing and basic setup demonstration of the AMOCAM video doorbell system, showing the components and initial power-up test.
4. Operating Instructions
4.1 Receiving a Call
When a visitor presses the call button on the outdoor doorbell unit, the indoor monitor will ring and automatically display the visitor's video feed. You can then:
- Answer: Press the Intercom button to begin two-way communication.
- Monitor: If you wish to only view the visitor without speaking, the video feed will be active.
- Unlock: Press the Unlock button to open a connected electric door or gate.
- End Call: The call will automatically end after a set period or can be manually ended.
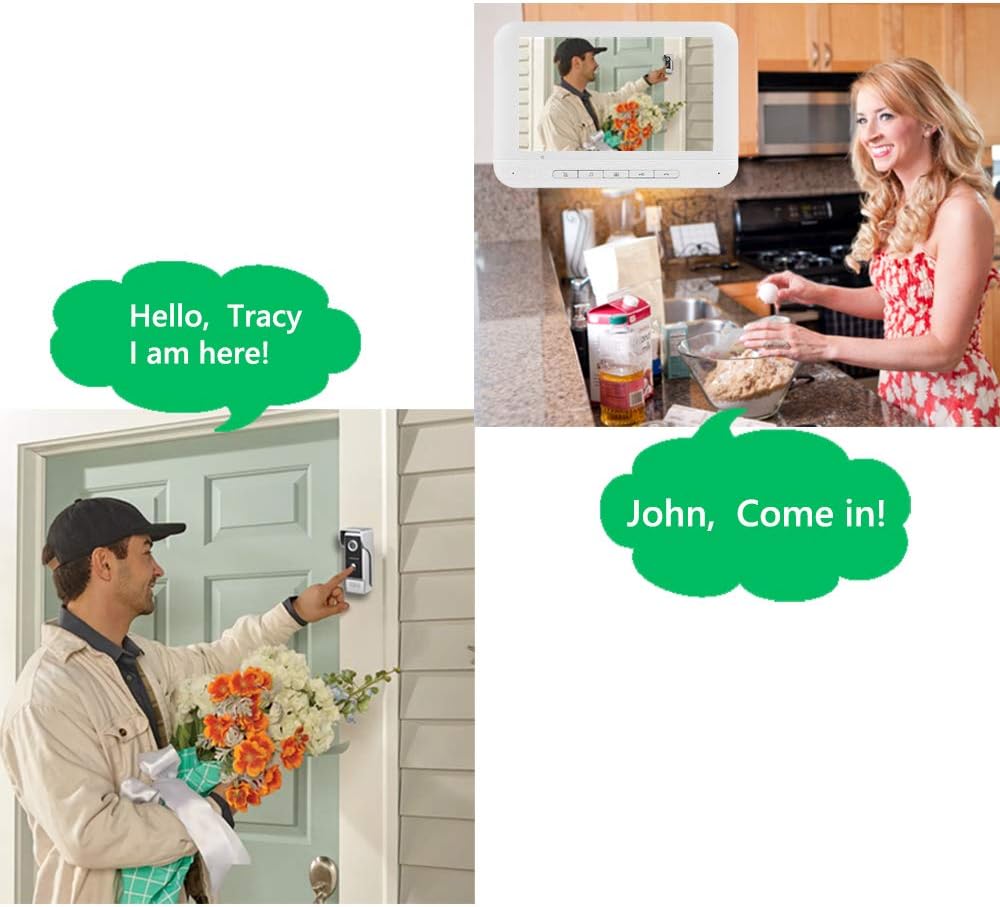
Image: Illustration of the two-way intercom function, showing a person at the door and the indoor monitor displaying their image, with speech bubbles representing a conversation between the visitor and the resident.
4.2 Active Monitoring
You can actively monitor the outdoor area at any time without a visitor pressing the doorbell. Simply press the Monitor button on the indoor unit to view the live feed from the outdoor camera.

Image: A graphic illustrating the "One Key to Monitor," "One Key to Unlocking," and "One Key to Communication" features of the indoor monitor, emphasizing ease of use for checking outside, granting access, and speaking with visitors.
4.3 Adjusting Settings
The indoor monitor allows for adjustments to improve your experience:
- Brightness: Adjust the screen brightness for optimal viewing.
- Volume: Control the volume of the intercom and ringtone.
- Contrast: Fine-tune the image contrast.
- Ringtones: Select from 25 available ringtones.
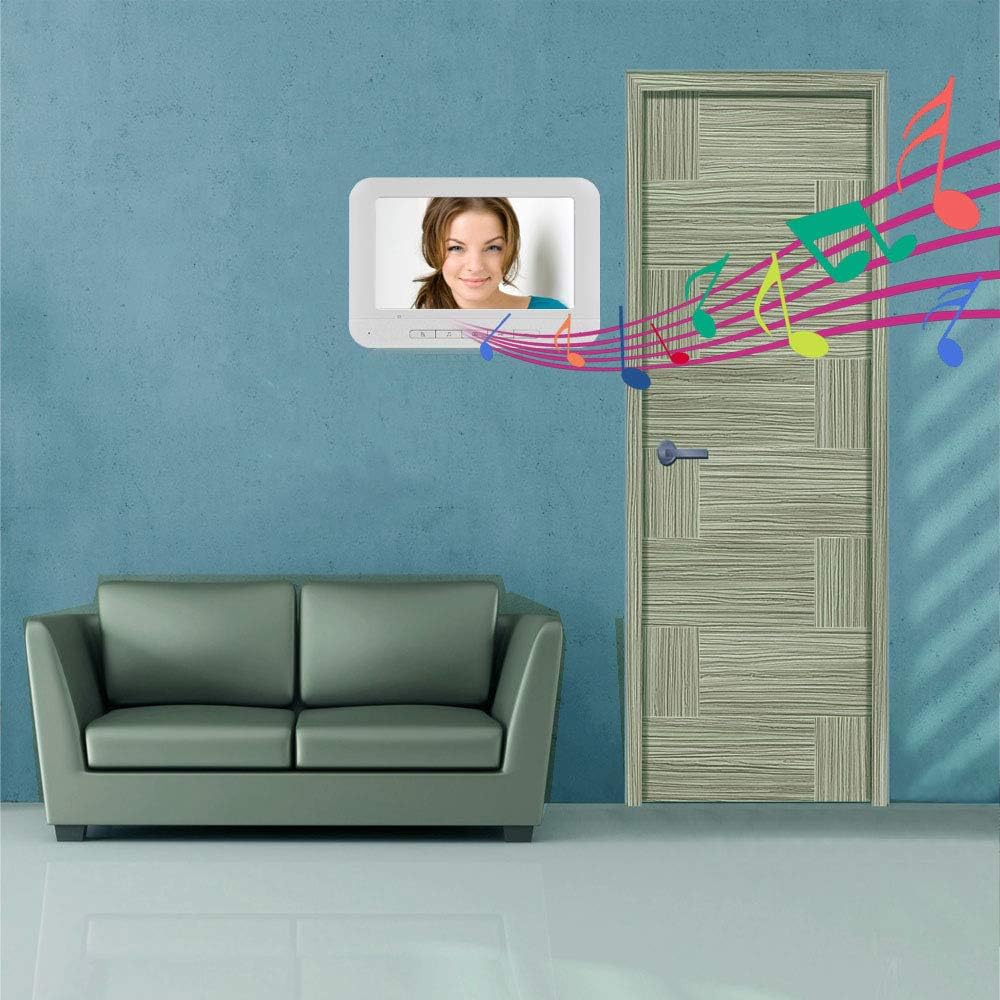
Image: The indoor monitor displaying a clear image of a person, with musical notes emanating from the screen, symbolizing the customizable ringtones and clear audio of the system.
5. Maintenance
To ensure the longevity and optimal performance of your AMOCAM Video Intercom System, follow these maintenance guidelines:
- Cleaning: Use a soft, dry cloth to clean the monitor screen and outdoor unit. Avoid abrasive cleaners or solvents that could damage the surfaces.
- Outdoor Unit Protection: While rainproof, regularly check the outdoor unit for any debris, spiderwebs, or obstructions that might block the camera lens or microphone.
- Wiring Inspection: Periodically inspect all wiring connections for any signs of wear, corrosion, or loose connections. Ensure all cables are securely fastened and protected from physical damage.
- Software Updates: Check the manufacturer's website (if applicable) for any firmware or software updates that may improve performance or add new features.
6. Troubleshooting
If you encounter issues with your video intercom system, refer to the following common problems and solutions:
| Problem | Possible Cause | Solution |
|---|---|---|
| No image on indoor monitor. |
|
|
| No audio or poor audio quality. |
|
|
| Doorbell not ringing. |
|
|
| Electric lock not unlocking. |
|
|
7. Specifications
| Feature | Detail |
|---|---|
| Brand | AMOCAM |
| Model Number | 70M401 |
| Connectivity Technology | Wired |
| Screen Size | 7 inches |
| Video Capture Resolution | 480p |
| Field Of View | 120 Degrees |
| Special Feature | Night Vision (IR LED) |
| Indoor/Outdoor Usage | Indoor (Monitor), Outdoor (Doorbell) |
| Material | Plastic (Monitor), Aluminum alloy panel (Outdoor Unit) |
| Power Source | Wired Electric (Power Supply Included) |
| Voltage | 240 Volts |
| Wattage | 3 watts |
| Item Dimensions (L x W x H) | 8.5 x 8.5 x 3.8 inches |
| Item Weight | 2.1 pounds |
| International Protection Rating | IP54 (Outdoor Unit) |
8. Warranty and Support
AMOCAM products are designed for reliability and performance. For warranty information, technical support, or service inquiries, please refer to the contact details provided with your product packaging or visit the official AMOCAM website. Keep your purchase receipt as proof of purchase for warranty claims.
For additional assistance, you may contact AMOCAM customer service via their Amazon Brand Store.
Ask a question about this manual
Ask about setup, troubleshooting, compatibility, parts, safety, or missing instructions. Manuals+ will review the question and use this page’s manual context to help answer it.