Dyna-Glo BFSS10NGT-2N
Dyna-Glo BFSS10NGT-2N 10,000 BTU Natural Gas Blue Flame Thermostatic Vent Free Wall Heater
Model: BFSS10NGT-2N
1. Introduction and Safety Information
This manual provides essential instructions for the safe installation, operation, and maintenance of your Dyna-Glo BFSS10NGT-2N Natural Gas Blue Flame Thermostatic Vent Free Wall Heater. Please read this manual thoroughly before installing or using the heater. Failure to follow these instructions can result in property damage, personal injury, or death.
Important Safety Warnings:
- FOR NATURAL GAS ONLY: This heater is designed exclusively for use with natural gas. Do not attempt to convert it to use with propane or any other fuel. Fuel conversion is not permitted.
- VENT-FREE OPERATION: This is a vent-free appliance. It draws combustion air from the room and vents combustion products into the room. Ensure adequate ventilation as specified in local codes and this manual.
- CARBON MONOXIDE HAZARD: This appliance can produce carbon monoxide, which has no odor. Using it in an enclosed space can kill you. Install a carbon monoxide detector in your home.
- PROFESSIONAL INSTALLATION: Installation and service must be performed by a qualified installer, service agency, or gas supplier. Improper installation, adjustment, alteration, service, or maintenance can cause injury or property damage.
- OXYGEN DEPLETION SENSOR (ODS): This heater is equipped with an Oxygen Depletion Sensor (ODS) safety system, which automatically shuts down the heater if oxygen levels in the room become too low. Do not tamper with or bypass the ODS system.
- LOCAL REGULATIONS: Check your local regulations regarding installation restrictions and requirements for vent-free heaters. This product may not be for sale or use in certain regions, such as California or Canada.
- CLEARANCES: Maintain proper clearances from combustible materials as indicated in the installation section.
2. Product Overview
The Dyna-Glo BFSS10NGT-2N is a 10,000 BTU Natural Gas Blue Flame Thermostatic Vent Free Wall Heater designed for safe, indoor supplemental heating. Its blue flame technology distributes heat similar to a central heating system, providing efficient warmth for areas up to 300 square feet. This heater operates with 99.9% efficiency and does not require electricity for operation, making it suitable for everyday use and emergency situations during power outages.

Front view of the Dyna-Glo BFSS10NGT-2N heater, showcasing the blue flame burner behind a protective grate.
Key Features:
- Natural Gas Ready: Designed for natural gas fuel only.
- Blue Flame Technology: Convects heat to warm the air, similar to a central heating system.
- Adjustable Heat Output: 5,000-10,000 BTUs/hr, capable of heating up to 300 sq. ft.
- Thermostatic Control: Knob automatically maintains your desired temperature setting.
- No Electricity Required: Provides reliable back-up heating during power outages.
- Oxygen Depletion Sensor (ODS): Built-in safety feature that shuts down the heater if oxygen levels are low.
- Battery-Assisted Igniter: For quick and effortless ignition.
- Versatile Mounting: Includes hardware and bracket for wall mounting. Optional base legs (WBL100) and wall heater fan (WHF100) are sold separately.
3. Components
Familiarize yourself with the main components of your Dyna-Glo wall heater:
- Control Knob: Used to turn the heater on/off, set the pilot, and adjust the thermostat.
- Piezo Igniter Button: Used to ignite the pilot light.
- Gas Inlet: Connection point for the natural gas supply line.
- Oxygen Depletion Sensor (ODS): A safety device that monitors oxygen levels.
- Blue Flame Burner: The heating element where combustion occurs.
- Protective Grate: Covers the burner area.

Control knob and igniter button for operating the heater.
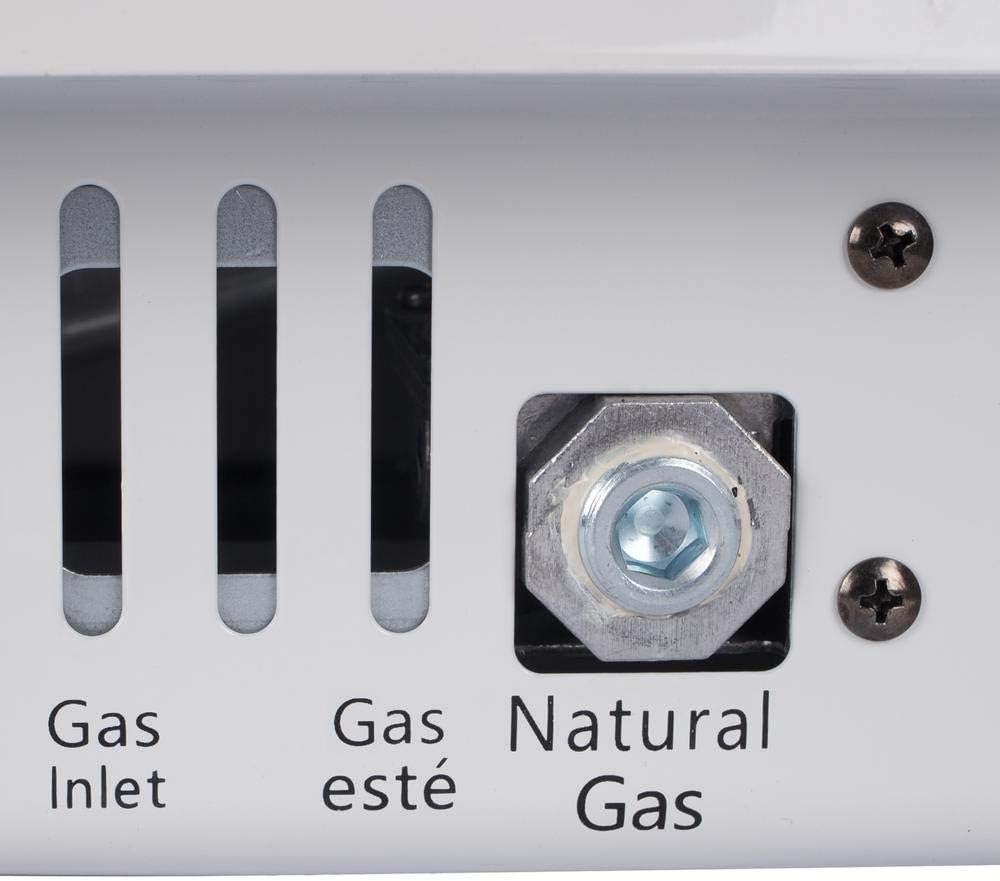
Natural gas inlet connection point.
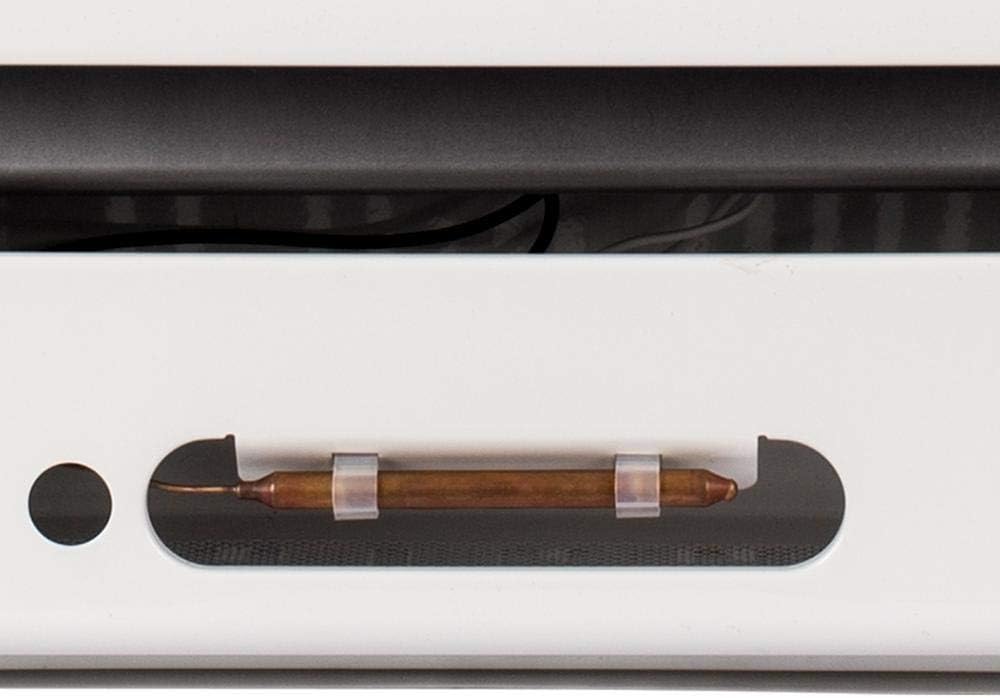
Detail of the Oxygen Depletion Sensor (ODS).
4. Setup and Installation
Proper installation is critical for the safe and efficient operation of your heater. It is strongly recommended that a qualified professional install this appliance.
Installation Steps:
- Unpacking: Carefully remove the heater from its packaging. Inspect for any damage. Retain packaging for future transport or storage.
- Location Selection: Choose a suitable indoor location. Ensure adequate clearances from combustible materials (walls, furniture, drapes) as specified in the full installation manual. The heater should be mounted on a vertical wall.
- Wall Mounting: Use the provided hardware and bracket to securely mount the heater to a sturdy wall surface. Ensure the heater is level.
- Gas Line Connection: This step MUST be performed by a qualified and licensed gas technician. Connect the natural gas supply line to the heater's gas inlet. All connections must be leak-tested before operation.
- Ventilation: Ensure the room has adequate air for combustion and ventilation. Refer to local codes for minimum room size and ventilation requirements for vent-free appliances.
- Optional Accessories: If using optional base legs (WBL100) for floor mounting or a wall heater fan (WHF100), install them according to their respective instructions.

The Dyna-Glo heater installed on a wall, providing supplemental heat to a room.
5. Operating Instructions
Follow these steps to safely operate your Dyna-Glo wall heater:
Igniting the Pilot Light:
- Ensure the gas supply valve to the heater is open.
- Turn the control knob to the 'OFF' position, then push it in and turn it counter-clockwise to the 'PILOT' position.
- While holding the control knob in, press the piezo igniter button repeatedly until the pilot flame ignites. You should hear a clicking sound.
- Continue to hold the control knob in for approximately 30-60 seconds after the pilot ignites. This allows the thermocouple to heat up and hold the pilot valve open.
- Release the control knob. If the pilot light goes out, repeat steps 2-4.
Operating the Heater:
- Once the pilot light is stable, turn the control knob counter-clockwise from the 'PILOT' position to your desired heat setting (1-5). The main burner will ignite.
- The thermostatic control will automatically adjust the heat output to maintain the set temperature. The burner may cycle on and off.
- To increase the heat, turn the knob to a higher number. To decrease, turn to a lower number.
Shutting Down the Heater:
- To turn off the main burner, turn the control knob clockwise to the 'PILOT' position. The pilot light will remain lit.
- To completely shut off the heater, including the pilot light, turn the control knob clockwise to the 'OFF' position.
- For extended periods of non-use, it is recommended to close the main gas supply valve to the appliance.
6. Maintenance
Regular maintenance ensures the longevity and safe operation of your heater. Always turn off the heater and allow it to cool completely before performing any maintenance.
Cleaning:
- Exterior: Wipe the exterior surfaces with a soft, damp cloth. Do not use abrasive cleaners or solvents.
- Burner and Pilot Area: Periodically inspect the burner and pilot light area for dust, lint, or debris. Use a vacuum cleaner with a soft brush attachment or compressed air to gently clean these areas. Ensure all air openings are kept clear.
Annual Inspection:
It is recommended to have your heater inspected annually by a qualified service technician to ensure all components are functioning correctly and safely.
7. Troubleshooting
If you encounter issues with your heater, refer to the following common troubleshooting steps. For problems not listed or if issues persist, contact a qualified service technician.
| Problem | Possible Cause | Solution |
|---|---|---|
| Pilot light will not light. | No gas supply; Air in gas line; Pilot orifice clogged; Igniter not sparking. | Ensure gas valve is open; Bleed air from line (professional only); Clean pilot orifice (professional only); Check igniter for spark. |
| Pilot light lights but will not stay lit when control knob is released. | Control knob not held long enough; Thermocouple not heating; Loose thermocouple connection. | Hold control knob in for 30-60 seconds; Clean or replace thermocouple (professional only); Tighten thermocouple connection. |
| Main burner will not light. | Pilot light not lit; Control knob not set to a heat setting; Low gas pressure. | Light pilot first; Turn control knob to a numbered setting; Contact gas supplier for pressure check. |
| Heater shuts off unexpectedly. | ODS system activated (low oxygen); Pilot light extinguished; Low gas pressure. | Increase ventilation; Relight pilot; Contact gas supplier. |
| Unusual odors. | Dust burning off; Gas leak. | Ensure heater is clean; If gas odor, immediately shut off gas supply and evacuate area, then call gas company. |
8. Specifications
Detailed specifications for the Dyna-Glo BFSS10NGT-2N heater:
| Feature | Detail |
|---|---|
| Brand | Dyna-Glo |
| Model Number | BFSS10NGT-2N |
| BTU Output | 5,000 - 10,000 BTU/hr (Adjustable) |
| Fuel Type | Natural Gas Only |
| Heating Coverage | Up to 300 sq. ft. |
| Ignition Type | Piezo (Battery-assisted) |
| Control Type | Thermostatic |
| Safety Features | Oxygen Depletion Sensor (ODS) |
| Color | White |
| Product Dimensions (D x W x H) | 9.49" x 17.32" x 20" |
| Item Weight | Approximately 0.01 ounces (Note: This weight seems unusually low and may be a data entry error. Refer to product packaging for accurate weight.) |
| Mounting Type | Wall Mount (Optional floor stand available) |
| UPC | 872076037828 |

Dimensional diagram of the Dyna-Glo BFSS10NGT-2N heater.
9. Warranty and Support
For specific warranty information, please refer to the official documentation provided with your Dyna-Glo BFSS10NGT-2N heater or visit the Dyna-Glo official website. Warranty terms and conditions may vary.
If you require technical assistance, replacement parts, or have questions not covered in this manual, please contact Dyna-Glo customer support directly. Contact information can typically be found on the product packaging or the manufacturer's website.
Ask a question about this manual
Ask about setup, troubleshooting, compatibility, parts, safety, or missing instructions. Manuals+ will review the question and use this page’s manual context to help answer it.