1. Introduction
This manual provides detailed instructions for the setup, operation, and maintenance of your Depusheng U6 6-Channel Audio Mixer. Designed for versatility, the U6 mixer integrates a soundcard for PC recording, USB audio interface capabilities, and Bluetooth wireless streaming, making it suitable for various audio applications including live streaming, podcasting, and DJ setups.
2. Key Features
- 6 Channels: Offers multiple device connectivity with 4 XLR/LINE jack combo microphone inputs, 1 pair 1/4'' stereo input, and 1 pair RCA stereo inputs. Includes 1 pair 1/4'' Main output and a headphone jack.
- Bluetooth Wireless Streaming: Enables seamless audio streaming from Bluetooth-enabled devices like smartphones and tablets directly to the mixer. Effective range is approximately 1.5 feet.
- USB Audio Interface: Connects directly to a PC for high-quality audio recording, editing, and monitoring with compatible software such as Pro Tools, Logic Pro X, GarageBand, and Audacity.
- Clean Sound Quality: Engineered to produce clear sound with minimal noise, suitable for small venues and portable use.
- Effects: Features DELAY and REPEAT effects to enhance audio output.
- Power Options: Can be powered via an adapter or USB.
- Included Accessories: Comes with a dynamic wired microphone (XLR/RCA cable included) and stereo headphones for immediate use.
3. Product Overview and Controls
Familiarize yourself with the layout and functions of the Depusheng U6 mixer's controls and input/output interfaces.

Figure 3.1: Top view of the Depusheng U6 Audio Mixer, showing all channels, controls, and main input/output ports.
3.1 Input/Output Interfaces
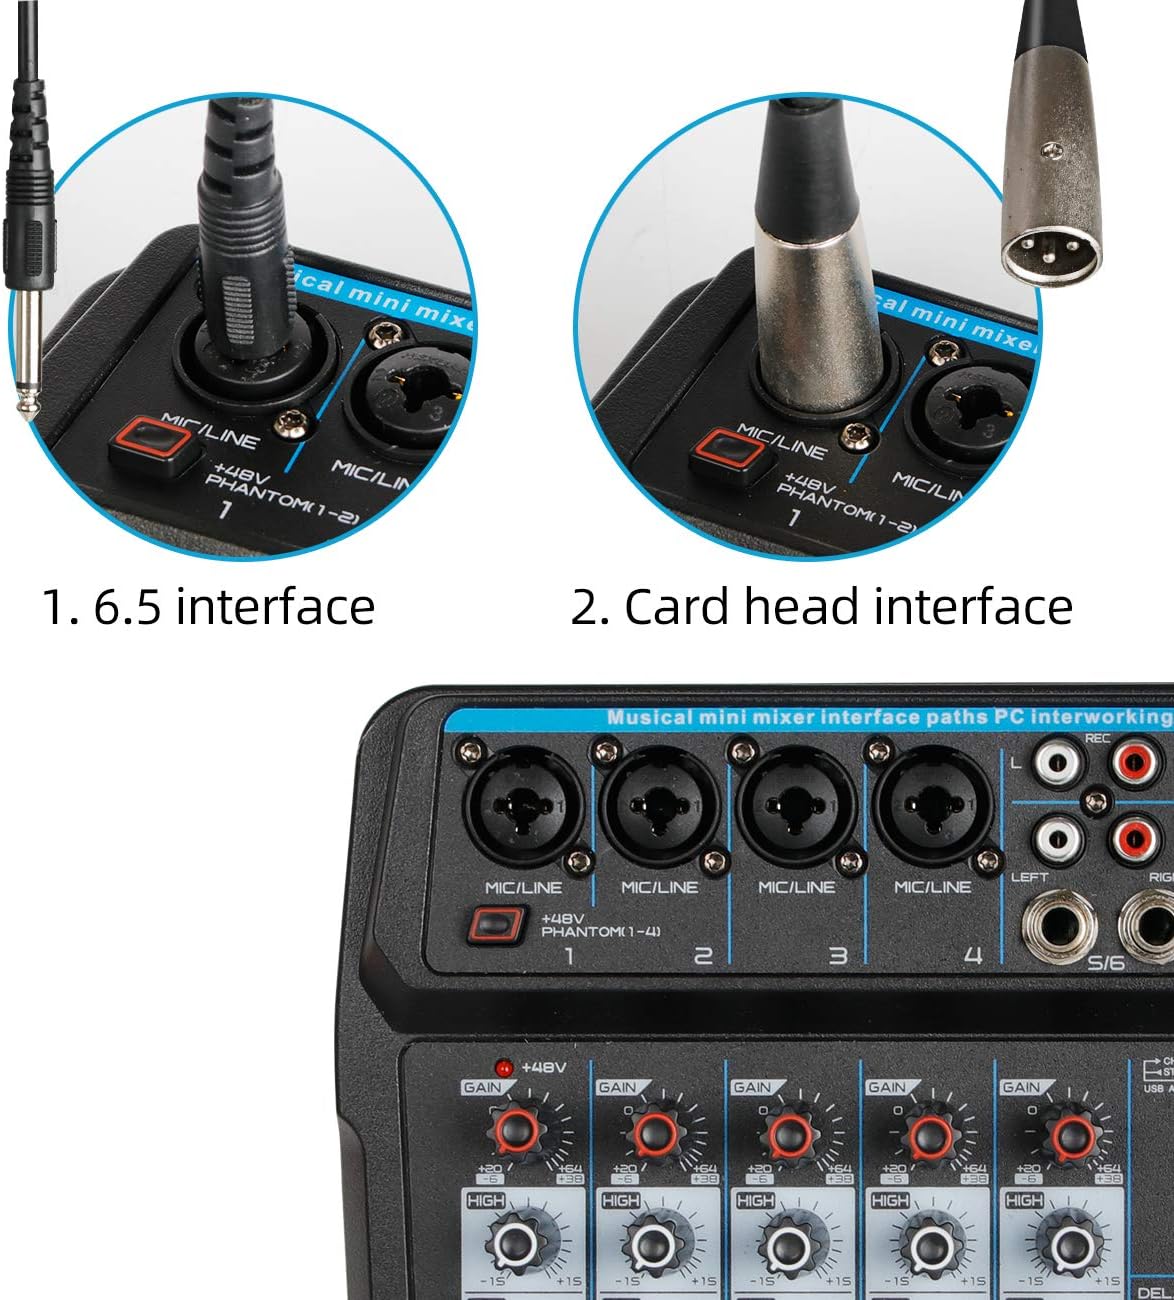
Figure 3.2: Close-up of the input jacks, including 6.5mm and XLR card head interfaces.
- MIC/LINE Inputs (Channels 1-4): XLR/LINE combo jacks for microphones or line-level instruments.
- +48V Phantom Power: Switch to activate phantom power for condenser microphones on channels 1-4.
- Stereo Inputs (Channels 5/6): RCA and 1/4'' jacks for stereo line-level devices.
- MAIN OUT: 1/4'' Left and Right outputs for connecting to amplifiers or recording devices.
- PHONES: 1/4'' stereo headphone output.
- USB Audio Interface: USB-A port for connecting to a computer or USB drive.
3.2 Channel Controls
- GAIN: Adjusts the input sensitivity for each channel.
- HIGH/LOW EQ: 2-band equalizer for adjusting treble and bass frequencies.
- EFX: Controls the level of the built-in effects (Delay/Repeat) sent from the channel.
- PEAK LED: Illuminates when the input signal is too high, indicating potential clipping.
- VOL: Adjusts the output volume for each channel.
3.3 Master Controls and USB/Bluetooth Section
- MAIN VOL: Master volume control for the main output.
- PHONES VOL: Volume control for the headphone output.
- DELAY/REPEAT: Controls for adjusting the parameters of the built-in effects.
- MP3 Control Button: Controls for USB playback (Play/Pause, Next/Previous, Mode).
- USB/BT Display: Digital display for showing mode, track number, and connection status.
- ST/USB Button (Channel 5/6): Switches input for channel 5/6 between stereo line input and USB audio.

Figure 3.3: Detail of the EFX button and channel volume knob.
4. Setup and Connections
4.1 Powering the Mixer
The Depusheng U6 mixer can be powered in multiple ways:
- Power Adapter: Connect the included power adapter to the DC 5V input on the mixer and a standard power outlet.
- Computer USB: Connect the mixer to a computer's USB port using a USB cable.
- Power Bank: For portable use, connect the mixer to a power bank via USB.
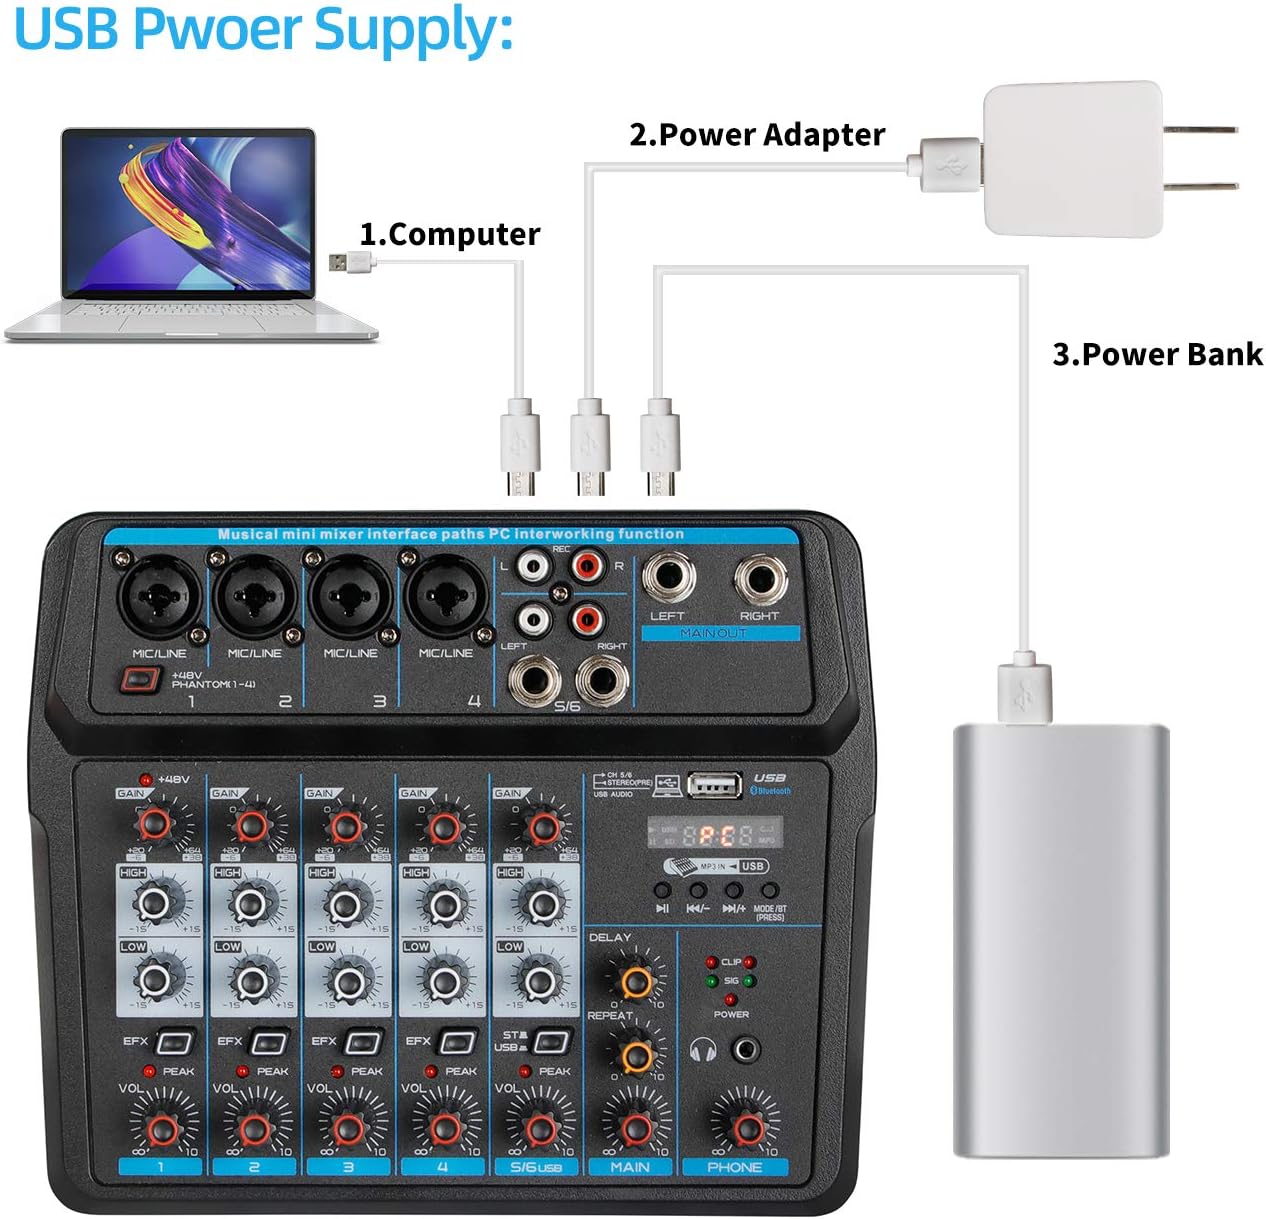
Figure 4.1: Illustration of various USB power supply options for the mixer, including computer, power adapter, and power bank.
4.2 Connecting Audio Devices
The U6 mixer supports a variety of audio input and output devices.

Figure 4.2: Diagram showing how to connect various devices such as computers, condenser microphones, dynamic microphones, wireless microphones, power amplifiers, passive speakers, and headphones to the U6 mixer.
- Microphones: Connect dynamic microphones or condenser microphones (requiring +48V phantom power) to the MIC/LINE inputs (Channels 1-4). Ensure phantom power is activated if needed.
- Instruments/Line Devices: Connect instruments or other line-level devices to the MIC/LINE inputs or the stereo inputs (Channels 5/6).
- Headphones: Connect stereo headphones to the PHONES output for monitoring.
- Speakers/Amplifiers: Connect your main output to powered speakers or an amplifier via the MAIN OUT jacks.
5. Operation
5.1 PC Playback and Recording
The U6 mixer functions as a USB audio interface for your computer.

Figure 5.1: Diagram illustrating the connection between the mixer and a computer for recording and playback. The mixer sends audio to the computer for recording, and the computer sends background music to the mixer.

Figure 5.2: Visual guide for connecting the mixer to a computer via USB. Ensure the switch on the back of the mixer is set to the 'PC' position and the 'ST/USB' button on channel 5/6 is engaged.

Figure 5.3: Step-by-step visual workflow for recording and playing back audio using the mixer and a computer recording program.
- Connect the mixer to your computer using a USB cable.
- Ensure the switch on the back of the mixer is set to the 'PC' position. The display should show 'PC'.
- On your computer, select "JieLi BR17" as both the audio playback and recording device in your sound settings.
- Press the 'ST/USB' button on channel 5/6 to route the USB audio to the mixer.
- Open your preferred digital audio workstation (DAW) or recording software.
- Adjust individual channel gains and master volume as needed.
- Begin recording or playback through your software.
5.2 USB Drive Playback and Recording
The mixer can play audio files directly from a USB drive and record to it.

Figure 5.4: The mixer's USB port supports playing MP3/WAV/WMA/FLAC files and direct recording to a U-Disk.
- Insert a USB drive into the USB-A port.
- Use the MP3 control buttons (Play/Pause, Next/Previous, Mode) to navigate and play audio files.
- To record, press the 'REC' button. Press again to stop recording.
5.3 Bluetooth Wireless Streaming
Connect your smartphone or other Bluetooth device to the mixer for wireless audio playback.
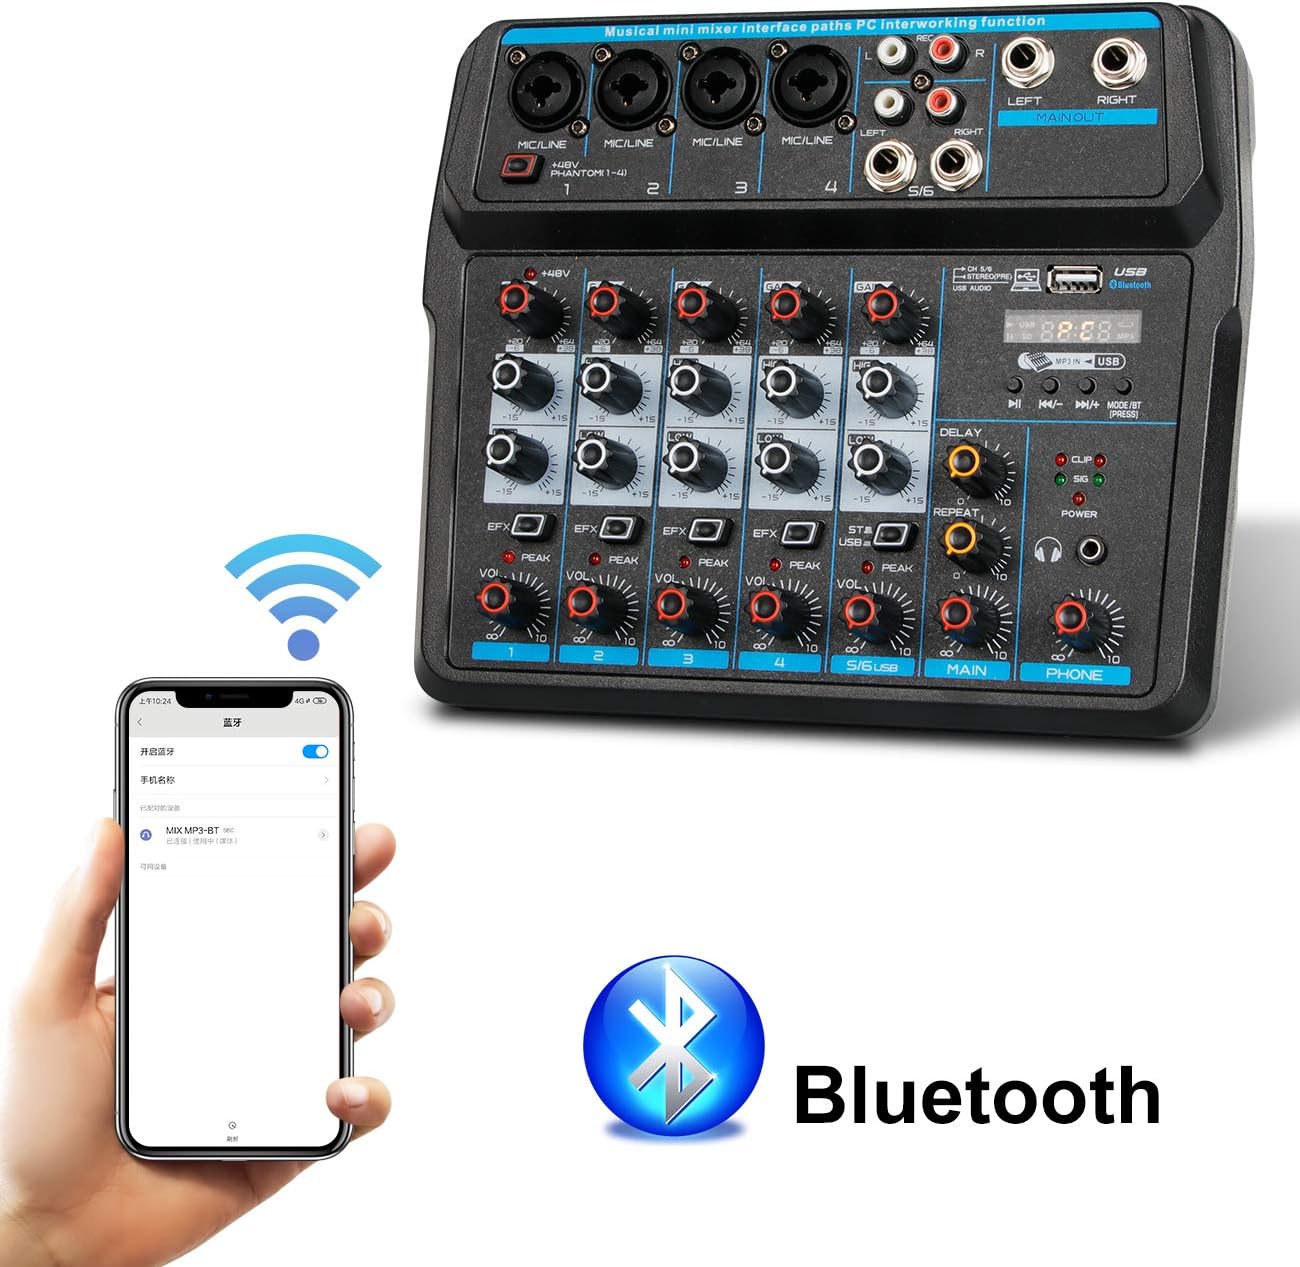
Figure 5.5: The mixer connected wirelessly to a smartphone via Bluetooth, indicated by the Bluetooth logo.
- Ensure the mixer is powered on.
- On the mixer's USB/BT display, select Bluetooth mode using the 'MODE/BT' button. The display will show 'BT'.
- On your Bluetooth device (e.g., smartphone), search for available devices and select "MIX MP3-BT".
- Once paired, audio from your device will stream to the mixer. Adjust the main volume and individual channel volumes as needed.
6. Specifications
Detailed technical specifications for the Depusheng U6 Audio Mixer.

Figure 6.1: Dimensions of the Depusheng U6 Audio Mixer and its packaging.
| Feature | Specification |
|---|---|
| Brand | Depusheng |
| Model | U6 |
| Number of Channels | 6 |
| Connectivity Technology | Interface, XLR, USB, Bluetooth |
| Power Source | Corded Electric (DC 5V) |
| Item Weight | 1.98 pounds (900 Grams) |
| Product Dimensions | 7.48"D x 8.86"W x 2.17"H (190mm x 225mm x 55mm approx.) |
| Phantom Power | +48V (Channels 1-4) |
7. Troubleshooting
This section addresses common issues you might encounter with your Depusheng U6 Audio Mixer.
- No Sound Output:
- Check all cable connections (inputs, outputs, power).
- Ensure all volume knobs (channel, main, headphone) are turned up.
- Verify the correct input source is selected (e.g., 'ST/USB' button for USB audio).
- If using PC, confirm "JieLi BR17" is selected as the audio device in your computer's sound settings.
- Hissing Noise:
- Reduce the GAIN levels on individual channels.
- Ensure all cables are properly shielded and connected.
- Check for ground loops if multiple devices are connected to different power outlets.
- Microphone Not Working (Condenser Mic):
- Ensure +48V Phantom Power is activated for the connected channel.
- Verify the microphone cable is securely connected.
- Bluetooth Pairing Issues:
- Ensure the mixer is in Bluetooth mode ('BT' displayed).
- Make sure your Bluetooth device is within approximately 1.5 feet of the mixer.
- Forget previous pairings on your device and try reconnecting.
- PC Recording Not Working:
- Confirm the mixer's rear switch is set to 'PC' and the display shows 'PC'.
- Verify "JieLi BR17" is selected as the recording input in your computer's sound settings and DAW.
- Ensure the 'ST/USB' button on channel 5/6 is engaged if you intend to record audio from the mixer's inputs to the PC.
8. Maintenance
To ensure the longevity and optimal performance of your Depusheng U6 Audio Mixer, follow these maintenance guidelines:
- Cleaning: Use a soft, dry cloth to clean the exterior of the mixer. Avoid abrasive cleaners or solvents.
- Storage: Store the mixer in a cool, dry place away from direct sunlight, extreme temperatures, and high humidity.
- Handling: Handle the mixer with care to prevent physical damage. Avoid dropping or subjecting it to strong impacts.
- Ventilation: Ensure proper ventilation around the mixer to prevent overheating. Do not block ventilation openings.
- Cable Management: Organize cables to prevent tangling and strain on ports.
9. Warranty and Support
For warranty information and technical support, please refer to the documentation included with your purchase or visit the official Depusheng website. Keep your proof of purchase for warranty claims.


