1. Introduction
This manual provides comprehensive instructions for the installation, operation, and maintenance of your reiga 52 Inch Smart White Ceiling Fan. Designed for both indoor and outdoor (patio) use, this fan features a quiet DC motor, dimmable LED light, and smart control capabilities via remote, app, and voice commands. Please read this manual thoroughly before installation and use to ensure safe and efficient operation.

Image: The reiga 52 Inch Smart White Ceiling Fan, showcasing its sleek design and white finish.
2. Safety Information
Always follow basic safety precautions when installing and operating electrical appliances to reduce the risk of fire, electric shock, and personal injury.
- Ensure the power is turned off at the circuit breaker before installation or maintenance.
- All wiring must be in accordance with national and local electrical codes.
- The fan must be mounted to a ceiling joist or support structure capable of supporting the fan's weight (19.8 lbs).
- Do not operate the fan with damaged wiring or if it is not functioning properly.
- Keep hands, hair, and clothing clear of the fan blades during operation.
- This fan is ETL Listed and IP44 rated for indoor and outdoor (patio) use.
3. Package Contents
Verify that all components are present before beginning installation:
- Ceiling Fan Unit
- Remote Control
- Mounting Hardware
- Shade (for LED light)
- 6-inch Downrod
- 10-inch Downrod
4. Setup and Installation
Follow these steps for proper installation. It is recommended to consult a qualified electrician if you are unsure about any steps.
4.1 Pre-Installation
- Turn off power at the main circuit breaker.
- Select a suitable mounting location that can support the fan's weight and allows for proper blade clearance.
- Choose the appropriate downrod (6-inch or 10-inch) based on your ceiling height.
4.2 Mounting the Fan
- Secure the mounting bracket to the ceiling junction box using the provided hardware. Ensure it is firmly attached to a structural beam.
- Assemble the downrod with the canopy and fan motor.
- Carefully lift the fan assembly and hang it from the mounting bracket.
4.3 Wiring Connections
The reiga ceiling fan features quick connect ports for simplified wiring. Connect the black and white wires, and ensure the ground wire is securely attached. Then, plug the numbered connectors into the controller as indicated in the detailed wiring diagram provided in the full manual.
4.4 Final Assembly
- Attach the fan blades to the motor housing.
- Install the LED light shade.
- Secure the canopy to the ceiling.

Image: Diagram showing fan dimensions and recommended room sizes for optimal airflow.
5. Operating Instructions
Your reiga smart ceiling fan offers multiple control options for convenience.
5.1 Remote Control Operation
Insert 2 AAA batteries (not included) into the remote control. The remote allows you to control fan speed (6 speeds), light on/off, light dimming, color temperature adjustment, and fan direction (forward/reverse).
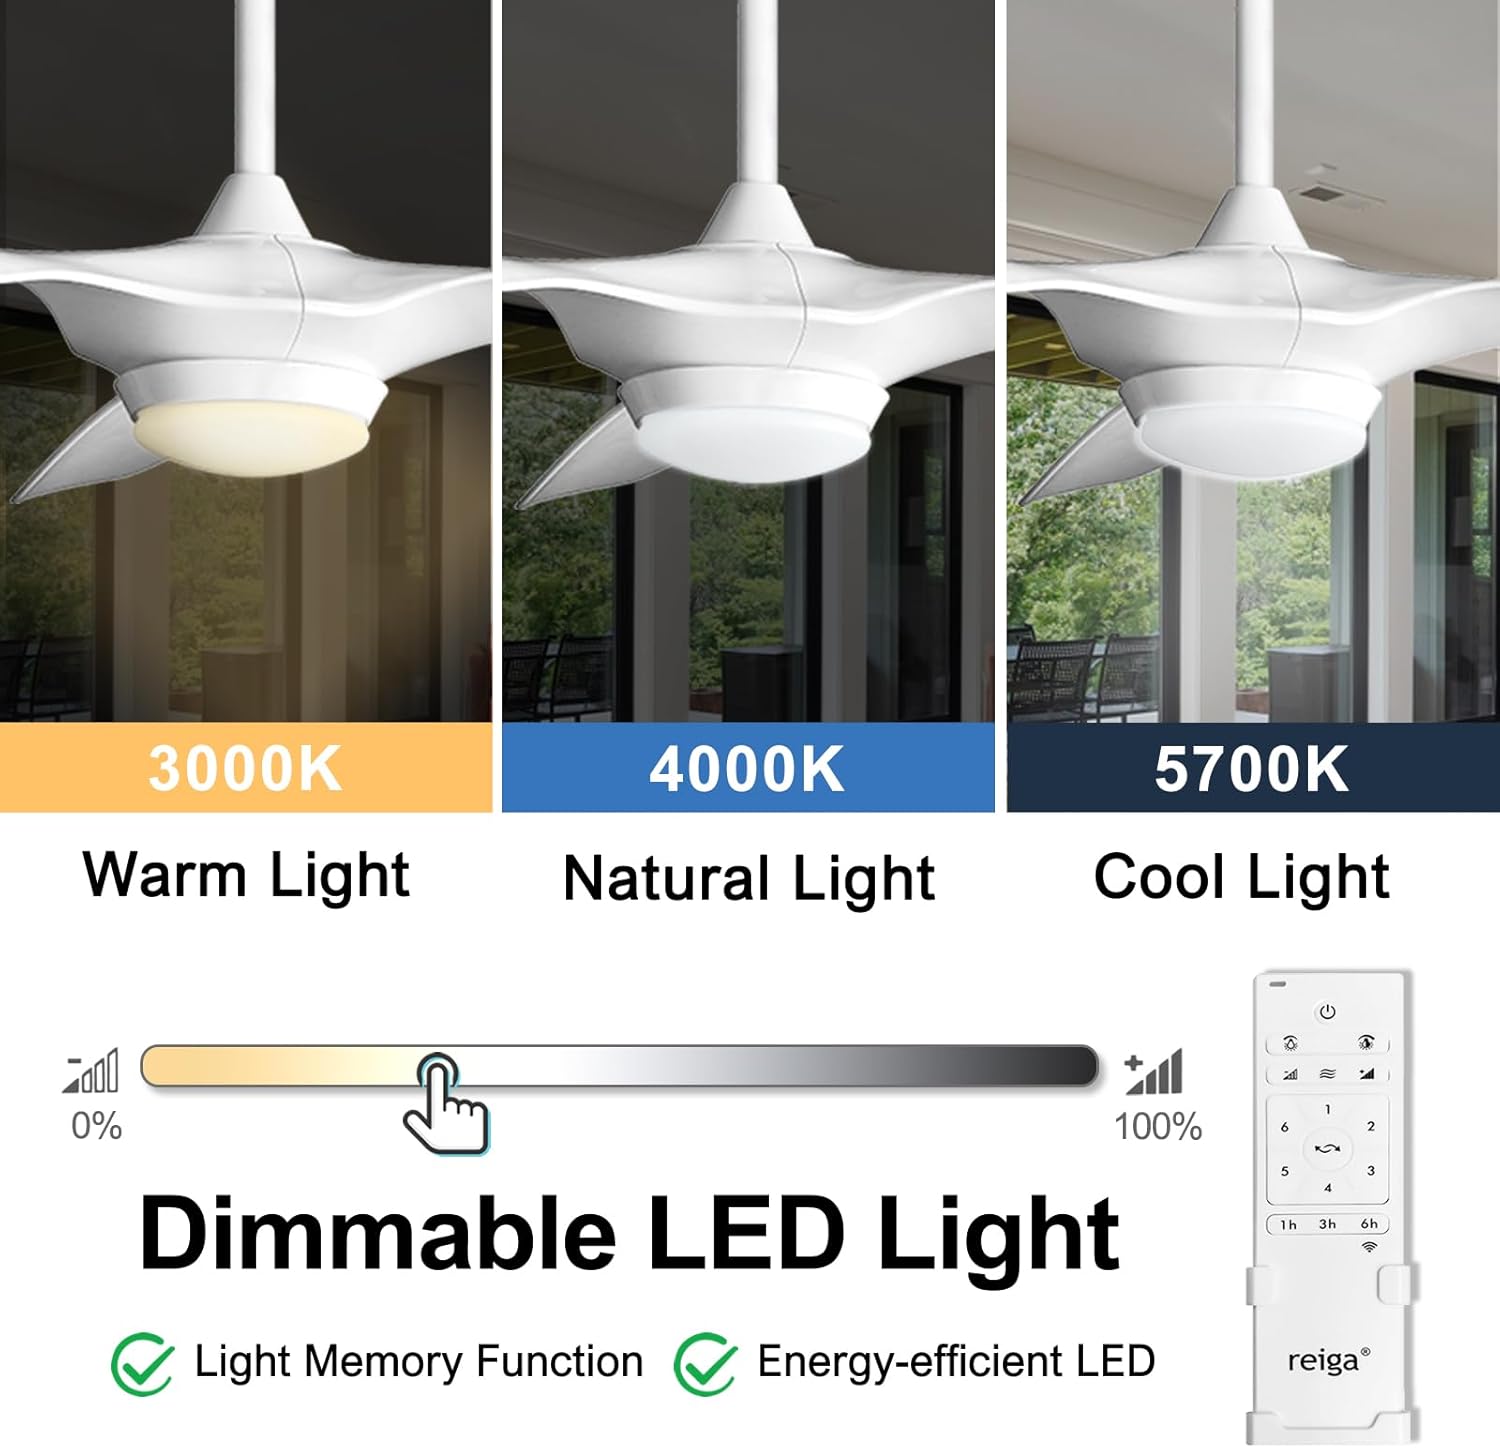
Image: Illustration of the dimmable LED light feature, showing warm, natural, and cool light options.
5.2 Smart Control (App & Voice)
This fan is compatible with the Smart Life App, Alexa, and Google Home for advanced control features.
- App Control: Download the Smart Life App from your device's app store. Follow the in-app instructions to pair your fan. This enables full control over fan speed, light settings, and scheduling from your smartphone.
- Voice Control: Once paired with the Smart Life App, enable the Smart Life skill in your Alexa or Google Home app. You can then use voice commands such as "Alexa, turn on the ceiling fan" or "Hey Google, set fan speed to 3."

Image: Demonstrates voice control functionality with Alexa and Google Home integration.
5.3 Seasonal Operation (Forward/Reverse)
The reversible DC motor allows for year-round comfort. In warmer weather, set the fan to forward mode (downward airflow) to create a cooling breeze. In cooler weather, switch to reverse mode (upward airflow) to recirculate warm air trapped near the ceiling, helping to reduce heating costs.

Image: Visual representation of fan direction for summer (forward) and winter (reverse) modes.
5.4 Quiet Operation and Timer
The fan's quiet DC motor operates at a low noise level of 35 dB, ensuring a peaceful environment. Utilize the built-in timer function (1, 3, or 8 hours) for automatic shut-off, ideal for sleeping or energy saving.

Image: Depicts the quiet operation of the fan and available timer settings.
6. Maintenance
Regular maintenance ensures the longevity and optimal performance of your ceiling fan.
- Cleaning: Dust the fan blades and motor housing periodically with a soft, damp cloth. Do not use abrasive cleaners or solvents.
- Blade Inspection: Check fan blade screws for tightness annually. Loose screws can cause wobbling and noise.
- Light Shade: Clean the LED light shade as needed with a soft cloth.
- Electrical Connections: Periodically check all electrical connections to ensure they are secure. (Ensure power is off at the breaker before checking).
7. Troubleshooting
If you encounter issues with your reiga ceiling fan, refer to the following common problems and solutions:
| Problem | Possible Cause | Solution |
|---|---|---|
| Fan does not start | No power to the fan; Loose wire connections; Remote control not paired or batteries dead. | Check circuit breaker and wall switch. Ensure all wiring connections are secure. Replace remote batteries. Re-pair the remote control with the fan (refer to full manual for pairing instructions, often involves holding a specific button on the remote). |
| Fan wobbles | Loose blade screws; Improperly balanced blades; Loose mounting bracket. | Tighten all blade screws. Ensure blades are installed correctly. Check mounting bracket for secure attachment to the ceiling. |
| Light does not work | Loose wire connection to light kit; LED module failure. | Check light kit wiring connections. If LED module is faulty, contact customer support for replacement. |
| Fan is noisy | Loose screws; Fan not level; Obstruction in fan path. | Tighten all screws. Ensure fan is level. Check for any objects interfering with blade rotation. |
| Smart control not connecting | Incorrect Wi-Fi network (5GHz vs 2.4GHz); Pairing mode not activated; App issues. | Ensure your Wi-Fi is 2.4GHz during pairing. Follow app instructions to put the fan into pairing mode (often indicated by light blinking/fan beeping). Restart the app or your router if necessary. |
8. Specifications
| Feature | Detail |
|---|---|
| Brand | reiga |
| Model Number | fr-fan-619h-485 |
| Color | 52'' Bright White |
| Product Dimensions | 52"D x 52"W x 15.4"H |
| Item Weight | 19.8 Pounds |
| Power Source | AC/DC |
| Voltage | 120 Volts (AC) |
| Wattage | 24 watts |
| Noise Level | 40 dB (typical operation, 35dB quiet mode) |
| Number of Blades | 3 |
| Blade Material | Acrylonitrile Butadiene Styrene (ABS) |
| Air Flow Capacity | 5614 Cubic Feet Per Minute |
| Light Type | LED |
| Luminous Flux | 2000 Lumen |
| Control Method | App, Remote, Voice |
| Indoor/Outdoor Usage | Outdoor, Indoor (IP44 rated) |
| Special Features | Smart Wifi Ceiling Fan, Memory Function & Dimmable Fan Light, ETL Listed Quiet DC Motor, 6 Speed |
9. Warranty and Support
Your reiga ceiling fan comes with a 3-year warranty. For warranty claims, technical support, or any questions not covered in this manual, please contact reiga customer service. Keep your purchase receipt as proof of purchase for warranty purposes.
For further assistance, please visit the official reiga store on Amazon or contact their support channels as listed on their product page or website.


