1. Introduction
This manual provides detailed instructions for the installation, operation, and maintenance of your Walfront THC30A Digital Timer Switch. This device is designed to automatically control the power supply to various electrical equipment based on user-defined schedules, offering convenience and energy efficiency. Please read this manual thoroughly before installation and use to ensure proper function and safety.
2. Safety Information
Warning: Electrical installation should only be performed by qualified personnel. Incorrect wiring can lead to electric shock, fire, or damage to the device and connected equipment. Always disconnect power at the circuit breaker before performing any installation or maintenance.
- Ensure the power supply matches the timer switch's rated voltage (110V).
- Do not exceed the maximum load capacity of 30A.
- Keep the device away from water and high humidity environments.
- Do not attempt to open or repair the device yourself. Contact qualified service personnel.
3. Product Overview
The Walfront THC30A is a digital programmable timer switch featuring a high-precision industrial-grade chip for accurate timing control. It offers 16 ON/OFF settings per day/week and includes a built-in backup power source to maintain settings during power outages.
Key Features:
- Automatic ON/OFF control based on user-set times.
- Strong anti-interference performance for stable operation.
- Built-in high-performance battery for power-off memory (180 days or more).
- High-precision industrial-grade chip for accurate timing.
- Versatile application for various electrical equipment.
Components:

- Digital Display: Shows current time, day, and programming status.
- Control Buttons: Used for setting time, programming, and manual override (specific buttons like 'CR', 'Manual' are typically present).
- Wiring Terminals: Screw terminals for connecting input power and output load.
- Mounting Points: Designed for screw mounting or DIN rail mounting.
4. Specifications
| Parameter | Value |
|---|---|
| Operating Voltage | AC 110V (as per model) |
| Switching Capacity | 30 A |
| Number of Settings | 16 ON/OFF (daily/weekly) |
| Setting Time Range | 1 minute - 168 hours |
| Time Error | ±1s/24h |
| Power Off Memory | ≥180 days (built-in battery) |
| Mounting Method | Screw mounting or DIN rail mounting |
| Dimensions | 86 x 36 x 66 mm (approx. 3.39 x 1.42 x 2.60 inches) |
| Weight | Approx. 145g (5.1 oz) |
5. Installation and Setup
Important: Ensure power is disconnected at the main circuit breaker before beginning installation. This device is intended for indoor use only.
Mounting:
The THC30A timer switch supports both screw mounting and DIN rail mounting. Choose the method appropriate for your installation environment.
- Screw Mounting: Secure the device to a flat surface using appropriate screws through the designated mounting holes.
- DIN Rail Mounting: Attach the device to a standard 35mm DIN rail by snapping it into place.
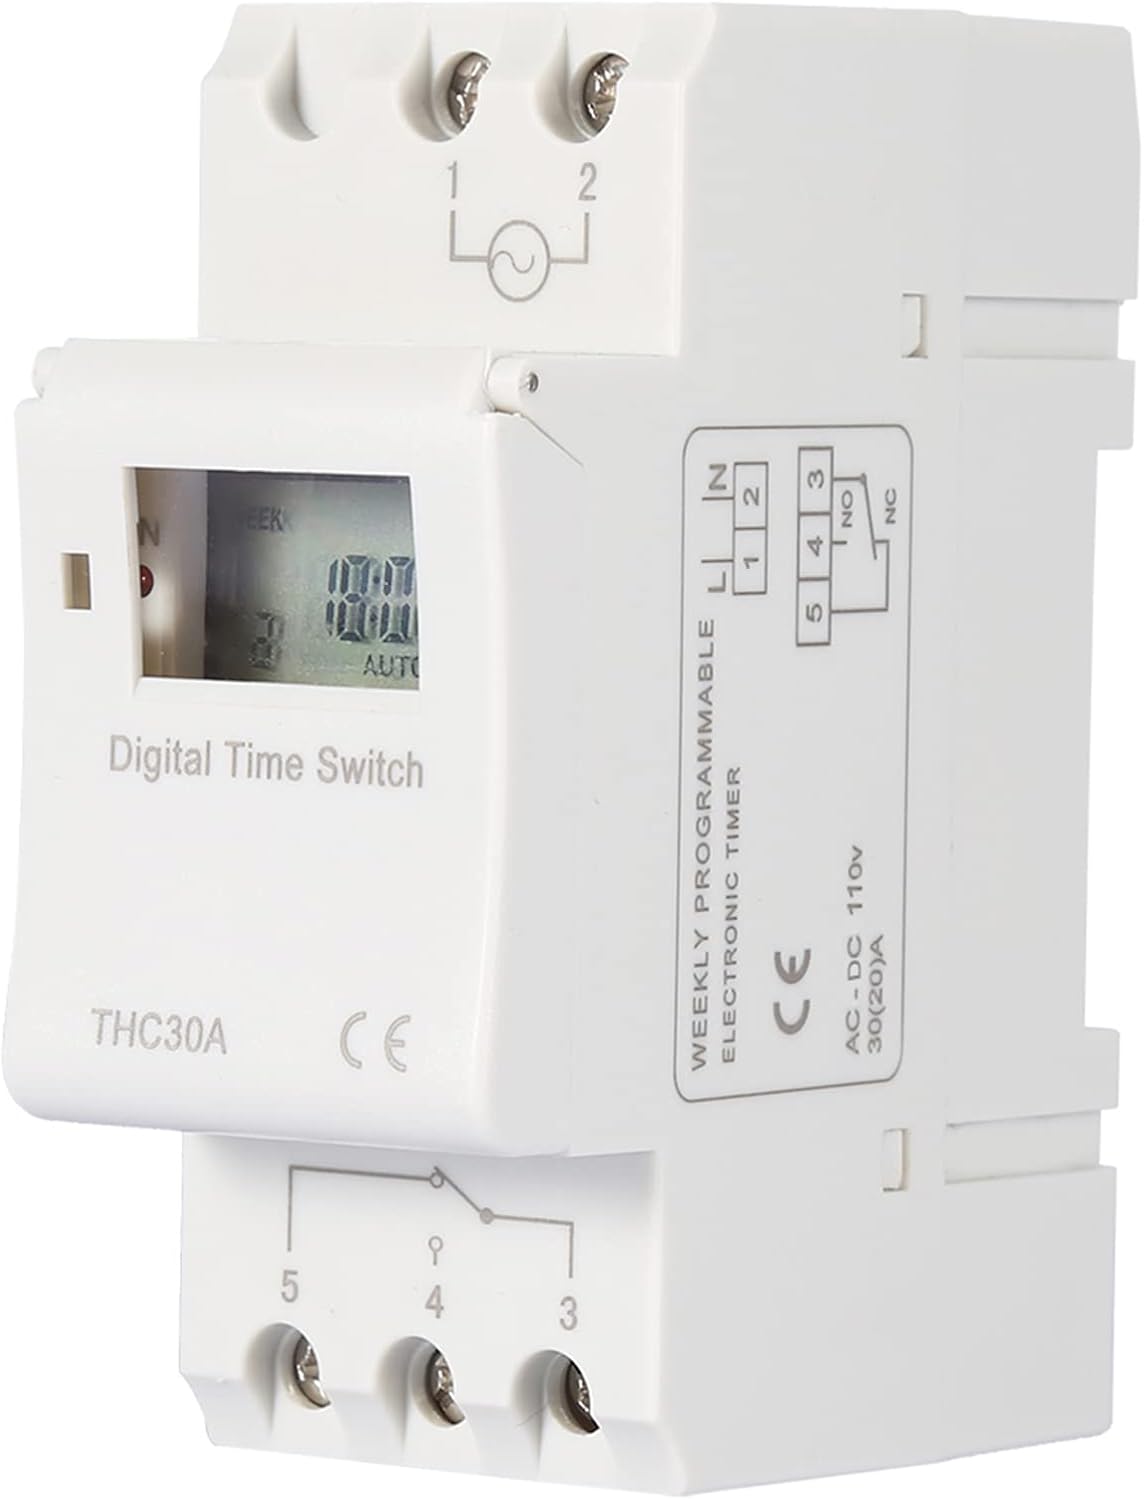
Wiring Diagram:
Refer to the diagram below for correct wiring connections. It is crucial to connect the Live (FireWire) and Neutral (Zero Line) correctly to the input terminals, and the load to the output terminals.
- Input Power (110V AC):
- Connect the Live (FireWire) to terminal 1.
- Connect the Neutral (Zero Line) to terminal 2.
- Output Load Connection:
- Terminal 3: Common (C) for the switch output.
- Terminal 4: Normally Closed (NC) contact. The circuit is closed when the timer is OFF.
- Terminal 5: Normally Open (NO) contact. The circuit is closed when the timer is ON.
- For a typical switched load, connect one side of the load to the Live wire (or a jumper from terminal 1 to 3), and the other side of the load to terminal 5 (NO). The Neutral wire of the load should connect to the main Neutral line (terminal 2).
6. Operating Instructions
Upon initial power-up, the display may be blank. Press the 'C/R' button to clear any previous settings and activate the display. The internal battery will charge once power is applied.
6.1. Setting Current Time and Day:
- Press the CLOCK button and hold it.
- While holding CLOCK, press the D+ button to set the current day of the week.
- While holding CLOCK, press the H+ button to set the current hour.
- While holding CLOCK, press the M+ button to set the current minute.
- Release the CLOCK button. The time is now set.
6.2. Programming ON/OFF Schedules (16 Settings):
The timer allows for up to 16 ON and 16 OFF programs. Each program can be set for a specific day or combination of days.
- Press the PROG button once. The display will show "1 ON".
- Press D+ to select the desired day(s) for this ON event. Options include individual days, weekdays, weekends, or all days.
- Press H+ to set the hour for the "1 ON" event.
- Press M+ to set the minute for the "1 ON" event.
- Press PROG again. The display will show "1 OFF".
- Repeat steps 2-4 to set the day(s), hour, and minute for the "1 OFF" event.
- Continue pressing PROG to cycle through "2 ON", "2 OFF", up to "16 ON", "16 OFF". Repeat steps 2-4 for each desired program.
- To exit programming mode, press the CLOCK button.
6.3. Manual Override:
The MANUAL button allows you to temporarily override the programmed settings.
- Press MANUAL repeatedly to cycle through modes: AUTO ON, AUTO OFF, and ON, OFF.
- AUTO ON: The timer will follow its programmed schedule, and the output is currently ON.
- AUTO OFF: The timer will follow its programmed schedule, and the output is currently OFF.
- ON: The output is forced ON, overriding any programmed OFF events. It will remain ON until manually changed or a programmed OFF event occurs if it returns to AUTO mode.
- OFF: The output is forced OFF, overriding any programmed ON events. It will remain OFF until manually changed or a programmed ON event occurs if it returns to AUTO mode.
6.4. Resetting the Device:
To clear all settings and reset the timer to its factory default state, press the C/R button using a pointed object (like a pen tip). This will erase all programmed schedules and reset the clock.
7. Maintenance
The Walfront THC30A Digital Timer Switch requires minimal maintenance.
- Cleaning: Wipe the exterior with a soft, dry cloth. Do not use abrasive cleaners or solvents. Ensure the device is powered off before cleaning.
- Internal Battery: The built-in battery is designed for long-term power-off memory. It recharges automatically when the device is powered. No user maintenance is required for the battery.
- Inspection: Periodically check wiring connections to ensure they are secure.
8. Troubleshooting
- Display is blank:
- Ensure the device is receiving power (110V AC).
- Press the C/R button to activate the display or clear any potential errors.
- Timer is not switching the load ON/OFF as programmed:
- Check if the timer is in AUTO ON or AUTO OFF mode. If it's forced ON or OFF, press MANUAL until "AUTO" appears on the display.
- Verify that the programmed times and days are correct. Re-enter programs if necessary.
- Ensure the current time and day are set accurately.
- Check wiring connections, especially to terminals 3, 4, and 5, to ensure the load is connected to the correct NO (Normally Open) or NC (Normally Closed) terminal as desired.
- Confirm the load does not exceed the 30A switching capacity.
- Settings are lost after a power outage:
- The internal backup battery may be depleted. Allow the device to remain powered for several hours to recharge the battery. The power-off memory is rated for 180 days or more once fully charged.
- Buttons are unresponsive:
- Press the C/R button to unlock the keypad or reset the device.
9. Warranty and Support
For warranty information or technical support, please contact your retailer or the manufacturer, Walfront, directly. Keep your purchase receipt as proof of purchase. Do not attempt to repair the device yourself, as this may void the warranty and pose safety risks.
For further assistance, please refer to the contact information provided with your purchase or visit the official Walfront website.

