1. Introduction
Thank you for choosing the BOBLOV C18 WiFi Body Camera. This compact and versatile device is designed for various recording needs, offering high-definition video, audio recording, and convenient WiFi connectivity. Please read this manual thoroughly to understand the camera's functions and ensure proper operation.
2. Product Overview
2.1 Key Features
- WiFi Connectivity: Control the camera and download files to your smartphone via the dedicated app.
- High-Definition Recording: Captures clear 1080P video at 30 frames per second (fps).
- OLED Screen: Provides direct access for settings adjustments and time stamp display.
- Long Battery Life: Built-in 1200mAh battery supports 3-4 hours of 1080P recording (WiFi off).
- Compact Design: Measures approximately 4-1/8 inches long, 1-1/8 inches wide, and 1-inch deep, making it highly portable.
- One-Button Operation: Simplifies recording initiation.
- Motion Detection: Automatically records when motion is detected.
- Detachable Clip: Allows for versatile mounting options, including front and back use.
- Built-in Storage: Includes 32GB internal storage.
2.2 Package Contents

Figure 2.2.1: Package Contents. The package includes the BOBLOV C18 Camera, two clips for mounting, a user manual, and a USB charging cable.
- BOBLOV C18 Camera
- Detachable Clips (2)
- USB Charging Cable
- User Manual
2.3 Camera Components

Figure 2.3.1: Front and Side View of the BOBLOV C18 Camera. This image highlights the camera's compact form factor, the main lens, the OLED display, control buttons, and the USB charging port.

Figure 2.3.2: OLED Display Interface. The OLED screen provides clear icons for video recording, audio recording, settings, and photo capture modes, along with battery and resolution indicators.
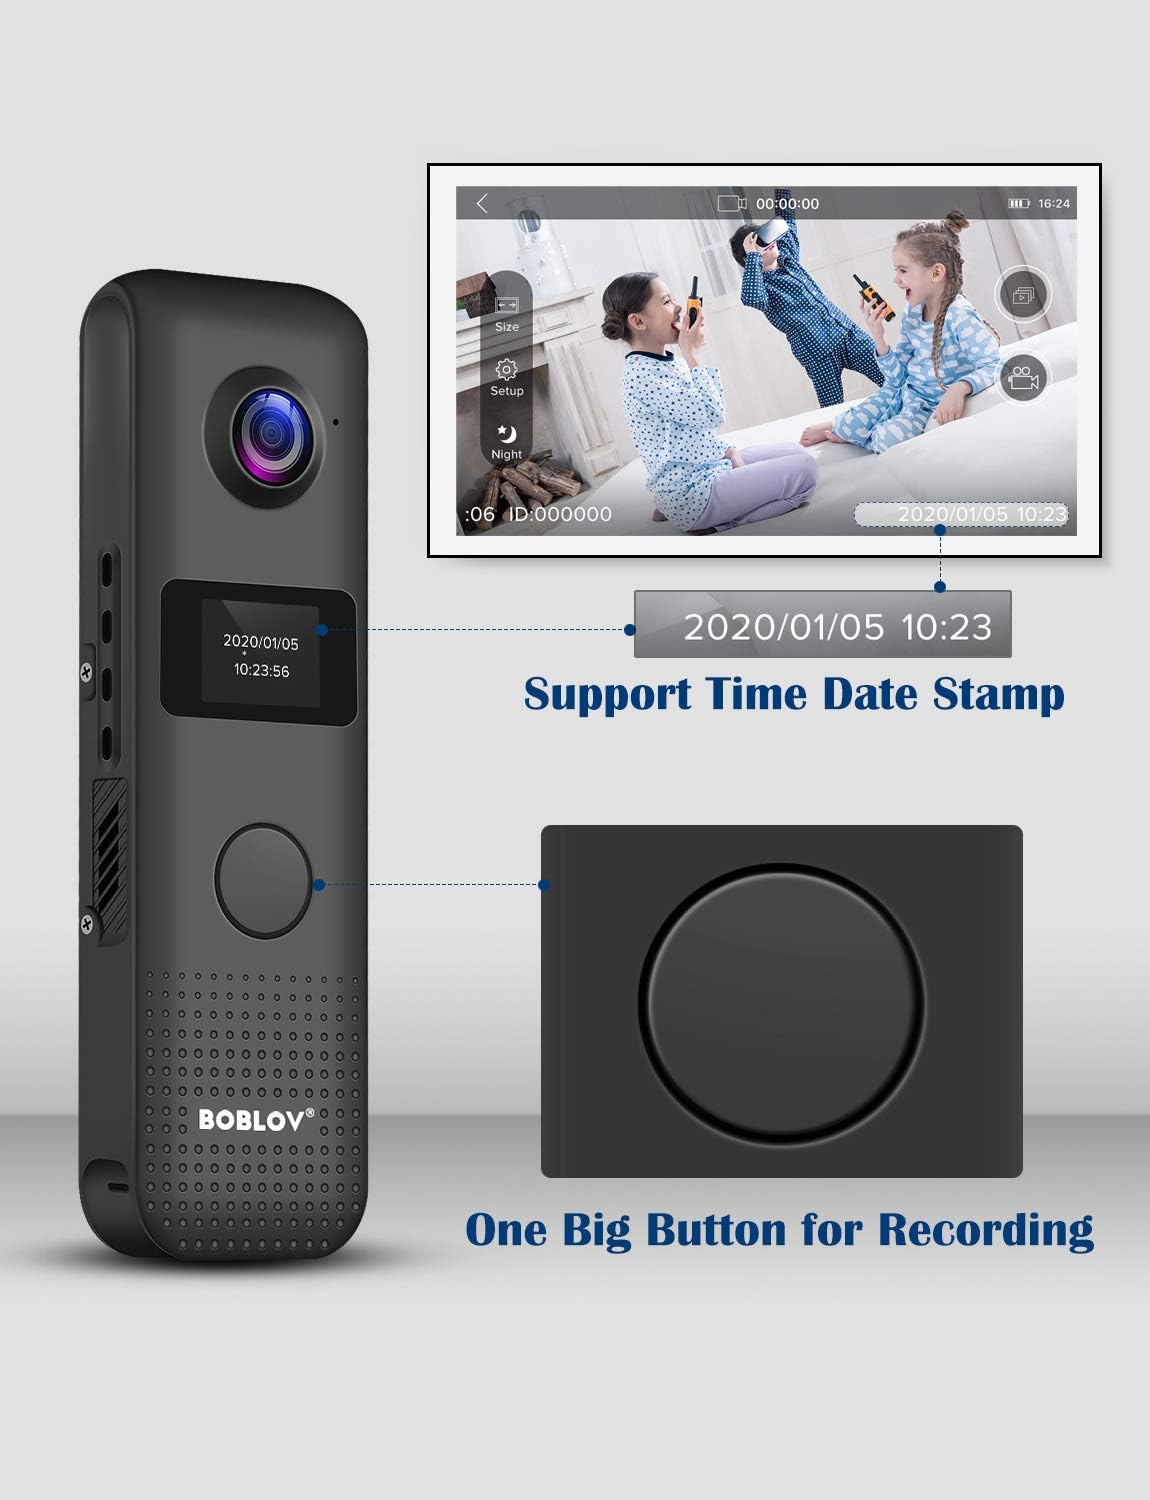
Figure 2.3.3: Recording Button and Time Stamp. This image illustrates the prominent one-big-button design for easy recording and the capability to display time and date stamps on recordings.
3. Setup
3.1 Charging the Battery
Before first use, fully charge the camera. Connect the camera to a USB power source (e.g., computer USB port, wall adapter) using the provided USB cable. The OLED screen will indicate charging status. A full charge takes approximately 2 hours.

Figure 3.1.1: Charging the BOBLOV C18 Camera. The camera is shown connected via its USB port to a power source, indicating the charging process.
3.2 Attaching the Clip
The BOBLOV C18 comes with a detachable clip for versatile mounting. You can attach the clip to allow the camera to be worn on clothing, such as a shirt pocket or lapel, facing either forward or backward.

Figure 3.2.1: Detachable Clip Usage. This diagram illustrates how the clip can be attached to the camera for both front-facing and back-facing wear, providing flexibility in how the camera is positioned.
3.3 Initial Power On and Time Stamp Setting
Press and hold the power button to turn on the camera. The OLED screen will display the current mode and battery status. To set the time stamp, navigate through the settings menu directly on the OLED screen using the camera's buttons. Ensure the time and date are accurate for proper record-keeping.
4. Operating Instructions
4.1 Video Recording
To start video recording, press the large central button once. The camera will begin recording, and an indicator on the OLED screen will confirm recording is active. Press the button again to stop recording. Videos are saved automatically to the internal 32GB storage.
4.2 Audio Recording
The camera supports audio recording. Refer to the on-screen menu via the OLED display to switch to audio-only recording mode if desired. Follow the same one-button operation to start and stop audio recording.
4.3 WiFi Connectivity and App Usage
The BOBLOV C18 features WiFi connectivity for remote control and file transfer to your smartphone. Download the "ZFXF" app (or specified app in the manual) from your smartphone's app store. Enable WiFi on the camera via the settings menu. Connect your smartphone to the camera's WiFi network. Once connected, you can view live footage, adjust settings, and download recorded videos and photos directly to your phone.

Figure 4.3.1: WiFi Connection and App Operation. This image demonstrates the camera's WiFi capability and how it connects to a smartphone app for remote control and file management.
4.4 Turning Off Working Indicator
For discreet recording, you can turn off the working indicator light. This setting can be adjusted through the camera's OLED screen menu.
4.5 Motion Detection
Activate the motion detection feature through the camera's settings. When enabled, the camera will automatically begin recording when it detects movement within its field of view, conserving battery life and storage space.
5. Maintenance
5.1 Cleaning
To clean the camera, use a soft, dry cloth. For the lens, use a specialized lens cleaning cloth and solution. Avoid using harsh chemicals or abrasive materials, as these can damage the camera's surface or lens.
5.2 Storage
Store the camera in a cool, dry place away from direct sunlight and extreme temperatures. If storing for an extended period, ensure the battery is partially charged (around 50%) to prolong its lifespan.
6. Troubleshooting
| Problem | Possible Cause | Solution |
|---|---|---|
| Camera does not power on. | Battery is depleted. | Charge the camera fully using the provided USB cable. |
| Cannot connect to WiFi. | Incorrect WiFi settings or app issue. | Ensure WiFi is enabled on the camera and your smartphone. Verify you have the correct app ("ZFXF") installed. Restart both devices and try again. Note: The app may have specific OS requirements (e.g., iOS only, as per some user reviews). |
| Poor video quality. | Lens is dirty; low light conditions; incorrect resolution setting. | Clean the camera lens. Ensure adequate lighting. Check the video resolution setting on the OLED screen and set it to 1080P for best quality. |
| Camera freezes or becomes unresponsive. | Software glitch or full storage. | Perform a soft reset by holding the power button until the camera turns off, then restart. If issues persist, connect to a computer and back up/delete files to free up space. |
| Recordings do not have correct time stamp. | Time and date not set or incorrect. | Access the settings menu via the OLED screen to manually set the correct time and date. |
7. Specifications
| Feature | Detail |
|---|---|
| Model | C18 |
| Video Resolution | 1296P, 1080P, 480P (selectable) |
| Frame Rate | 30 fps |
| Battery Capacity | 1200mAh Lithium Polymer |
| Recording Time (1080P, WiFi off) | Approx. 3-4 hours |
| Charging Time | Approx. 2 hours |
| Storage | 32GB Internal (non-expandable) |
| Connectivity | Wi-Fi, USB |
| Dimensions (L x W x H) | 4-1/8 x 1-1/8 x 1 inches |
| Weight | 1.76 ounces (approx. 50 grams) |
| Operating Temperature | Not specified, generally room temperature. |
| IP Rating | IP54 (Dust protected, splash resistant) |
8. Warranty and Support
BOBLOV offers the following support for the C18 camera:
- 1-Month Refund or Replacement: For any reason, within one month of purchase.
- 1-Year Free Accessories or Repair: For accessories, within one year of purchase.
- Lifetime Online Support: Continuous online support for the product.
For technical assistance or warranty claims, please contact BOBLOV customer service through their official channels or the platform where the product was purchased.


