
1. Introduction
This user manual provides comprehensive instructions for the installation, operation, and maintenance of the Sonew A7-RK-EM RFID Access Controller. This device is designed to provide secure access control for various environments, offering multiple authentication methods and robust construction.

Figure 1.1: Front view of the Sonew A7-RK-EM RFID Access Controller. This image shows the silver-colored unit with a black keypad featuring numerical buttons (0-9), asterisk (*), and hash (#) keys.
2. Safety Information
- Read all instructions carefully before installation and operation.
- Ensure the power supply voltage matches the device's specifications (DC 10-24V). Incorrect voltage can damage the unit.
- Disconnect power before performing any wiring or maintenance.
- Installation should be performed by qualified personnel if you are unsure about electrical wiring.
- Do not expose the device to extreme temperatures or corrosive environments beyond its IP67 rating.
3. Package Contents
Please verify that all items are present in the package:
- Sonew A7-RK-EM RFID Access Controller Unit
- Mounting Screws and Wall Plugs (typically 2 sets)
- User Manual (this document)

Figure 3.1: Package contents showing the access controller unit alongside mounting screws and wall plugs.
4. Product Features
The Sonew A7-RK-EM RFID Access Controller boasts a range of features designed for reliable and secure access management:
- Non-contact Induction: Supports RFID ID cards for quick and convenient access.
- High User Capacity: Capable of storing up to 2000 user credentials.
- Multiple Access Modes: Offers three methods for door opening: Card, Password, or a combination of Card + Password.
- Robust Construction: Features a durable zinc alloy casing.
- Enhanced Security: Equipped with a tamper alarm for increased security.
- Environmental Durability: IP67 rated for explosion-proof, waterproof, and dustproof performance, suitable for outdoor installation.
- Wiegand26 Support: Compatible with standard Wiegand26 input/output for integration with other access control systems.
- User Management: Includes functions for adding and deleting user cards for easy administration.

Figure 4.1: Visual representation of key product features, highlighting non-contact induction, user capacity, and IP67 rating.
5. Setup and Installation
Proper installation is crucial for the optimal performance and longevity of your access controller. Refer to the wiring diagram for connections.
5.1 Mounting the Device
- Choose a suitable location for installation, typically near the door frame.
- Mark the drilling points on the wall using the device's mounting holes as a template.
- Drill holes and insert the provided wall plugs.
- Secure the access controller to the wall using the mounting screws.

Figure 5.1: The access controller unit securely mounted on a wall, ready for operation.
5.2 Wiring Diagram
Connect the access controller to your door lock system and power supply according to the following general diagram. Specific wiring details may vary based on your lock type (e.g., NO/NC lock) and power supply unit.

Figure 5.2: Illustrative wiring diagram showing the connection of the access controller to a door lock, power supply, and exit button.
5.3 Power Connection
Connect the power supply (DC 10-24V) to the designated power input terminals on the back of the unit. Ensure correct polarity.

Figure 5.3: Rear view of the access controller, indicating the power input and other connection ports.
6. Operating Instructions
6.1 Initial Power-Up
Upon first power-up, the device will typically enter a standby mode. The default administrator password is usually 123456 (or similar, refer to specific product documentation if different). It is highly recommended to change this immediately.
6.2 Accessing the System
Users can gain access using one of the configured methods:
- Card Access: Present a registered RFID card to the reader area on the front of the device.
- Password Access: Enter your registered password on the keypad, followed by the '#' key.
- Card + Password Access: Present your registered RFID card, then enter your password followed by the '#' key.

Figure 6.1: A user demonstrating card access by holding an RFID card near the controller's reader.
7. Programming and Configuration
This section outlines common programming steps. Refer to the full programming guide for advanced features.
7.1 Entering Programming Mode
To enter programming mode, typically you will press * then enter the Administrator Password, followed by #. The device will usually emit a confirmation tone or light indicator.
7.2 Changing Administrator Password
- Enter Programming Mode.
- Follow the specific command for changing admin password (e.g., 0 + new password + #).
- Confirm the new password.
7.3 Adding User Cards
- Enter Programming Mode.
- Follow the specific command for adding users (e.g., 1 + user ID + #).
- Present the RFID card to be added to the reader.
- The device will confirm successful addition. Repeat for additional cards.
7.4 Deleting User Cards
- Enter Programming Mode.
- Follow the specific command for deleting users (e.g., 2 + user ID + #, or 3 + present card to delete + #).
- The device will confirm successful deletion.
Note: Specific programming codes and sequences may vary. Always refer to the detailed programming instructions provided with your device for precise commands.
8. Maintenance
The Sonew A7-RK-EM access controller is designed for low maintenance. However, regular checks can ensure optimal performance:
- Cleaning: Wipe the surface with a soft, damp cloth. Do not use abrasive cleaners or solvents.
- Wiring Inspection: Periodically check all wiring connections for looseness or damage.
- Functionality Test: Regularly test the access methods (card, password) to ensure they are working correctly.
- Firmware Updates: Check the manufacturer's website for any available firmware updates (if applicable).

Figure 8.1: The device's IP67 rating ensures durability against water and dust, simplifying outdoor maintenance.
9. Troubleshooting
If you encounter issues with your access controller, refer to the following common problems and solutions:
| Problem | Possible Cause | Solution |
|---|---|---|
| Device does not power on. | No power supply, incorrect wiring, or faulty power adapter. | Check power connections, ensure correct voltage (DC 10-24V), and test power adapter. |
| Card/Password not recognized. | Card not registered, incorrect password, or card reader malfunction. | Ensure card/password is correctly registered. Re-register if necessary. Clean card reader area. |
| Door does not unlock. | Lock wiring issue, faulty lock, or incorrect lock settings. | Verify lock wiring (NO/NC), test the lock independently, and check controller's lock output settings. |
| Tamper alarm constantly triggers. | Improper mounting or physical interference with the tamper switch. | Ensure the device is securely mounted and there is no obstruction to the tamper switch. |
10. Specifications
| Feature | Detail |
|---|---|
| Model | A7-RK-EM |
| Brand | Sonew |
| Material | Zinc Alloy (Casing), Metal |
| Input Voltage | DC 10-24V |
| User Capacity | 2000 Users |
| Access Modes | Card, Password, Card + Password |
| Wiegand Interface | Wiegand26 |
| Protection Rating | IP67 (Waterproof, Dustproof, Explosion-proof) |
| Manufacturer | shanrya |
| UPC | 719855487675 |
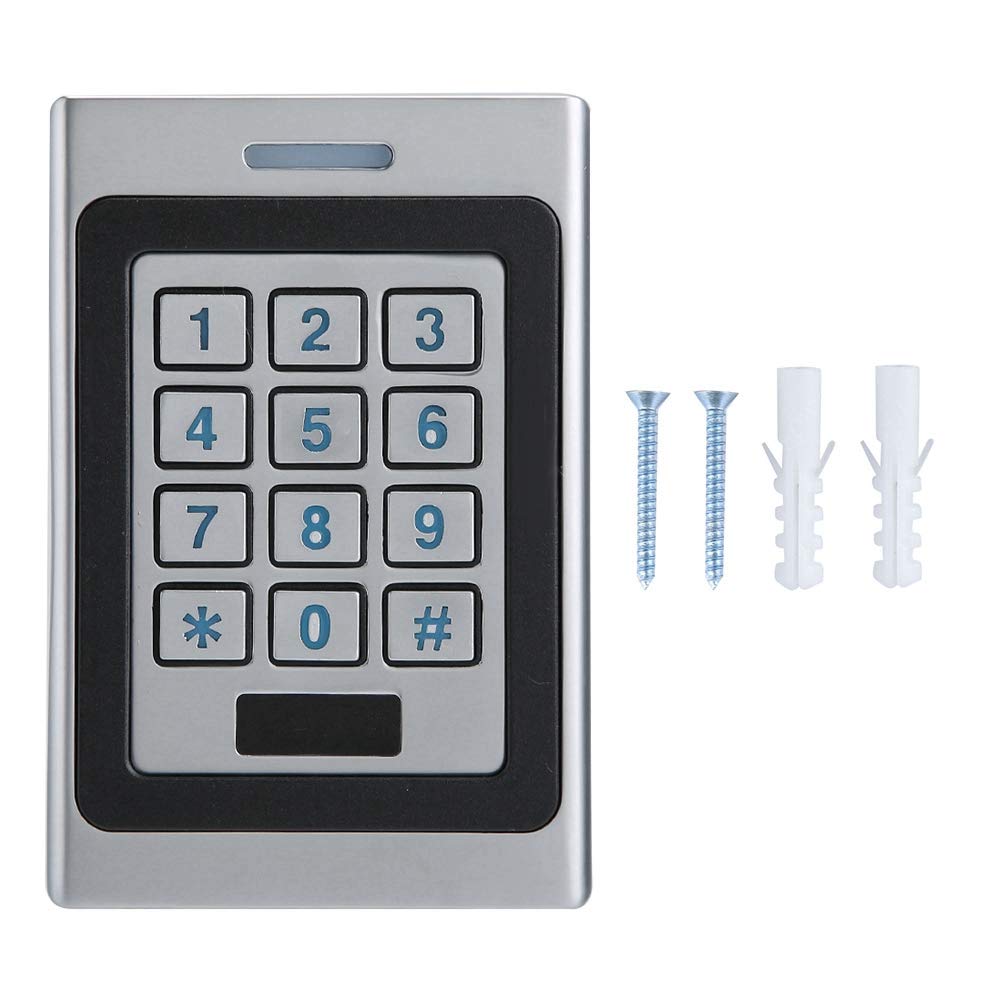
Figure 10.1: Detailed view of the product, showing front keypad and rear label with input voltage and certifications.
11. Warranty and Support
Specific warranty information for the Sonew A7-RK-EM RFID Access Controller is not provided in this manual. Please refer to your purchase documentation or contact the retailer/manufacturer directly for warranty terms and technical support.
For further assistance, please visit the manufacturer's official website or contact their customer service department.