Sunmile SM-G35
Sunmile Electric Meat Grinder and Sausage Maker SM-G35 User Manual
Model: SM-G35
Important Safety Instructions
Please read all instructions carefully before using the appliance. Failure to follow these instructions may result in electric shock, fire, or serious injury.
- Always ensure the power supply voltage matches the rating on the appliance.
- Do not immerse the motor unit in water or other liquids.
- Unplug the appliance from the outlet when not in use, before assembling or disassembling parts, and before cleaning.
- Keep hands and utensils away from moving parts during operation to prevent injury. Use the food pusher provided.
- Do not grind bones, nuts, or other hard items as this can damage the motor and grinding components. This appliance is designed for meat only.
- Do not operate the appliance with a damaged cord or plug, or after the appliance malfunctions or has been damaged in any manner.
- This appliance is not intended for use by persons (including children) with reduced physical, sensory, or mental capabilities, or lack of experience and knowledge, unless they have been given supervision or instruction concerning use of the appliance by a person responsible for their safety.
- Avoid contact with moving parts.
- Do not use outdoors.
Product Overview
The Sunmile Electric Meat Grinder and Sausage Maker SM-G35 is designed for efficient meat grinding and sausage preparation. It features a powerful motor and various accessories for versatile use.
Components
- Motor Unit (Main Body)
- Food Tray
- Grinder Head (Housing)
- Auger (Feeding Screw)
- Cutting Blade (Knife)
- Grinding Plates (Fine, Medium, Coarse)
- Fixing Ring
- Food Pusher
- Sausage Stuffer Attachment

Image: All components of the Sunmile Electric Meat Grinder, including the motor unit, food tray, grinder head, auger, cutting blade, three grinding plates, fixing ring, food pusher, and sausage stuffer attachment.
Key Features
- Powerful Motor: Equipped with a 250W rated power and 1000W max locked power motor for efficient grinding.
- High-Quality Construction: The main body is made of selected plastic, while the food tray and grinder head are polished cast aluminum. All food-contact parts are food-grade and ETL certified.
- Versatile Grinding: Includes three stainless steel cutting plates (coarse, medium, fine) and a stainless steel cutting blade for various grinding needs.
- Sausage Making: Comes with a large sausage stuffing attachment for homemade sausages.
- Easy Operation: Features a simple ON/OFF/Reverse switch for user convenience.
- Safety Features: Integrated circuit breaker to prevent motor burnout and good ventilation for continuous operation.

Image: A close-up view of the internal pure-copper motor, highlighting its robust construction for powerful performance.

Image: The side of the grinder showing ventilation slots, indicating rapid heat dissipation to ensure motor longevity.
Setup and Assembly
Follow these steps to correctly assemble your meat grinder before use.
- Ensure the motor unit is unplugged from the power outlet.
- Insert the grinder head into the motor unit opening. Turn it counter-clockwise until it is firmly locked.
- Place the auger (feeding screw) into the grinder head.
- Install the cutting blade onto the auger shaft. Important: Ensure the flat side of the cutting blade faces outwards, towards the grinding plate. Incorrect placement will cause clogging.
- Select the desired grinding plate (fine, medium, or coarse) and place it over the cutting blade, aligning the notch with the pin on the grinder head.
- Screw the fixing ring onto the grinder head until it is hand-tight. Do not overtighten.
- Place the food tray on top of the grinder head.

Image: Diagram illustrating the correct orientation for installing the cutting blade, with the flat side facing outwards towards the grinding plate.
Operating Instructions
Preparing Meat for Grinding
- Cut meat into small pieces (approximately 1-inch cubes) that can easily fit into the feeding tube.
- Remove all bones, tendons, and excessive fat. Grinding only meat is crucial for optimal performance and to prevent damage.
- For best results, chill the meat and the metal grinding components (grinder head, auger, blade, plates) in the freezer for 15-30 minutes before grinding. This helps prevent smearing and ensures a cleaner grind.

Image: Illustration emphasizing that the grinder is designed for meat only, and should not be used for bones, tendons, or other hard items.
Grinding Meat
- Ensure the appliance is properly assembled and plugged into a power outlet.
- Place a suitable container under the grinder head to collect the ground meat.
- Turn the switch to the 'ON' position.
- Feed the prepared meat pieces into the feeding tube using the food pusher. Do not force meat into the grinder; let the auger pull it through.
- If the grinder jams, switch to the 'REVERSE' position for a few seconds to clear the blockage, then switch back to 'ON'.
- After grinding, switch the appliance to 'OFF' and unplug it.

Image: A diagram illustrating the three-stage grinding process: twist, squeeze, and cut, performed by the auger and cutting blade.
Making Sausages
- Disassemble the grinding plate and cutting blade.
- Attach the sausage stuffer to the auger shaft, then secure it with the fixing ring.
- Prepare your sausage mixture and place it in the food tray.
- Carefully slide the casing onto the sausage stuffer.
- Turn the grinder to 'ON' and gently feed the mixture into the grinder, guiding the casing as it fills.
- Once finished, switch to 'OFF' and unplug the appliance.

Image: The plastic sausage stuffer attachment, ready for use in making homemade sausages.
Maintenance and Cleaning
Proper cleaning and maintenance ensure the longevity and hygienic operation of your meat grinder.
- Always unplug the appliance before cleaning.
- Disassemble all removable parts: food tray, grinder head, auger, cutting blade, grinding plate, and fixing ring.
- Immediately after use, rinse all parts under running water to remove any meat residue. Use a brush if necessary for hard-to-reach areas.
- Wash the stainless steel cutting blade and grinding plates with warm, soapy water. These parts are dishwasher safe.
- The grinder head, auger, and food tray are made of aluminum alloy and are NOT dishwasher safe. Wash these parts by hand with warm, soapy water and a soft cloth. Dishwashing can cause discoloration due to aluminum oxidation.
- Wipe the motor unit with a damp cloth. Never immerse the motor unit in water.
- Dry all parts thoroughly immediately after washing to prevent rust and water spots.
- Reassemble the dry parts for storage or next use.

Image: A hand washing the disassembled metal parts of the meat grinder under running water, emphasizing the importance of immediate cleaning.

Image: A visual guide showing which parts are food-grade aluminum alloy (grinder head, auger, food tray) and which are food-grade stainless steel (cutting blade, grinding plates), with corresponding cleaning instructions.
Troubleshooting
Refer to this section for common issues and their solutions.
| Problem | Possible Cause | Solution |
|---|---|---|
| Motor stops during operation. | Overload or blockage. | Switch to 'REVERSE' to clear blockage. If motor still doesn't run, unplug and let cool for 10-15 minutes. Reduce meat quantity. |
| Meat is not grinding properly or clogs. | Incorrect blade installation, meat not chilled, too much fat/tendon, or dull blade. | Ensure flat side of cutting blade faces outwards. Chill meat and components. Trim fat/tendons. Replace blade if dull. |
| Loud noise during operation. | Loose parts or foreign object. | Check assembly to ensure all parts are securely tightened. Disassemble and check for any foreign objects. |
| Grinder head discolors after dishwashing. | Aluminum oxidation. | The grinder head and auger are aluminum and should only be hand-washed. This discoloration is normal for aluminum exposed to harsh dishwasher detergents. |
Specifications
- Model: SM-G35
- Rated Power: 250W
- Max Locked Power: 1000W
- Voltage: 120 Volts
- Product Dimensions (L x W x H): 14.76 x 7.68 x 14.17 inches
- Item Weight: 7.25 pounds
- Housing Material: Plastic
- Grinder Head/Tray Material: Polished Cast Aluminum
- Cutting Blade/Plates Material: Stainless Steel
- UPC: 715444320118
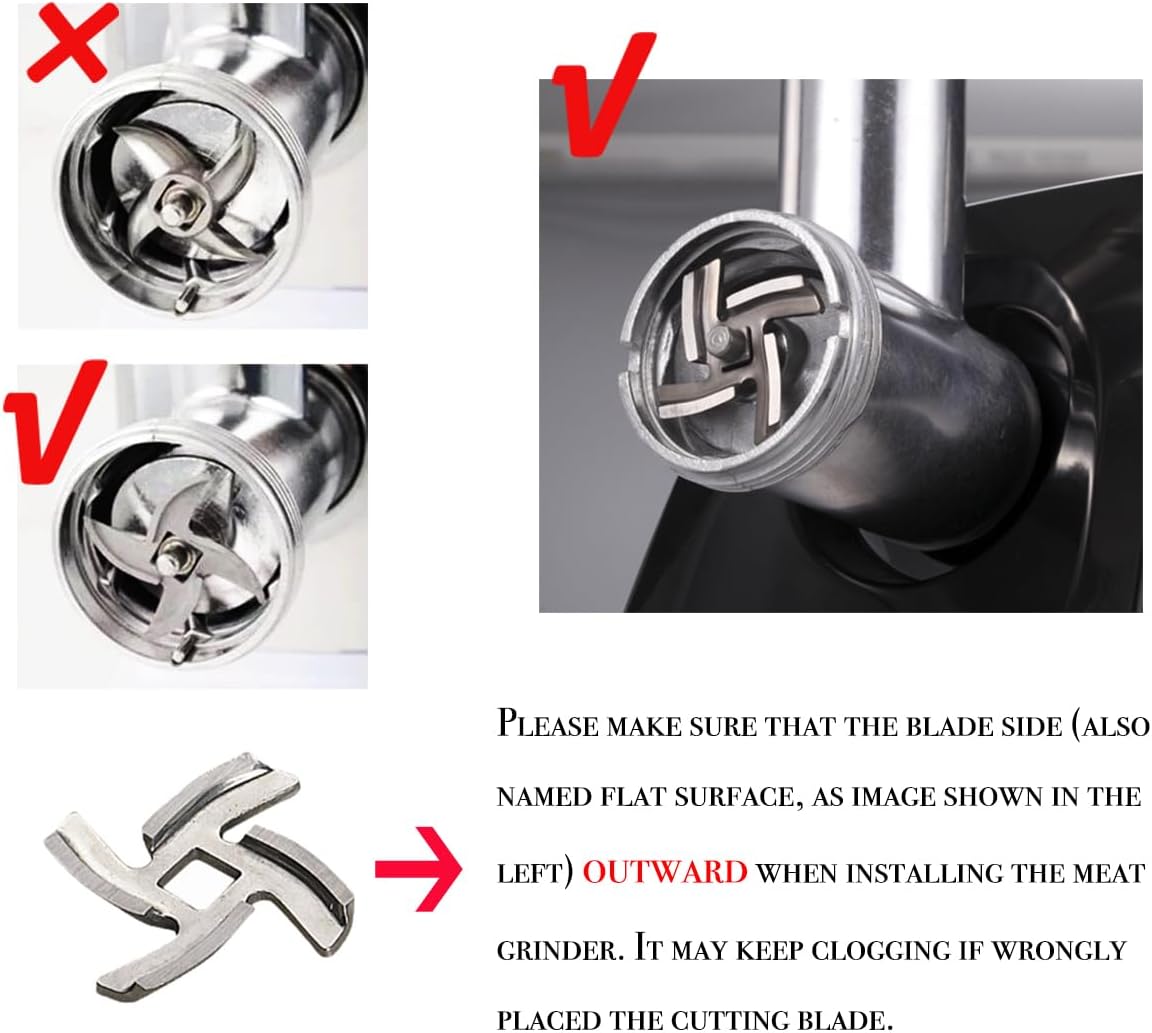
Image: A diagram showing the dimensions of the Sunmile SM-G35 meat grinder in both inches and centimeters.
Warranty and Support
Sunmile provides a 1-year manufacturer warranty for all Sunmile Meat Grinders. If you require assistance with parts, accessories, or any other support, please contact us. We aim to respond within 24 hours with a solution.
For customer support, please refer to the contact information provided with your purchase or visit the official Sunmile website.
Related Documents - SM-G35
 |
Delimano Kitchen Robot PRO User Manual - Model SM-1519BM Comprehensive user manual for the Delimano Kitchen Robot PRO (Model SM-1519BM), detailing its parts, operation for various attachments like meat mincer, sausage maker, pasta maker, cookie maker, and slicer/grater, along with cleaning and troubleshooting guides. |
 |
Delimano Kitchen Robot PRO User Manual Comprehensive user manual for the Delimano Kitchen Robot PRO, detailing its parts, usage instructions, safety warnings, and troubleshooting tips. Learn how to use various attachments for mixing, mincing, sausage making, and more. |
 |
Braun SnackMaker 5: User Manual and Operating Instructions Comprehensive user manual for the Braun SnackMaker 5, detailing operation, features, cleaning, and maintenance. Covers models SM 5000, SM 5001, SM 5005, SM 5006, and SM 5038. |
 |
VOSPEED Stand Mixer SM-1520BM User Manual Comprehensive user manual for the VOSPEED SM-1520BM Stand Mixer, covering technical data, safety instructions, component overview, usage guides for stand mixer, blender, and meat mincer functions, troubleshooting, and suggested recipes. |
 |
Braun SnackMaker 5 User Manual and Instructions User manual for the Braun SnackMaker 5 (models SM 5000, SM 5001, SM 5005, SM 5006, SM 5038) covering operation, plate changes, cleaning, and safety. Includes detailed instructions for making sandwiches, waffles, and grilled items. |
 |
Guía de Usuario Samsung Galaxy Watch: Modelos SM-R860 a SM-R965F Explore las funciones, configuraciones y solución de problemas de su Samsung Galaxy Watch con esta completa guía de usuario. Cubre modelos desde la serie Galaxy Watch4 hasta la serie Galaxy Watch6. |