IDS Home Galaxy Tracker 375 Smart Telescope
Eastcolight Professional Galaxy Tracker Telescope User Manual
Model: Galaxy Tracker 375 Smart Telescope
1. Introduction
This manual provides comprehensive instructions for the assembly, operation, and maintenance of your IDS Home Galaxy Tracker 375 Smart Telescope. Designed for beginners, this telescope offers a 375x power magnification and a 50mm wide-angle objective lens, making it suitable for observing celestial bodies and terrestrial objects. Please read this manual thoroughly before using the telescope to ensure proper setup and optimal viewing experience.

Figure 1: The Galaxy Tracker 375 Smart Telescope, fully assembled with its tripod and packaging.
2. Package Contents
Verify that all components listed below are present in your package:
- Telescope Body (1)
- Eyepieces (2) (One typically attached to the telescope body)
- Tripod (1)
- Barlow Lens (1)
- Smartphone Adapter (1)
- Smartphone Adapter Knob (1)
- Eyepiece Lid (1)
- User Manual (English) (1)
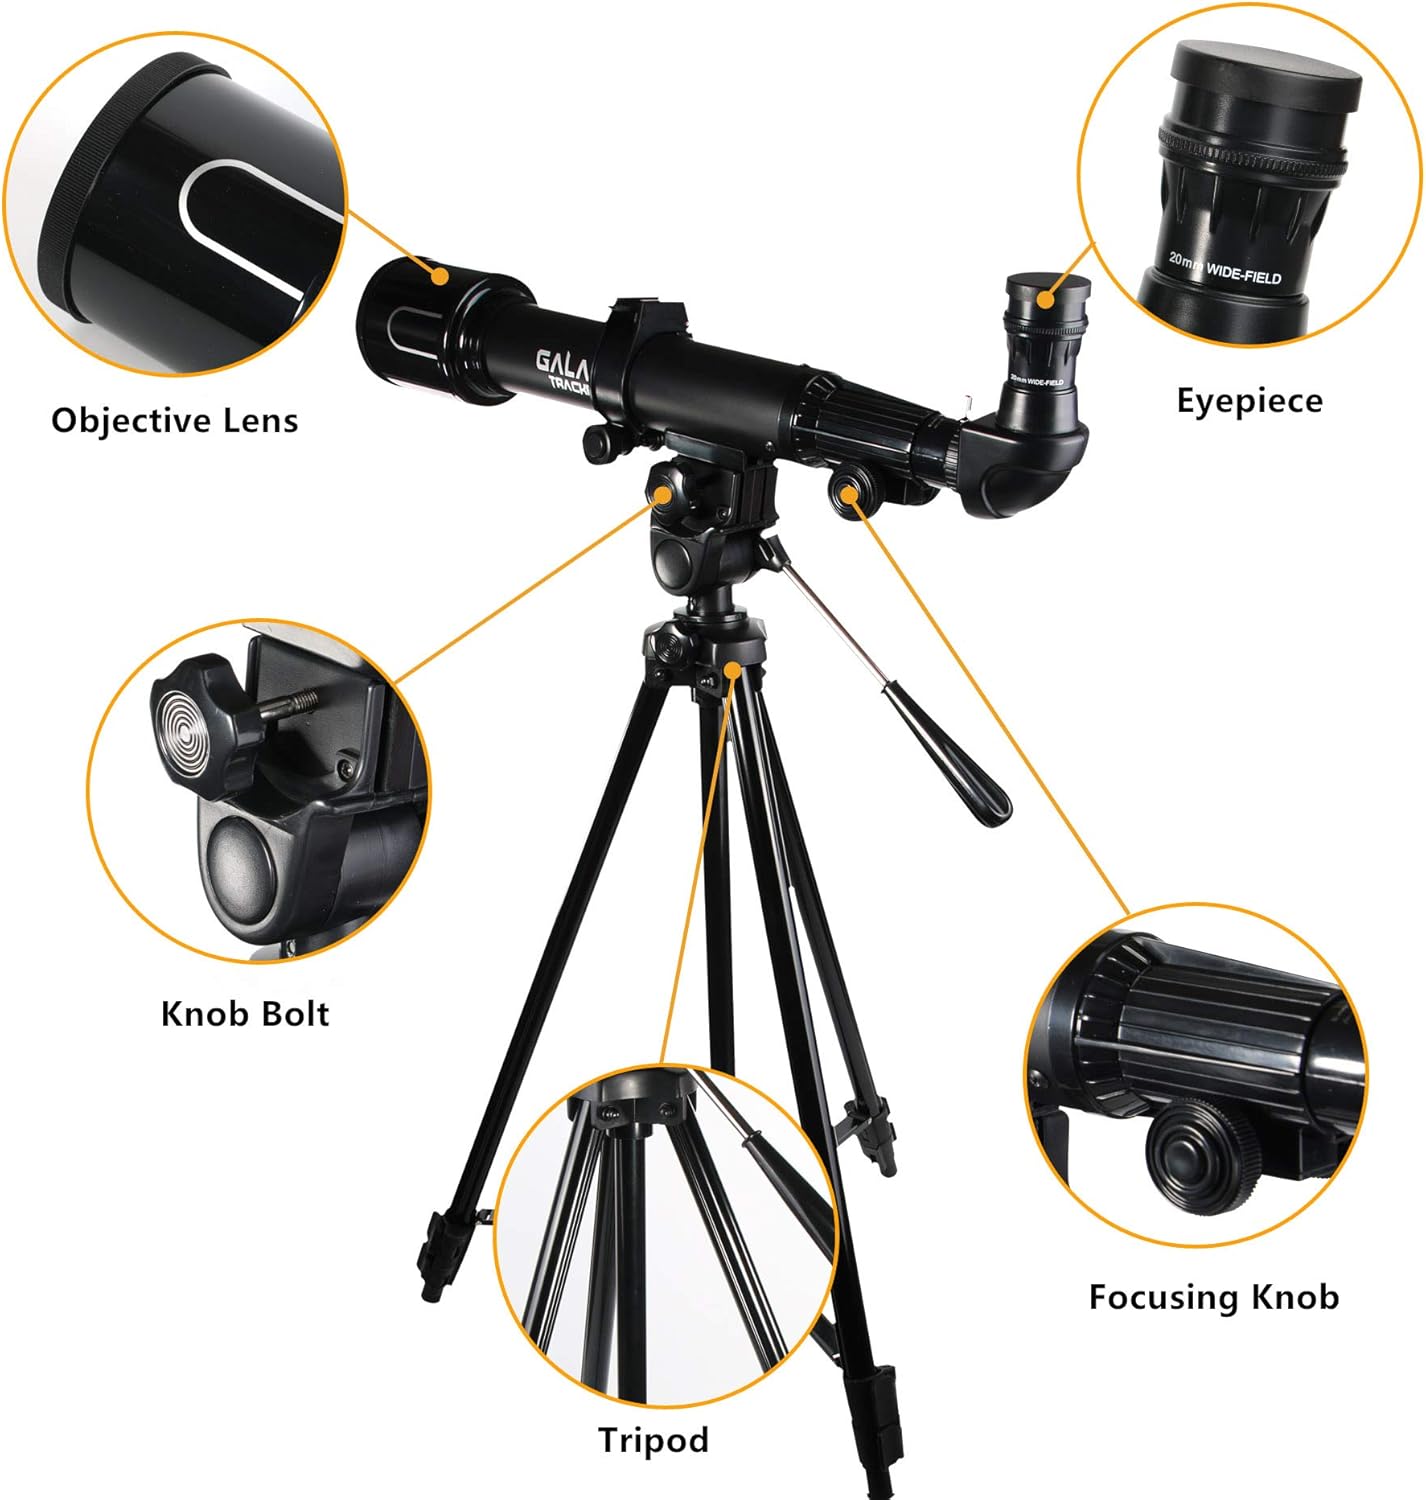
Figure 2: Key components of the Galaxy Tracker 375 Smart Telescope.
3. Setup and Assembly
Follow these steps to assemble your telescope:
- Set up the Tripod:
Unfold the tripod legs and extend them to your desired height. Ensure the tripod is stable on a flat surface. The tripod features a multifunctional aluminum alloy design with tree-level height adjustment, allowing for heights of 21 inches (55cm), 31 inches (78cm), and 45 inches (115cm).

Figure 3: Tripod height adjustment options.
The tripod head allows for smooth horizontal and vertical adjustments. Use the handle to control the movement and the knob bolt to secure its position.

Figure 4: Tripod head for precise aiming.
- Attach the Telescope Body:
Carefully place the telescope body onto the tripod mount. Secure it using the provided knob bolt on the tripod head. Ensure it is firmly attached to prevent accidental falls.
- Insert the Eyepiece:
Remove the eyepiece lid from the telescope's diagonal prism. Insert one of the eyepieces into the diagonal prism. For initial viewing, it is recommended to start with the eyepiece that provides lower magnification (e.g., 20mm eyepiece for 25x magnification).
- Attach the Barlow Lens (Optional):
To increase magnification, insert the Barlow lens into the diagonal prism first, then insert the eyepiece into the Barlow lens. A 3X Barlow lens combined with a 4mm eyepiece can achieve 375x magnification.

Figure 5: Assembly of Barlow lens and eyepiece.
- Install the Smartphone Adapter:
The smartphone adapter allows you to attach your smartphone to the eyepiece for capturing images or using stargazing apps. Secure your smartphone into the adapter, then attach the adapter to the eyepiece. Adjust the adapter to align your phone's camera with the eyepiece lens.

Figure 6: Smartphone adapter components and assembly.
4. Operating the Telescope
4.1 Basic Observation
- Choose a Location: Select a dark location away from city lights for astronomical observations. For terrestrial viewing, any stable location is suitable.
- Aim the Telescope: Loosen the knob bolt on the tripod head and gently move the telescope to point towards your desired object. Tighten the knob bolt to secure its position.
- Focus the Image: Look through the eyepiece and slowly turn the focusing knob until the image appears sharp and clear.
- Change Magnification: To change magnification, swap eyepieces or add the Barlow lens.
- 20mm Eyepiece: Approximately 25X Magnification
- 4mm Eyepiece: Approximately 125X Magnification
- 4mm Eyepiece + 3X Barlow Lens: Approximately 375X Magnification

Figure 7: Magnification options and their effects on viewing the moon.
4.2 Using the Star Walk 2 App
The Galaxy Tracker 375 Smart Telescope is designed to integrate with the "Star Walk 2" application, providing an enhanced stargazing experience. A complimentary full subscription version of the app is included.
- Download the App: Download "Star Walk 2" from the Apple App Store or Google Play Store.
- Connect your Smartphone: Use the smartphone adapter to securely attach your phone to the telescope's eyepiece.
- Identify Celestial Objects: The app uses your phone's sensors to identify stars, constellations, planets, and other celestial objects in real-time as you point your phone towards the sky.
- Motion Tracking: The app features stargazing tools with motion tracking, assisting beginners in locating and tracking objects.

Figure 8: Star Walk 2 app interface for stargazing.

Figure 9: Smartphone with Star Walk 2 app mounted on the telescope for motion tracking.
4.3 What You Can Observe
This telescope is capable of observing a variety of objects:
- Moon: Observe craters, mountains, and maria on the lunar surface.
- Planets: View brighter planets like Jupiter, Saturn, and Mars, though details may vary based on conditions.
- Nebulae: Glimpse some brighter nebulae and star clusters.
- Sunspots: (WARNING: Only observe the sun with a certified solar filter attached to the objective lens. Never look directly at the sun through the telescope without proper protection, as it can cause permanent eye damage.)
- Scenery: Use for terrestrial viewing of distant landscapes, wildlife, or other objects.

Figure 10: Examples of celestial and terrestrial objects viewable with the telescope.
5. Maintenance and Care
- Cleaning Lenses:
Use a soft, lint-free cloth specifically designed for optical lenses. Gently wipe the lens surfaces. For stubborn smudges, use a small amount of optical lens cleaning fluid applied to the cloth, not directly to the lens. Avoid touching the lens surfaces with your fingers.
- Storage:
When not in use, store the telescope in a dry, dust-free environment. Keep the eyepiece lid on to protect the optics. Store the telescope in its original packaging or a dedicated carrying case to prevent damage.
- Environmental Protection:
Avoid exposing the telescope to extreme temperatures, high humidity, or direct sunlight for prolonged periods, as this can damage the optical components and coatings.
6. Troubleshooting
| Problem | Possible Cause | Solution |
|---|---|---|
| Image is blurry or out of focus. | Incorrect focus setting. | Adjust the focusing knob slowly until the image is sharp. |
| Cannot see anything through the eyepiece. | Eyepiece lid still on; telescope pointed at an opaque object; wrong eyepiece. | Remove the eyepiece lid. Ensure the telescope is pointed at a clear object. Try a lower magnification eyepiece first. |
| Image is dim or unclear. | Light pollution; dirty lenses; high magnification in poor conditions. | Move to a darker location. Clean the objective lens and eyepiece. Use a lower magnification eyepiece. |
| Smartphone adapter not holding phone securely. | Adapter not tightened properly; phone case interfering. | Ensure the smartphone adapter knob is tightened. Remove bulky phone cases if necessary. |
7. Product Specifications
| Feature | Specification |
|---|---|
| Brand | IDS Home |
| Objective Lens Diameter | 50 Millimeters |
| Eye Piece Lens Description | Barlow |
| Telescope Mount Description | Altazimuth Mount |
| Focus Type | Manual Focus |
| Power Source | Solar Powered (Note: This likely refers to the smartphone adapter's potential for solar charging or is a misclassification. The telescope itself does not require external power.) |
| Compatible Devices | Smartphone |
| Lens Coating Description | Fully Coated |
| Exit Pupil | 2 Millimeters |
| Field Of View | 2 Degrees |
| Item Weight | 4.99 pounds |
| Package Dimensions | 32 x 12 x 4 inches |
8. Warranty and Support
Specific warranty information for the IDS Home Galaxy Tracker 375 Smart Telescope is not provided in this manual. Please refer to the product packaging or contact the manufacturer directly for details regarding warranty coverage and customer support.
For technical assistance or inquiries, please visit the official IDS Home website or contact their customer service department using the contact information provided with your purchase or on their official channels.
Ask a question about this manual
Ask about setup, troubleshooting, compatibility, parts, safety, or missing instructions. Manuals+ will review the question and use this page’s manual context to help answer it.