Introduction
This manual provides comprehensive instructions for the setup, operation, and maintenance of your Creality CR-10 V3 3D Printer. Please read this manual thoroughly before operating the printer to ensure proper function and safety.

The Creality CR-10 V3 3D Printer, featuring its main components including the printer frame, print bed, extruder assembly, and a separate control box with display.
Key Features
- Titan Direct Drive: Enables direct filament feeding into the nozzle, minimizing travel distance and improving reliability for flexible filaments like TPU and ABS, while reducing stringing and oozing.
- Dual Part Cooling Fans Extruder: Two fans on the hotend promote efficient heat dissipation, preventing jamming and improving print quality.
- Upgraded Silent Motherboard: Features an industrial self-developed motherboard with TMC2208 ultra-silent drivers for reduced noise and enhanced stability. Includes thermal runaway protection and resume printing function.
- All Metal Frame and Triangle Stable Structure: High-quality V-profile structure forms a firm golden triangle, effectively reducing vibrations and ensuring high printing accuracy.
- 24V/350W Meanwell Power Supply: Provides rapid heating to 100°C for the thermally efficient bed heater.
Feature Highlights

An illustration highlighting the dual-port cooling fan extruder, designed for efficient heat dissipation and immediate cooling to reduce jamming and improve print quality.

A visual representation of the industrial self-developed motherboard with TMC2208 ultra-silent drivers, emphasizing noise reduction and stable operation.

Details of the Carborundum glass platform, known for its high hardness, increased viscosity, reduced warping, and ease of model removal.
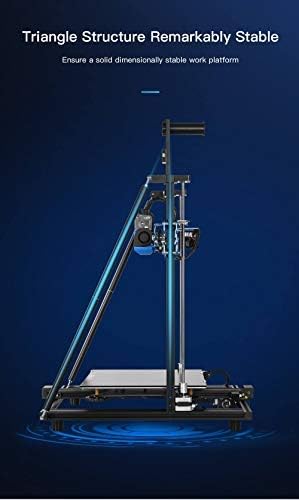
An image illustrating the all-metal frame and V-profile structure forming a stable golden triangle, which minimizes vibrations and enhances printing accuracy.
Official Product Video
Official product video demonstrating key upgrades of the Creality CR-10 V3, including the silent mainboard, Meanwell power supply, and all-metal extruder.
Setup Guide
1. Assembly
The Creality CR-10 V3 comes partially assembled. Users are required to connect the gantry to the base and secure the main components. Follow the included quick start guide for detailed steps. Ensure all electrical connections are secure and correctly matched.

Visual guide for the simple 1-step assembly and 3 connections required for the Creality CR-10 V3.
2. Initial Power-Up and Power Supply Check
Before powering on, verify the voltage switch on the Meanwell power supply is set correctly for your region (110V for North America, 220V for most other regions). Incorrect voltage can damage the unit.

The 24V/350W Meanwell power supply unit, crucial for stable and efficient operation of the printer.
3. Bed Leveling
Accurate bed leveling is crucial for successful prints. The CR-10 V3 supports both manual and optional auto-leveling (BL-Touch, if installed). For manual leveling, adjust the large nuts under each corner of the print bed. Use a standard piece of paper between the nozzle and the bed, adjusting until you feel a slight drag. Repeat for all four corners and the center until the bed is consistently level.

Illustration showing the manual leveling points on the print bed, highlighting the large adjustment nuts for precise calibration.
Operating Instructions
1. Software and Slicing
Before printing, 3D models (e.g., STL files) must be processed by slicing software (e.g., Ultimaker Cura). This software converts the 3D model into G-code, which contains instructions for the printer, including layer height, print speed, and temperature settings. Select the CR-10 V3 as your printer model in the software for optimized settings.
2. Loading Filament
Ensure the filament spool is mounted correctly on the holder. Feed the filament into the direct drive extruder. Heat the nozzle to the appropriate temperature for your filament type (e.g., PLA: 190-220°C). Once heated, gently push the filament until it extrudes smoothly from the nozzle.
3. Starting a Print
Insert the SD card containing your G-code file into the printer's SD card slot. Navigate the printer's menu using the control knob to select "Print" and then choose your desired file. The printer will preheat the bed and nozzle, then begin the printing process. Monitor the first layer closely to ensure proper adhesion to the print bed.
Maintenance
Regular maintenance ensures optimal performance and extends the lifespan of your 3D printer.
- Clean the Print Bed: After each print, allow the bed to cool and carefully remove the printed object. Clean the Carborundum glass platform with isopropyl alcohol to ensure good adhesion for subsequent prints.
- Nozzle Cleaning: Periodically check the nozzle for clogs or debris. Use the provided needle or a brass brush to clean the nozzle while it is heated.
- Lubricate Z-Axis Rods: Apply a small amount of lithium grease or similar lubricant to the Z-axis lead screws every few weeks to ensure smooth vertical movement.
- Check Belts and Pulleys: Ensure the X and Y axis belts are properly tensioned and that all pulleys are free of debris and rotate smoothly.
- Firmware Updates: Check the official Creality website for the latest firmware updates to ensure your printer has the most current features and bug fixes.
Troubleshooting
This section addresses common issues you might encounter and provides solutions.
| Issue | Possible Cause | Solution |
|---|---|---|
| Print not sticking to bed | Improper bed leveling, dirty print surface, incorrect bed temperature. | Re-level the print bed, clean the surface with isopropyl alcohol, adjust bed temperature according to filament type. |
| Filament stringing or oozing | Incorrect retraction settings, nozzle temperature too high, wet filament. | Adjust retraction distance and speed in slicing software, lower nozzle temperature, dry filament if necessary. |
| Under-extrusion | Clogged nozzle, incorrect E-steps calibration, tangled filament, worn extruder gear. | Clean or replace nozzle, calibrate E-steps, ensure filament feeds smoothly, check extruder gear for wear. |
| Excessive noise during operation | Loose components, worn bearings, fan noise. | Tighten all screws and bolts, check and replace worn bearings, consider upgrading fans if noise persists. |
| Print quality issues (e.g., layer shifts, rough surfaces) | Loose belts, unstable printer frame, incorrect print speed, worn nozzle. | Check and tension X/Y belts, ensure printer is on a stable surface, reduce print speed, replace nozzle. |
Specifications
- Product Dimensions: 21.65 x 16.54 x 25.59 inches (55 x 42 x 65 cm)
- Item Weight: 25.3 pounds (11.5 Kilograms)
- Build Volume: 300x300x400mm (11.8 x 11.8 x 15.7 inches)
- Model Number: CR10 V3
- Brand: Comgrow
- Material: Carborundum (for print bed), PLA (compatible filament)
- Color: Black
- Manufacturer: Creality 3D
- Power Supply: 24V/350W Meanwell
- Motherboard: Upgraded Silent Motherboard with TMC2208 drivers
- Extruder: Titan Direct Drive
Warranty and Support
Comgrow, as the primary seller of Creality 3D products on Amazon, is committed to providing high-quality products and excellent after-sales service. We have a dedicated technical staff to offer professional support to all customers.
For any inquiries regarding warranty, technical assistance, or troubleshooting beyond this manual, please contact Comgrow customer support directly through your purchase platform or the official Comgrow website. Please have your product model and purchase details ready for faster service.
Comgrow is devoted to providing high quality and economical 3D printers, 3D printer accessories, 3D printer filament, and excellent after-sales service to all customers.


