
1. Introduction
Thank you for choosing the Mac Allister MSCD18-li-2 Cordless Impact Drill. This manual provides essential information for the safe and efficient operation, maintenance, and troubleshooting of your new tool. Please read these instructions carefully before use and keep them for future reference.
The Mac Allister MSCD18-li-2 is a versatile 18V Li-ion cordless impact drill designed for drilling into wood, metal, and masonry, as well as for screwdriving tasks. Its cordless design offers maximum portability and convenience.
2. Safety Instructions
WARNING: Read all safety warnings, instructions, illustrations, and specifications provided with this power tool. Failure to follow all instructions listed below may result in electric shock, fire, and/or serious injury.
General Power Tool Safety
- Work Area Safety: Keep your work area clean and well-lit. Cluttered or dark areas invite accidents. Do not operate power tools in explosive atmospheres, such as in the presence of flammable liquids, gases, or dust.
- Electrical Safety: Avoid body contact with earthed or grounded surfaces such as pipes, radiators, ranges, and refrigerators. There is an increased risk of electric shock if your body is earthed or grounded.
- Personal Safety: Always wear eye protection. Use personal protective equipment such as dust masks, non-skid safety shoes, hard hats, or hearing protection when appropriate. Stay alert, watch what you are doing, and use common sense when operating a power tool.
- Tool Use and Care: Do not force the power tool. Use the correct power tool for your application. Disconnect the battery pack from the power tool before making any adjustments, changing accessories, or storing power tools.
- Battery Tool Use and Care: Recharge only with the charger specified by the manufacturer. Use power tools only with specifically designated battery packs.
3. Product Overview
Familiarize yourself with the components of your Mac Allister MSCD18-li-2 drill before operation.
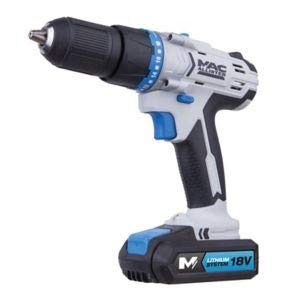
Figure 1: Mac Allister MSCD18-li-2 Cordless Impact Drill. This image shows the main body of the drill, including the chuck, handle, and battery slot.
Key Components:
- Keyless Chuck: For quick and easy bit changes.
- Torque Adjustment Ring: To select the desired torque setting for screwdriving or drill mode.
- Mode Selector: To switch between drilling, impact drilling, and screwdriving modes.
- Speed Selector Switch: For high or low-speed settings.
- Forward/Reverse Switch: To change the rotation direction.
- Trigger Switch: To activate the drill and control speed.
- Battery Pack: 18V Li-ion battery.
- Battery Release Button: To detach the battery.
- LED Work Light: Illuminates the work area.
4. Setup
4.1 Charging the Battery
- Ensure the battery charger is connected to a suitable power outlet.
- Slide the battery pack into the charger until it clicks into place.
- The charging indicator light on the charger will show the charging status. Refer to your charger's manual for specific light indications.
- Once fully charged, disconnect the charger from the power outlet and remove the battery pack.
4.2 Installing/Removing the Battery Pack
- To Install: Align the battery pack with the slot in the drill handle and slide it in until it clicks securely into place.
- To Remove: Press the battery release button and slide the battery pack out of the handle.
4.3 Installing/Removing Drill Bits or Screwdriver Bits
- Ensure the drill is switched off and the forward/reverse switch is in the center (locked) position to prevent accidental starting.
- Hold the rear part of the chuck firmly and rotate the front part counter-clockwise to open the chuck jaws.
- Insert the drill bit or screwdriver bit fully into the chuck.
- Rotate the front part of the chuck clockwise to tighten the jaws securely around the bit. Ensure the bit is centered and firmly gripped.
- To remove, reverse the process: hold the rear part, rotate the front part counter-clockwise, and pull the bit out.
5. Operating Instructions
5.1 Selecting Operating Mode
Use the mode selector ring (usually located behind the chuck) to choose the appropriate mode:
- Screwdriving Mode: For driving screws. Set the torque adjustment ring to the desired clutch setting (1-X). The clutch will disengage when the set torque is reached, preventing overtightening.
- Drill Mode: For drilling into wood, plastic, or metal. Set the torque adjustment ring to the drill symbol. The clutch will not engage in this mode, providing maximum torque.
- Impact Drill Mode: For drilling into masonry or concrete. Set the torque adjustment ring to the impact drill symbol. This mode combines rotation with a hammering action.
5.2 Selecting Speed
Use the speed selector switch (usually on top of the drill) to choose between two speed ranges:
- Speed 1 (Low Speed): For high torque applications like driving large screws or drilling large holes. (0-400 RPM)
- Speed 2 (High Speed): For faster drilling of smaller holes or general drilling tasks. (0-1600 RPM)
5.3 Forward/Reverse Rotation
The forward/reverse switch (located above the trigger) controls the direction of rotation:
- Push left for Forward rotation (for drilling and driving screws).
- Push right for Reverse rotation (for removing screws or freeing jammed bits).
- Center position locks the trigger for safety during bit changes or storage.
5.4 Starting and Stopping
- To Start: Squeeze the trigger switch. The speed is variable depending on how far you press the trigger.
- To Stop: Release the trigger switch.
5.5 LED Work Light
The integrated LED work light will illuminate automatically when the trigger is pressed, providing better visibility in dimly lit areas.
6. Maintenance
Regular maintenance ensures the longevity and optimal performance of your drill.
6.1 Cleaning
- Keep the ventilation slots of the tool clean to prevent overheating.
- Regularly clean the tool housing with a soft, damp cloth. Do not use harsh chemicals or abrasive cleaners.
- Remove any dust or debris from the chuck jaws after each use.
6.2 Battery Care
- Store battery packs in a cool, dry place away from direct sunlight and extreme temperatures.
- Do not store battery packs in a discharged state for extended periods. Recharge them periodically.
- Do not attempt to open or modify the battery pack.
6.3 Carbon Brush Replacement
This model uses carbon brushes. Over time, carbon brushes wear down and may need replacement. If you notice reduced power, intermittent operation, or excessive sparking, the brushes may need inspection or replacement. This procedure should ideally be performed by a qualified service technician.
7. Troubleshooting
Refer to this section for common issues and their solutions.
| Problem | Possible Cause | Solution |
|---|---|---|
| Drill does not start. | Battery not charged or not properly inserted. Forward/reverse switch in center (locked) position. | Charge battery. Ensure battery is fully inserted. Move forward/reverse switch to forward or reverse position. |
| Reduced power or intermittent operation. | Low battery charge. Worn carbon brushes. | Recharge battery. Have carbon brushes inspected/replaced by a service technician. |
| Bit slips in chuck. | Chuck not tightened sufficiently. Bit shank is dirty or damaged. | Retighten chuck firmly. Clean or replace the bit. |
| Overheating during use. | Blocked ventilation slots. Overloading the tool. | Clean ventilation slots. Reduce load, allow tool to cool. |
If the problem persists after attempting these solutions, please contact Mac Allister customer support or an authorized service center.
8. Specifications
| Feature | Specification |
|---|---|
| Brand | MAC ALLISTER |
| Model Number | MSCD18-li-2 |
| Power Source | Battery Powered |
| Voltage | 18 Volts |
| Battery Capacity | 1.5 Ampere-hours (Ah) |
| Max Rotational Speed | 1600 RPM |
| Number of Gears | 2 |
| Max Torque | 35 Newton-meters (Nm) |
| Drill Type | Impact Drill |
| Drilling in Wood (Max Diameter) | 30 Millimeters |
| Drilling in Metal (Max Diameter) | 10 Millimeters |
| Material | Metal |
| Special Feature | Cordless |
| Included Components | Chuck key and screwdriver bits (Note: 'Klucz do chwytu i wkrętki' translates to 'Chuck key and screwdriver bits', but the drill has a keyless chuck. This might be a generic description or refer to included screwdriver bits only.) |
| Item Weight | 4 Kilograms |
9. Warranty and Support
Warranty information for your Mac Allister MSCD18-li-2 Cordless Impact Drill is typically provided with your purchase documentation. Please refer to the warranty card or contact your retailer for specific details regarding warranty coverage and duration.
For technical support, spare parts, or service inquiries, please contact Mac Allister customer service or visit their official website. Ensure you have your model number (MSCD18-li-2) and proof of purchase available when seeking support.
10. Video Resources
Currently, there are no official product videos available from the seller for this model to embed in this manual. Please refer to the written instructions and diagrams for guidance.