1. Introduction
Thank you for choosing the Alfawise S70 Automatic Window Cleaner Robot. This device is designed to efficiently clean various glass surfaces, including windows, mirrors, and tiled walls. Please read this manual thoroughly before operating the robot to ensure safe and optimal performance. Keep this manual for future reference.
2. Safety Information
WARNING: Failure to follow these safety instructions may result in fire, electric shock, or other injury or damage.
- Always attach the safety rope to a secure anchor point before operating the robot, especially on high windows.
- Ensure the power cord is securely connected and not damaged. Do not use if the cord is frayed or broken.
- Use only the original power adapter provided with the device.
- Do not use the robot on cracked or damaged glass surfaces.
- Keep hands, hair, and loose clothing away from moving parts.
- Do not operate the robot in rainy or extremely humid conditions.
- This appliance is not intended for use by persons (including children) with reduced physical, sensory or mental capabilities, or lack of experience and knowledge, unless they have been given supervision or instruction concerning use of the appliance by a person responsible for their safety.
- Supervise children to ensure they do not play with the appliance.
- Before cleaning, remove any obstacles from the window surface.
- Do not use the robot on windows with excessive dirt or debris that could scratch the glass.
- Ensure the cleaning pads are properly attached and clean before each use.
3. Package Contents
Verify that all items are present in the package:
- Alfawise S70 Window Cleaner Robot
- Power Adapter (EU Plug)
- AC Power Cord
- Safety Rope
- Remote Control
- Cleaning Pads (multiple pairs)
- Cleaning Solution Spray Bottle (empty)
- User Manual
4. Product Overview
Familiarize yourself with the main components of your Alfawise S70 robot.

Figure 4.1: Top view of the Alfawise S70 Window Cleaner Robot, showing its compact design and control button.
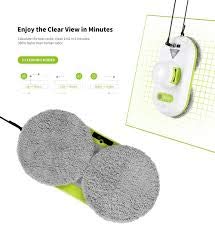
Figure 4.2: Bottom view of the Alfawise S70, highlighting the two circular cleaning pads and the drive wheels.
- Power Button: To turn the device on or off.
- Indicator Lights: Provide status information (e.g., charging, operating, error).
- Power Port: For connecting the power adapter.
- Safety Rope Attachment Point: Where the safety rope is secured.
- Cleaning Pads: Removable and washable microfiber pads for cleaning.
- Drive Wheels: Allow the robot to move across the glass surface.
- Vacuum Suction Port: Creates the vacuum to adhere to the glass.
5. Setup
5.1 Charging the Battery
Before first use, fully charge the robot's internal battery. The battery provides backup power in case of a power outage, preventing the robot from falling.
- Connect the power adapter to the robot's power port.
- Plug the AC power cord into the power adapter, then into a wall outlet.
- The indicator light will show charging status (refer to the indicator light section for details, usually blinking while charging and solid when fully charged).
- Allow approximately 1-2 hours for a full charge.
5.2 Attaching Cleaning Pads
Ensure the cleaning pads are clean and dry before attachment.
- Align the cleaning pads with the circular drive wheels on the bottom of the robot.
- Press the pads firmly onto the hook-and-loop fasteners until they are securely attached.
- Lightly spray the cleaning pads with a small amount of window cleaning solution (not excessively wet).
5.3 Connecting the Safety Rope
This is a critical safety step, especially for outdoor or high-window cleaning.
- Locate the safety rope attachment point on the robot.
- Securely fasten one end of the safety rope to this point.
- Attach the other end of the safety rope to a sturdy, immovable object indoors (e.g., a heavy piece of furniture, a window frame anchor).
5.4 Connecting Power
The robot operates primarily on AC power, with the battery serving as backup.
- Connect the power adapter to the robot.
- Plug the AC power cord into the adapter and then into a grounded wall outlet.
- Ensure the power cord has enough slack to allow the robot to move freely across the entire window surface without tension.
6. Operating Instructions
6.1 Placing the Robot on the Window
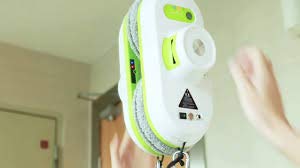
Figure 6.1: A hand carefully placing the Alfawise S70 onto a window surface, demonstrating the initial placement for operation.
- Hold the robot firmly against the glass surface.
- Press and hold the power button for 2-3 seconds until the vacuum motor starts and the robot adheres to the glass.
- Release the robot only after confirming it is securely attached.
6.2 Starting Cleaning
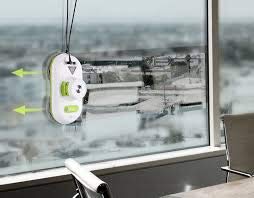
Figure 6.2: The Alfawise S70 in operation on a window, with arrows indicating its cleaning path and movement.
- Once the robot is securely attached and powered on, press the Start button on the robot or the remote control.
- The robot will automatically detect the window edges and begin its cleaning pattern.
- Monitor the robot during its first few cleaning cycles to ensure proper operation.
6.3 Stopping and Removing the Robot
- To stop cleaning at any time, press the Stop button on the robot or the remote control.
- The robot will pause its movement.
- To remove the robot, firmly grasp it with one hand, then press and hold the power button until the vacuum motor stops.
- Carefully pull the robot away from the glass.
- Turn off the robot and disconnect the power cord.
7. Maintenance
7.1 Cleaning Pads
Clean the microfiber pads after each use to maintain cleaning efficiency.
- Remove the cleaning pads from the robot.
- Hand wash or machine wash the pads with mild detergent. Do not use bleach or fabric softener.
- Allow the pads to air dry completely before reattaching them to the robot.
- Replace worn or damaged pads with new ones.
7.2 Cleaning Sensors and Wheels
Regularly clean the sensors and drive wheels to ensure proper navigation and adhesion.
- Use a clean, dry cloth to wipe the sensors located on the edges and bottom of the robot.
- Remove any dust or debris from the drive wheels.
- Do not use abrasive cleaners or solvents.
7.3 Storage
When not in use, store the robot in a cool, dry place.
- Ensure the robot is clean and dry before storage.
- Disconnect all power cords.
- Store the robot and its accessories in their original packaging or a suitable container to protect them from dust and damage.
8. Troubleshooting
| Problem | Possible Cause | Solution |
|---|---|---|
| Robot does not adhere to the window. |
|
|
| Robot stops during cleaning. |
|
|
| Poor cleaning performance. |
|
|
9. Specifications
| Feature | Detail |
|---|---|
| Brand | Alfawise |
| Model Name | S70 (automatic, outdoor vacuum) |
| Colour | White |
| Form Factor | Robotic |
| Power Source | Corded Electric |
| Voltage | 220 Volts |
| Wattage | 120 Watts |
| Is It Cordless? | No (operates with cord, battery for backup) |
| Filter Type | HEPA Filter |
| Surface Recommendation | Window |
| Battery Life | 100 Minutes (backup) |
| Controller Type | Push Button |
| Connectivity Technology | USB |
| Item Weight | 2 kg 410 g |
10. Warranty and Support
For warranty information, technical support, or service inquiries, please refer to the warranty card included in your product packaging or visit the official Alfawise website. Keep your purchase receipt as proof of purchase.
Online Support: www.alfawise.com/support (Example link, actual link may vary)