1. Introduction
Thank you for choosing the COSTWAY Ice Maker Countertop. This portable ice machine is designed to provide efficient and convenient ice production for your home, office, bar, or any gathering. With its rapid ice-making capability and user-friendly features, you can enjoy fresh ice cubes whenever you need them. This manual provides essential information for safe operation, maintenance, and troubleshooting to ensure optimal performance and longevity of your appliance.

Figure 1: COSTWAY Ice Maker Countertop (Green)
2. Safety Instructions
Please read all instructions carefully before using this appliance to prevent injury or damage.
- Ensure the power supply voltage matches the rating label on the appliance.
- Do not operate the ice maker with a damaged cord or plug.
- Keep the appliance away from heat sources and direct sunlight.
- Place the ice maker on a stable, level surface to prevent tipping.
- Do not immerse the appliance, cord, or plug in water or other liquids.
- Unplug the ice maker before cleaning or when not in use for extended periods.
- This appliance is ETL certified, ensuring it meets safety standards.
- Only use potable water in the ice maker.
3. Product Components
Familiarize yourself with the main parts of your ice maker:
- A. Transparent Window: Allows you to monitor the ice-making process and ice level without opening the lid.

Figure 2: Transparent Window and Features
- B. Control Panel: Features intuitive buttons and indicator lights for operation.

Figure 3: Control Panel Layout
- CLEAN Button: Initiates the self-cleaning cycle.
- SELECT Button: Toggles between Small and Large ice cube sizes.
- POWER Button: Turns the unit On/Off.
- SMALL/LARGE Indicators: Lights up to show selected ice size.
- ICE FULL Indicator: Lights up when the ice basket is full.
- ADD WATER Indicator: Lights up when water needs to be refilled.
- C. Removable Ice Basket & Scoop: For easy collection and serving of ice.

Figure 4: Ice Basket and Scoop
- D. High Efficiency Vent: Ensures proper heat dissipation for optimal performance.
4. Setup
- Unpacking: Carefully remove the ice maker from its packaging. Remove all packing materials, including tape and labels.
- Placement: Place the ice maker on a flat, stable, and heat-resistant surface. Ensure there is at least 4 inches of clearance around the unit for proper ventilation. Avoid placing it near heat sources or in direct sunlight.
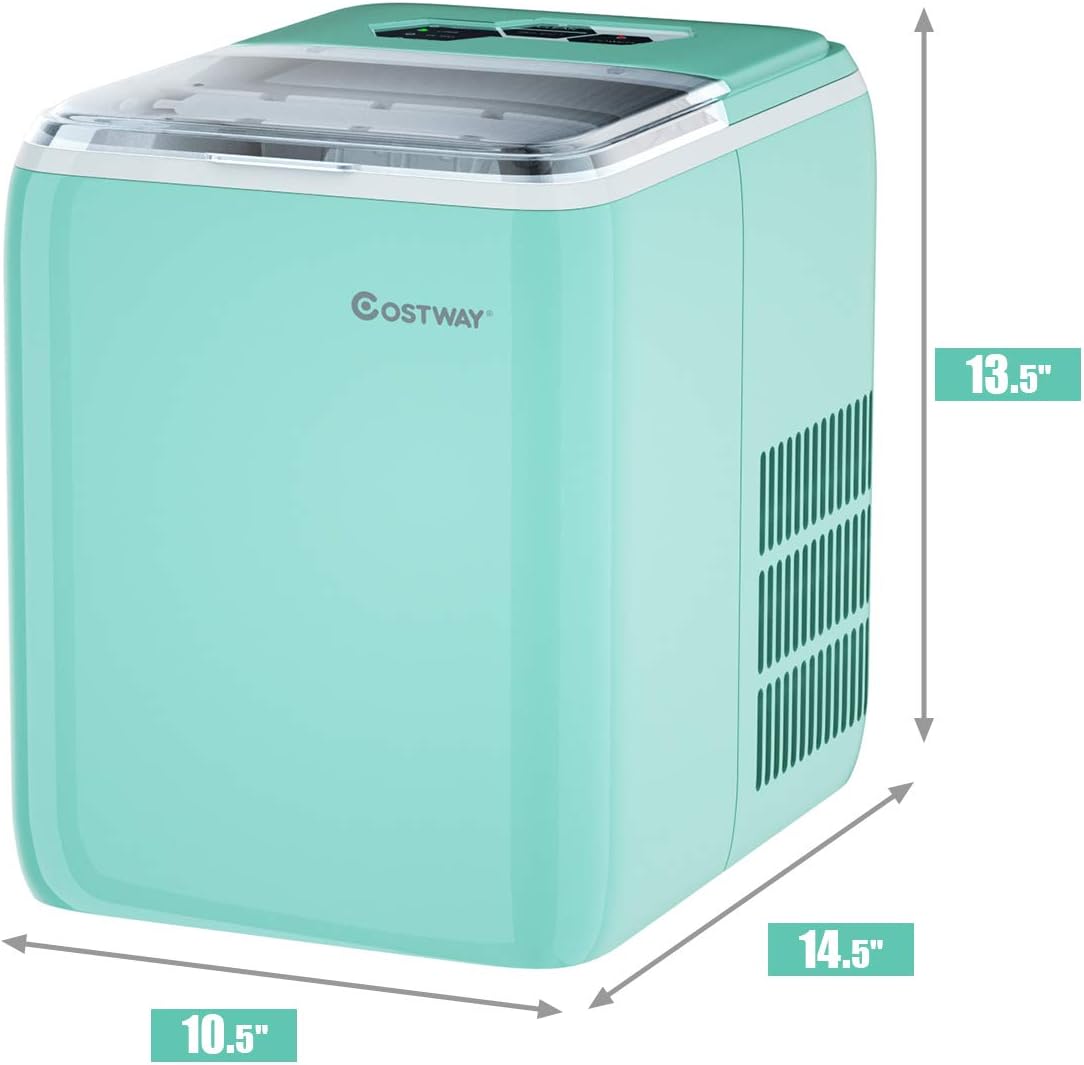
Figure 5: Product Dimensions for Placement
- Initial Cleaning: Before first use, clean the interior of the ice maker. Remove the ice basket and wash it with warm, soapy water. Wipe the interior with a soft cloth. It is recommended to run a self-cleaning cycle (see Section 6) before making ice for consumption.
- Power Connection: Plug the power cord into a grounded electrical outlet.
5. Operating Instructions
- Add Water: Open the lid and remove the ice basket. Fill the water reservoir with potable water up to the MAX fill line. Do not overfill.
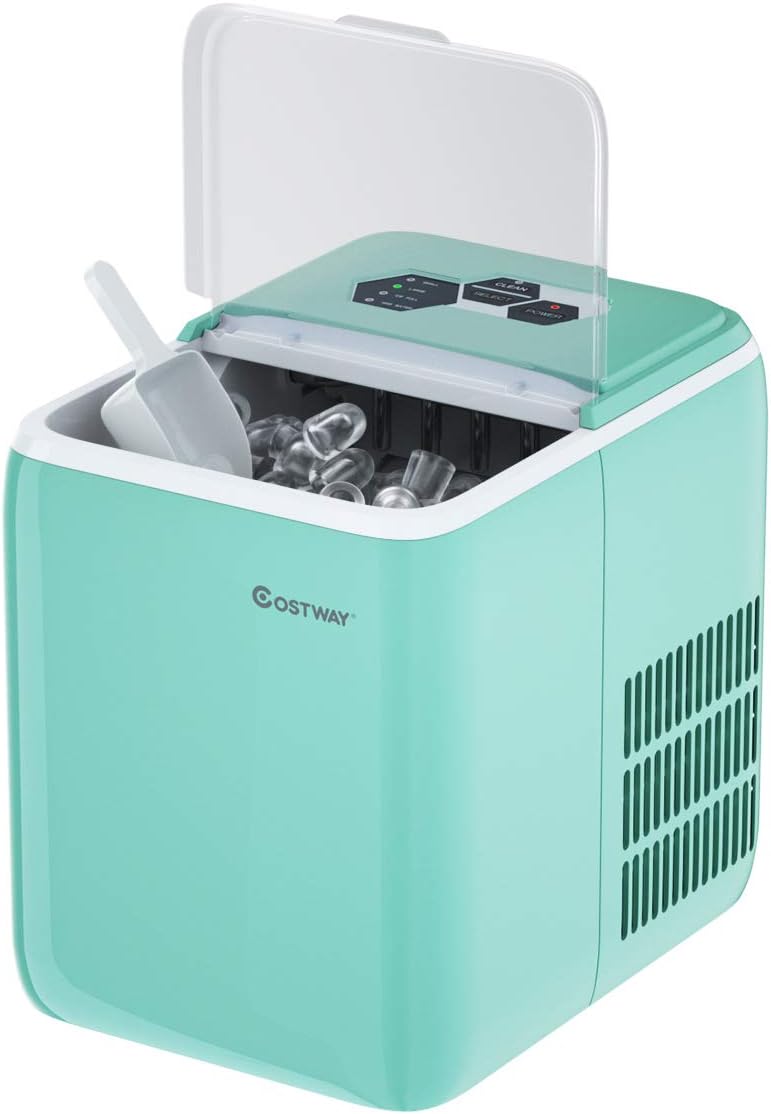
Figure 6: Water Reservoir Access
- Power On: Press the POWER button on the control panel. The power indicator light will illuminate.
- Select Ice Size: Press the SELECT button to choose between Small or Large ice cubes. The corresponding indicator light will turn on.
Note: The ice maker produces bullet-shaped ice cubes. Small cubes are approximately 2.2cm/0.9" in diameter, and Large cubes are 2.5cm/1" in diameter, both 3.5cm/1.4" in height.
- Ice Production: The ice maker will begin its cycle. Ice cubes will be ready in approximately 8.5 to 9.5 minutes for the first batch. Subsequent batches may be faster. The unit can produce up to 44 lbs of ice in 24 hours.

Figure 7: Ice Production Efficiency
- Ice Full / Add Water Indicators:
- When the ICE FULL indicator lights up, the ice basket is full. Remove ice to continue production.
- When the ADD WATER indicator lights up, the water reservoir is low. Add more water to resume ice making.
- Collecting Ice: Use the provided ice scoop to remove ice from the removable basket.
- Power Off: To stop ice production, press the POWER button.

Figure 8: Versatile Ice Applications
6. Maintenance and Cleaning
Regular cleaning and maintenance will extend the life of your ice maker and ensure hygienic ice production.
- Self-Cleaning Function:
- Ensure the water reservoir is filled.
- Press and hold the CLEAN button for 3 seconds to activate the self-cleaning cycle.
- The unit will automatically clean its internal components. This cycle typically takes several minutes.
- Once the cycle is complete, drain any remaining water from the reservoir by unplugging the drain plug located at the bottom of the unit.
- Regular Cleaning:
- Unplug the ice maker before cleaning.
- Remove the ice basket and wash it with mild detergent and warm water. Rinse thoroughly.
- Wipe the interior and exterior surfaces of the ice maker with a soft cloth dampened with mild detergent.
- For stubborn stains, use a solution of water and vinegar (1:1 ratio).
- Ensure all parts are completely dry before reassembling and storing.
- Long-Term Storage: If the ice maker will not be used for an extended period, perform a self-cleaning cycle, drain all water, and ensure the unit is completely dry. Store it in a cool, dry place.
7. Troubleshooting
If you encounter issues with your ice maker, refer to the following table for common problems and solutions.
| Problem | Possible Cause | Solution |
|---|---|---|
| Ice maker not working | No power; Water shortage; Ice full. | Check power connection; Add water; Remove ice from basket. |
| Ice cubes are too small or not forming | Water temperature too high; Ambient temperature too high; Insufficient water. | Use colder water; Ensure proper ventilation and cooler room temperature; Add water. |
| "ADD WATER" indicator is on, but there is water in the reservoir | Water sensor issue; Unit not level. | Ensure unit is level; Contact customer support if issue persists. |
| Unusual noise during operation | Normal operation sounds (compressor, water pump); Loose parts. | Some noise is normal; Check for any loose components; Contact support if noise is excessive or unusual. |
For more detailed troubleshooting or issues not listed here, please contact COSTWAY Customer Support.
8. Specifications
| Specification | Detail |
|---|---|
| Brand | COSTWAY |
| Model Name | countertop ice machine |
| Model Number | 24228-CYEP |
| Product Dimensions | 14.5"D x 10.5"W x 13.5"H |
| Capacity | 2.6 Liters (Water Reservoir) |
| Ice Production | Up to 44 lbs per 24 hours |
| Ice Cycle Time | 8.5 - 9.5 minutes per batch (12 cubes) |
| Wattage | 150 watts |
| Voltage | 120 Volts |
| Refrigerant | R600a |
| Material | Acrylonitrile Butadiene Styrene (ABS) |
| Item Weight | 23 pounds |
| Installation Type | Countertop |
| Color | Green |
| Certifications | ETL Certified |
9. Warranty and Support
For warranty information, please refer to the warranty card included with your product packaging or visit the official COSTWAY website.
If you require technical assistance, have questions about your product, or need to report a defect, please contact COSTWAY Customer Support.
- Website: www.costway.com
- Customer Service: Refer to your product's specific contact information or the website for support channels.